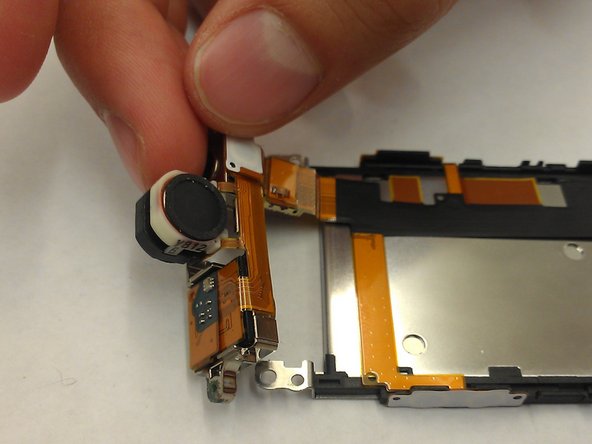
Reaching the Speaker and Camera in SONY Ericsson W890i Cell Phone

What you need

  1. Reaching the Speaker and Camera in SONY Ericsson W890i Cell Phone, Battery: step 1, image 1 of 1
    • Flick the two lock tabs into the unlocked positions by pushing each button forward.

  2. Reaching the Speaker and Camera in SONY Ericsson W890i Cell Phone: step 2, image 1 of 1
    • Pop the back cover up using the groove on the top of the phone.

  3. Reaching the Speaker and Camera in SONY Ericsson W890i Cell Phone: step 3, image 1 of 1
    • You can now access the phone's battery.

    • Using a spudger, remove the battery and set it aside.

  4. Reaching the Speaker and Camera in SONY Ericsson W890i Cell Phone, Speaker or Camera: step 4, image 1 of 2 Reaching the Speaker and Camera in SONY Ericsson W890i Cell Phone, Speaker or Camera: step 4, image 2 of 2
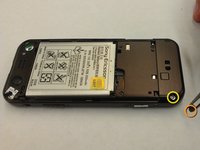
    • Two rubber buttons cover the bottom two screws. Remove these rubber coverings to access the phone screws.

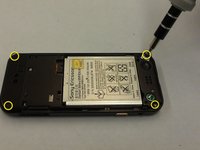
    • Using a T6 torx wrench, remove the four small screws at the top and bottom corners on the backside of the phone.

  5. Reaching the Speaker and Camera in SONY Ericsson W890i Cell Phone: step 5, image 1 of 1
    • Carefully pry off the faceplate using a spudger. Insert the spudger into the middle of the phone.

    • Start near a button and carefully work your way around the phone until the faceplate pops off.

  6. Reaching the Speaker and Camera in SONY Ericsson W890i Cell Phone: step 6, image 1 of 1
    • Remove the plastic and metal buttons located around the seam and place off to the side.

    • Be careful not to lose them!

  7. Reaching the Speaker and Camera in SONY Ericsson W890i Cell Phone: step 7, image 1 of 1
    • With a tweezer, pry off the back metal plate.

  8. Reaching the Speaker and Camera in SONY Ericsson W890i Cell Phone: step 8, image 1 of 2 Reaching the Speaker and Camera in SONY Ericsson W890i Cell Phone: step 8, image 2 of 2
    • The speaker and camera combo is accessible after the removal of two small #00 screws. Use the #00 Philips Screwdriver for this step.

    • The piece is now free to move from the phone core.

Conclusion

To reassemble your device, follow these instructions in reverse order.

One other person completed this guide.

Bob

Member since: 04/15/13

316 Reputation

3 Guides authored

Team

SUNY Cortland, Team 1-3, Getto Spring 2013 Member of SUNY Cortland, Team 1-3, Getto Spring 2013

SUNYCORT-GETTO-S13S1G3

3 Members

8 Guides authored

0 Comments

Add Comment

View Statistics:

Past 24 Hours: 0

Past 7 Days: 1

Past 30 Days: 1

All Time: 799