
15% Off Selected iFixit Tools — Limited Time
Free Shipping on Domestic Orders $75+

Zeal Optics iON Viewfinder Lens Assembly Replacement

Prerequisite Only
This is a prerequisite-only guide! This guide is part of another procedure and isn’t meant to be used alone.

What you need

  1. Zeal Optics iON Viewfinder Lens Assembly Replacement, Viewfinder Lens Assembly: step 1, image 1 of 2 Zeal Optics iON Viewfinder Lens Assembly Replacement, Viewfinder Lens Assembly: step 1, image 2 of 2
    • Remove the two 7.5 mm Phillips screws on the front of the viewfinder housing.

    • Flip the viewfinder housing over 180 degrees.

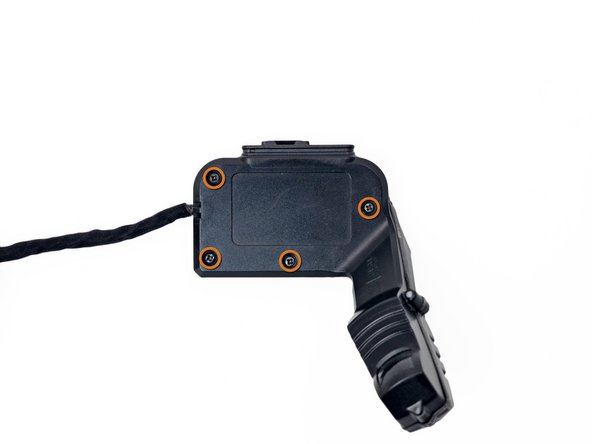
    • Remove the four 7.1 mm Phillips screws from the back of the viewfinder housing.

    Ask FixBot

    Add Comment

  2. Zeal Optics iON Viewfinder Lens Assembly Replacement: step 2, image 1 of 2 Zeal Optics iON Viewfinder Lens Assembly Replacement: step 2, image 2 of 2
    • Pull the two halves of the viewfinder housing apart.

    Ask FixBot

    Add Comment

  3. Zeal Optics iON Viewfinder Lens Assembly Replacement: step 3, image 1 of 2 Zeal Optics iON Viewfinder Lens Assembly Replacement: step 3, image 2 of 2
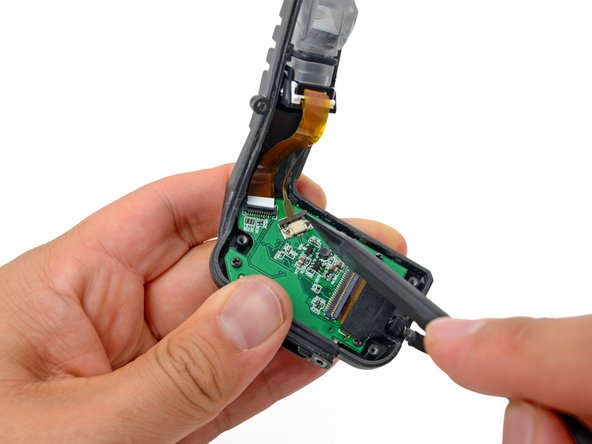
    • Use the tip of a spudger to flip up the retaining flap on the LCD ribbon cable ZIF connector.

    • Be sure to pry up on the hinged flap, not the connector itself.

    Ask FixBot

    Add Comment

  4. Zeal Optics iON Viewfinder Lens Assembly Replacement: step 4, image 1 of 2 Zeal Optics iON Viewfinder Lens Assembly Replacement: step 4, image 2 of 2
    • Use the tip of a spudger to push out the retaining clip on the viewfinder backlight ribbon cable ZIF connector.
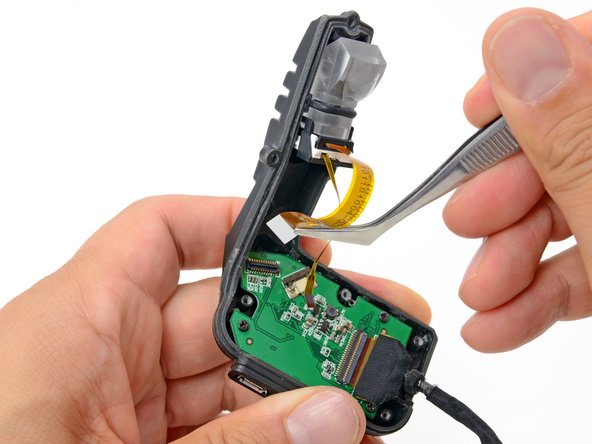
    Ask FixBot

    Add Comment

  5. Zeal Optics iON Viewfinder Lens Assembly Replacement: step 5, image 1 of 2 Zeal Optics iON Viewfinder Lens Assembly Replacement: step 5, image 2 of 2
    Tool used on this step:
    Tweezers
    $4.99
    Buy
    • Using your fingers or tweezers, gently pull out the backlight ribbon cable from its connector on the button board.

    Ask FixBot

    Add Comment

  6. Zeal Optics iON Viewfinder Lens Assembly Replacement: step 6, image 1 of 2 Zeal Optics iON Viewfinder Lens Assembly Replacement: step 6, image 2 of 2
    • Using your fingers or tweezers, remove the LCD ribbon cable from its connector on the button board.

    Ask FixBot

    Add Comment

  7. Zeal Optics iON Viewfinder Lens Assembly Replacement: step 7, image 1 of 2 Zeal Optics iON Viewfinder Lens Assembly Replacement: step 7, image 2 of 2
    • Remove the viewfinder lens assembly from the viewfinder housing.

    Ask FixBot

    Add Comment

Conclusion

To reassemble your device, follow these instructions in reverse order.

Cancel: I did not complete this guide.

Eric Flores

Member since: 07/31/12

128 Reputation

9 Guides authored

0 Guide Comments

Add Comment

View Statistics:

Past 24 Hours: 0

Past 7 Days: 3

Past 30 Days: 29

All Time: 400