Protocol TerraCopter EVO Left & Right Joystick Replacement

What you need

  1. Protocol TerraCopter EVO Left & Right Joystick Replacement, Controller's battery: step 1, image 1 of 2 Protocol TerraCopter EVO Left & Right Joystick Replacement, Controller's battery: step 1, image 2 of 2
    • Using a Phillips #0 screwdriver, remove the screw connecting the battery cover to the controller.

    • Remove the battery cover from the controller.

  2. Protocol TerraCopter EVO Left & Right Joystick Replacement: step 2, image 1 of 1
    • Remove all of four of the AA batteries from the controller.

  3. Careful: steps 3-4 are sourced from a guide that's marked as in-progress.

    Protocol TerraCopter EVO Left & Right Joystick Replacement, Protocol TerraCopter EVO Controller Opening: step 3, image 1 of 1
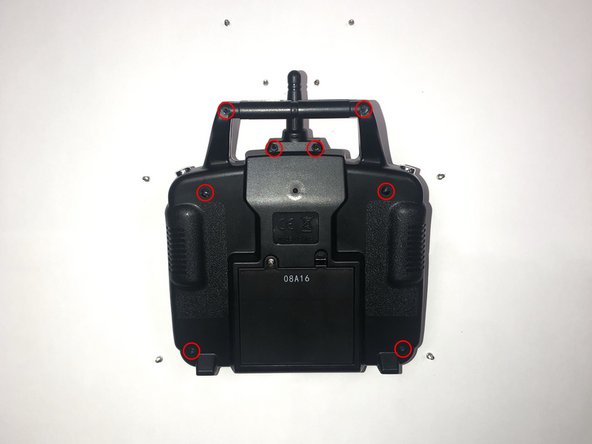
    • Note: the four Phillips screws on the rear panel are a millimeter longer than the two screws near the antenna and the two screws on the handle.

    • Orientate the controller to where the battery compartment is facing upwards.

    • Remove the four 5mm and four 4mm Phillips #1 screws from the case.

  4. Protocol TerraCopter EVO Left & Right Joystick Replacement: step 4, image 1 of 1
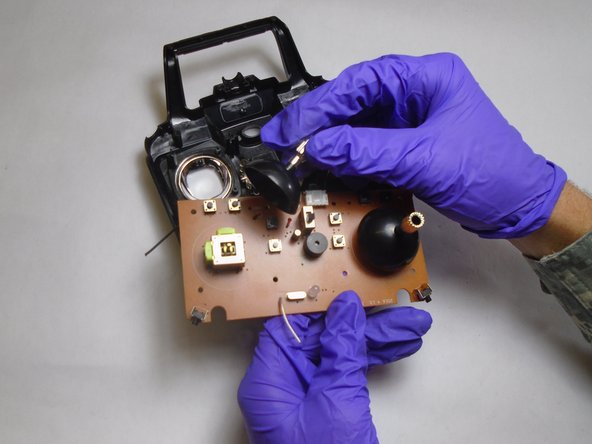
    • Since the battery wires are still attached, carefully move the rear panel down to expose the motherboard.

  5. Protocol TerraCopter EVO Left & Right Joystick Replacement, Left & Right Joystick: step 5, image 1 of 1
    • Remove the eight 5mm Phillips #1 screws from the motherboard.

  6. Protocol TerraCopter EVO Left & Right Joystick Replacement: step 6, image 1 of 2 Protocol TerraCopter EVO Left & Right Joystick Replacement: step 6, image 2 of 2
    • After removing the screws, orientate the motherboard to where the side with the black joysticks face upwards.

    • Pull the black plastic joysticks from the motherboard, out of their their assembly.

  7. Protocol TerraCopter EVO Left & Right Joystick Replacement: step 7, image 1 of 1
    • Once the joysticks are removed, orientate the motherboard to where the green side is facing upwards.

    • On the green side of the motherboard, locate the two sets of ten pin arrays that hold the joystick assembly to the motherboard.

  8. Protocol TerraCopter EVO Left & Right Joystick Replacement: step 8, image 1 of 1
    • Melt the existing solder points on the pin arrays with a soldering iron and lift the joystick assemblies from their location on the motherboard.

    • Check out our How to Solder and Desolder Connections guide if you are unfamiliar with soldering practices.

Conclusion

To reassemble your device, follow these instructions in reverse order.

0 Comments

Add Comment

View Statistics:

Past 24 Hours: 0

Past 7 Days: 1

Past 30 Days: 5

All Time: 114