
Repairing Power Mac G4 Quicksilver Power Supply

What you need

  1. Repairing Power Mac G4 Quicksilver Power Supply, Opening the case: step 1, image 1 of 1
    • The handle to open your computer is located on top of the right side panel.

  2. Repairing Power Mac G4 Quicksilver Power Supply: step 2, image 1 of 2 Repairing Power Mac G4 Quicksilver Power Supply: step 2, image 2 of 2
    • Grab the circular handle and pull outward.

  3. Repairing Power Mac G4 Quicksilver Power Supply: step 3, image 1 of 1
    • Your computer is now open and ready for repair.

  4. Repairing Power Mac G4 Quicksilver Power Supply, Power Mac G4 Quicksilver Optical Drive Disassembly: step 4, image 1 of 1
    • The optical drive is in the top left corner of the case.

  5. Repairing Power Mac G4 Quicksilver Power Supply: step 5, image 1 of 2 Repairing Power Mac G4 Quicksilver Power Supply: step 5, image 2 of 2
    • There are four screws to be removed.

    • The first screw can be seen in the first picture.

    • The remaining three screws can be seen in the second picture.

  6. Repairing Power Mac G4 Quicksilver Power Supply: step 6, image 1 of 1
    • Remove the optical drive by pulling the drive away from the front of the computer and out.

  7. Repairing Power Mac G4 Quicksilver Power Supply: step 7, image 1 of 1
    • Detach the two cables attached to the back of the drive.

    • The flat ribbon cable can be detached by pulling the silver tab. The multicolored cable can be removed by grasping the plastic connector on either side and pulling with substantial force.

  8. Repairing Power Mac G4 Quicksilver Power Supply, Hard Drive Assembly: step 8, image 1 of 1
    • The hard drive is located in the back right corner of the case.

  9. Repairing Power Mac G4 Quicksilver Power Supply: step 9, image 1 of 1
    • Remove the flat ribbon cable by pulling with substantial force.

  10. Repairing Power Mac G4 Quicksilver Power Supply: step 10, image 1 of 1
    • Remove the screw holding the hard drive to the computer.

  11. Repairing Power Mac G4 Quicksilver Power Supply: step 11, image 1 of 1
    • Pull the drive up and out of the computer.

  12. Repairing Power Mac G4 Quicksilver Power Supply: step 12, image 1 of 1
    • Remove the multicolored cable by grasping the plastic connector on either side and pulling with substantial force.

  13. Repairing Power Mac G4 Quicksilver Power Supply, Power Supply: step 13, image 1 of 1
    • The power supply is in the upper right corner of the case.

  14. Repairing Power Mac G4 Quicksilver Power Supply: step 14, image 1 of 2 Repairing Power Mac G4 Quicksilver Power Supply: step 14, image 2 of 2
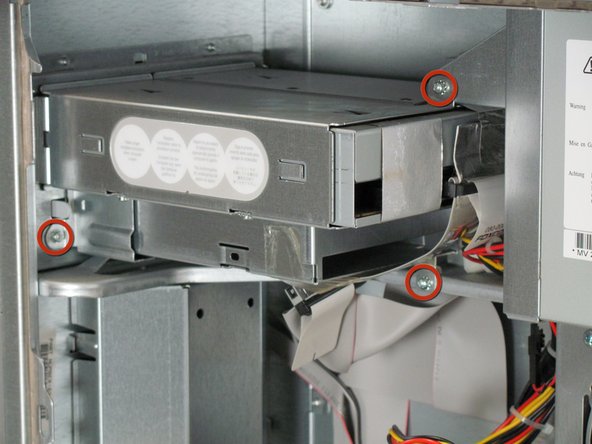
    • There is a total of four screws to be removed.

    • The first three can be seen in the first picture.

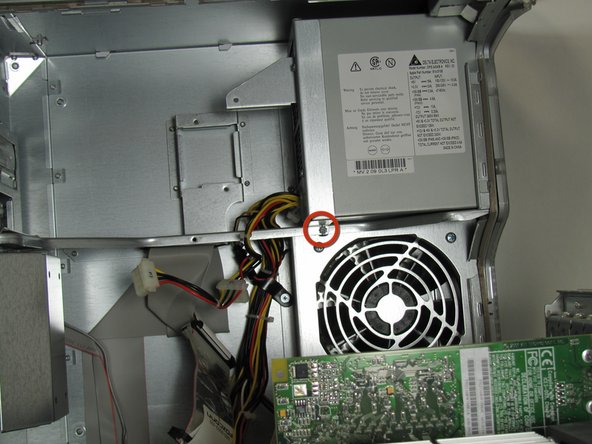
    • The final screw can be seen in the second picture.

  15. Repairing Power Mac G4 Quicksilver Power Supply: step 15, image 1 of 1
    • There are three 2.5mm hex bolts located in the back of the computer that also need to be removed.

    • A 3/32" Hex Key or Hex Driver is a bit small but may also work if gentle.

  16. Repairing Power Mac G4 Quicksilver Power Supply: step 16, image 1 of 1
    • Disconnect the power supply cables from the mother board by pressing in the tab on the back of the connector as shown.

  17. Repairing Power Mac G4 Quicksilver Power Supply: step 17, image 1 of 1
    • Before sliding out the power supply make sure to disconnect the cable to the big fan by pressing in the small black tab on the back of the black connector!

    • Slide the power supply away from the back of the computer and pull it out carefully stringing the cables through the hole in the metal support.

  18. Repairing Power Mac G4 Quicksilver Power Supply: step 18, image 1 of 1
    • Your power supply is now free from the enclosure and is ready to be replaced.

Jacob Garcia

Member since: 01/28/10

621 Reputation

2 Guides authored

Team

Cal Poly, Team 14-41, Regan Winter 2010 Member of Cal Poly, Team 14-41, Regan Winter 2010

CPSU-REGAN-W10S14G41

4 Members

17 Guides authored

View Statistics:

Past 24 Hours: 2

Past 7 Days: 14

Past 30 Days: 69

All Time: 30,291