
Polaroid PMID701i 10 Screen Replacement

What you need

  1. Polaroid PMID701i 10 Screen Replacement, Panel: step 1, image 1 of 2 Polaroid PMID701i 10 Screen Replacement, Panel: step 1, image 2 of 2
    • Turn off and unplug the device before starting replacement.

    • Flip the device so that the screen faces down, with the back facing up.

    • The back panel attaches to the device with four 4.0mm long screws, one at each corner, indicated by the red circles in the picture.

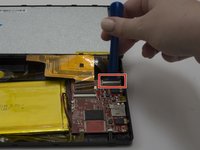
    • Unscrew the four screws with a PH000 screwdriver.

  2. Polaroid PMID701i 10 Screen Replacement: step 2, image 1 of 2 Polaroid PMID701i 10 Screen Replacement: step 2, image 2 of 2
    • Flip the device over so that the screen faces up, and the back faces down.

    • Separate the front panel using the Opening Tool on a corner to create an opening.

    • Removing the frame for the first time may take a significant amount of force.

    • Run the tool along the seams of the device to open up all the sides.

  3. Polaroid PMID701i 10 Screen Replacement: step 3, image 1 of 1
    • Removing the panel too quickly may damage the cable that attaches parts between the two panels.

    • Gently lift the top panel from the bottom panel.

  4. Polaroid PMID701i 10 Screen Replacement: step 4, image 1 of 2 Polaroid PMID701i 10 Screen Replacement: step 4, image 2 of 2
    • The flexible flat cables (FFC) attach to parts in the bottom panel with zero insertion force (ZIF) connectors.

    • Use the Opening tool to flip up the black retaining flap on the smaller connector.

    • Gently lift the cable, parallel to the panel, to detach it.

  5. Polaroid PMID701i 10 Screen Replacement: step 5, image 1 of 2 Polaroid PMID701i 10 Screen Replacement: step 5, image 2 of 2
    • Use the Opening tool to flip up the black retaining flap on the larger connector.

    • Gently lift the cable, parallel to the panel, to detach it.

  6. Polaroid PMID701i 10 Screen Replacement, Screen: step 6, image 1 of 3 Polaroid PMID701i 10 Screen Replacement, Screen: step 6, image 2 of 3 Polaroid PMID701i 10 Screen Replacement, Screen: step 6, image 3 of 3
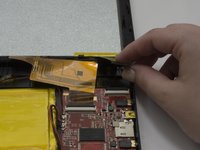
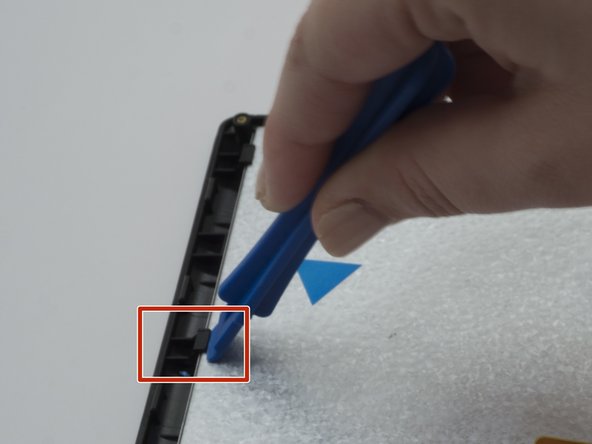
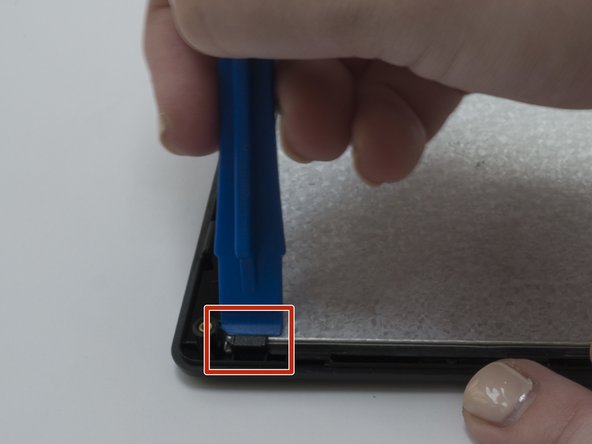
    • Set the top panel down so that the interior faces up, and the exterior of the screen faces down.

    • The screen attaches to to the panel with six black plastic snaps.

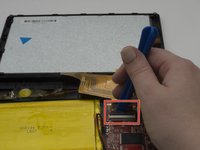
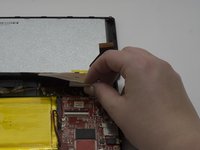
    • Using the Opening Tool, gently lift up each of the snaps to release the screen from the panel.

    • If a snap does not release when using the tool, attempt to lift it by hand.

  7. Polaroid PMID701i 10 Screen Replacement: step 7, image 1 of 1
    • Remove the screen from the frame by lifting it from the side.

Conclusion

To reassemble your device, follow these instructions in reverse order.

One other person completed this guide.

Amy Li

Member since: 01/31/17

627 Reputation

5 Guides authored

Team

Baylor, Team 3-4, Whitney Spring 2017 Member of Baylor, Team 3-4, Whitney Spring 2017

BU-WHITNEY-S17S3G4

3 Members

10 Guides authored

One Comment

In terms of removing the screen, we found the plastic opening tool didn't help to lift the snaps to release the screen from the panel. It worked better when we used our hands to snap it out.

Megan Rule - Reply

Add Comment

View Statistics:

Past 24 Hours: 0

Past 7 Days: 0

Past 30 Days: 1

All Time: 245