Introduction
If your projector is projecting an image with a green tint, this may indicate a burned green polarizing filter. In this guide, I will show how to replace it, as well as share a few other tips on solving image issues. I will be working on a Powerlite 93+ in this guide, but most Epson Tri-LCD projectors are built very similarly, and the concepts in this guide can be carried over to any Tri-LCD projector.
-
-
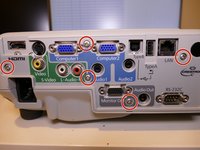
Far Left (size 1): These screws secure the mainboard. There is also one helping to secure the I/O plate.
-
2nd from left (size 2): This screw secures a ground wire to the I/O plate.
-
3rd from left (size 3): These screws are used exclusively on the I/O plate.
-
4th from left (size 4): These screws hold the projector's outer case together.
-
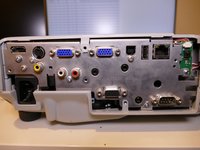
2nd picture (size 5): Two of these screws secure the yoke assembly.
 Ask FixBot
-
-
-
Open the air filter cover, otherwise it will prevent the top cover from being opened
-
-
-
Place the projector right-side up and lift off the cover. Be sure to remove this ribbon cable.
-
-
-
-
This is the green polarizer
-
Remove the screw and pull it out
-
-
-
Once you have a new polarizer, install it and the mainboard in order to test the projector. There is a kill switch for the lamp door you will need to hold down in order to power on the projector while it is disassembled.
-
-
-
As you can see, the screw doubles as an adjustment point, which you may have to adjust to get a good green level.
-
Cut through the glue and slide the polarizer left or right until the projector's color looks good. This can be a bit tedious because you need to reinstall the mainboard to test it between each adjustment.
-
Once you get it adjusted how you want, you're done! Just reassemble the projector and you're good to go.
-


To reassemble your device, follow these instructions in reverse order.
Cancel: I did not complete this guide.
6 other people completed this guide.

7 Guide Comments
hola tengo un epson 395W me hace una mancha roja por un lado y el lado contrario una azul que cubre el lateral y la parte superior los puedo reemplazar por otros de misma serie powerlite sin importar que no tengan la misma nomenclatura ejemplo H395R el mio y este de la imagen aqui de ejemplo es H372R unicamente tienen que ser de el tamaño y color igual ? Gracias
Your issue sounds more like a mirror that has fallen off. I'd recommend disassembling through step 11, removing the cover of the mirror housing (large black "U" shaped piece) and checking if there is a loose mirror. If there is, two part epoxy can be used to glue it back in place. If you do need a new polarizer, they are compatible across most Epson models, but I don't know specifically which ones. If it looks visually similar, it should fit.
Su problema suena más como un espejo que se ha caído. Recomendaría desarmar hasta el paso 11, quitar la cubierta de la carcasa del espejo (pieza grande negra en forma de "U") y verificar si hay un espejo suelto. Si es así, se puede utilizar epoxi de dos componentes para volver a pegarlo en su lugar. Si necesita un polarizador nuevo, son compatibles con la mayoría de los modelos Epson, pero no sé específicamente cuáles. Si se ve visualmente similar, debería encajar.
I have a Epson 535W that I bought used and I have a thin red line on the right hand edge of the projection. I have tried everything in the settings to get rid of it, after reading over your steps about the polarizer removal , I think it might be that one of the mirrors might have moved. Would the line be cause by the mirror or a defective polarizer? Thanks for this article it is great.
In my experience, a defective polarizing filter will discolor the entire image, so probably no issue there. Here's a couple of things to check; first, is there a corresponding greenish line on the left side of the screen? And looking closely at the screen, does the R,G, or B element of each pixel not quite line up? If so, one of your LCDs is misaligned. You could try reseating whichever LCD corresponds the the misaligned color, but I haven't had much luck fixing this problem so I don't have much advice to offer here. I'll re-add a section to this guide to aid in disassembling this section. Second, pick the projector up and rotate it around a bit while it's running. Does the red area change at all? If so, your issue is definitely a loose mirror, which should be a much easier fix. Hope this helps!