
Plantronics Headphone Battery Replacement

What you need

  1. Plantronics Headphone Battery Replacement, Battery: step 1, image 1 of 2 Plantronics Headphone Battery Replacement, Battery: step 1, image 2 of 2
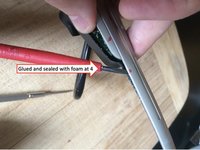
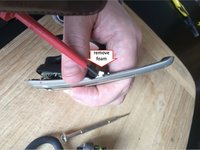
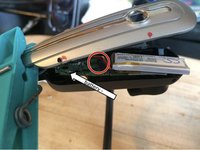
    • The red markings show the positions of breaking/fixing points inside the case, which are slightly glued. Nevertheless, the case can be opened without too much damage using a small, sharp screwdriver. The fix at the back of the headset at position 1 is clipped inside the case, rather than glued (see clip at steps 4 and 11).

  2. Plantronics Headphone Battery Replacement: step 2, image 1 of 1
    • Use a small, sharp screwdriver to open the case carefully, starting at position 1.

  3. Plantronics Headphone Battery Replacement: step 3, image 1 of 1
    • You will likely damage the case a little bit. First, open 2a and 2b with a sharp screwdriver.

    • Then, open 3a and 3b with a sharp screwdriver.

  4. Plantronics Headphone Battery Replacement: step 4, image 1 of 2 Plantronics Headphone Battery Replacement: step 4, image 2 of 2
    • Very carefully open 4 with a sharp screwdriver.

    • The case is glued and sealed with foam at 4.

    • Remove the foam from the case.

  5. Plantronics Headphone Battery Replacement: step 5, image 1 of 1
    • The two loudspeaker wires are quite delicate, so take special care with them as you continue to work on the headphones in future steps.

  6. Plantronics Headphone Battery Replacement, Power connector: step 6, image 1 of 1
    • If the power connector is glued into the case, then de-soldering it is the easiest solution. If it is not glued, then de-soldering is not necessary.

  7. Plantronics Headphone Battery Replacement: step 7, image 1 of 1
    • Be sure to remove assembly carefully.

    • Be careful with loudspeaker wires.

  8. Plantronics Headphone Battery Replacement: step 8, image 1 of 1
    • De-solder the battery positive (+) and negative (-) cables from the circuit board.

  9. Plantronics Headphone Battery Replacement, Battery: step 9, image 1 of 1
    • If the battery is glued with a piece of foam, then cut it with sharp knife.

    • Take care not to puncture the battery!

  10. Plantronics Headphone Battery Replacement, Replacement: step 10, image 1 of 3 Plantronics Headphone Battery Replacement, Replacement: step 10, image 2 of 3 Plantronics Headphone Battery Replacement, Replacement: step 10, image 3 of 3
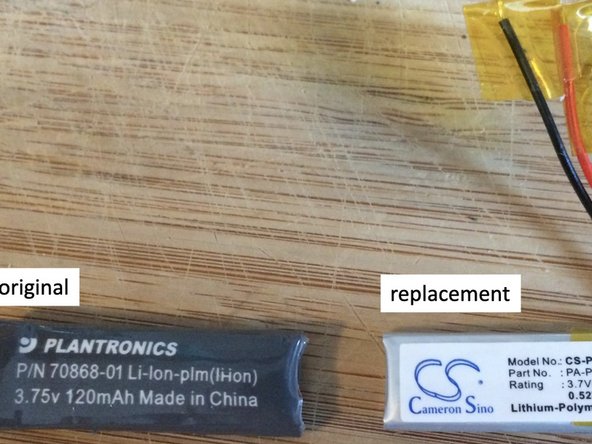
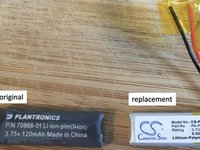
    • Exchange the battery with the new replacement.

    • The replacement battery in the picture worked perfectly for the Plantronics B70.

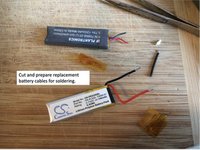
    • Cut and prepare the replacement battery cables for soldering.

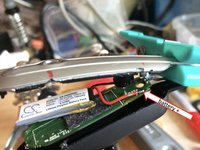
    • Solder the new battery to plus (red cable) and minus (black cable).

  11. Plantronics Headphone Battery Replacement: step 11, image 1 of 3 Plantronics Headphone Battery Replacement: step 11, image 2 of 3 Plantronics Headphone Battery Replacement: step 11, image 3 of 3
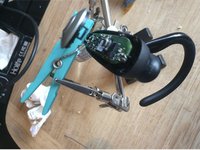
    • Fix the new battery onto the foam and place it in the center of the position, which is marked by a white line.

    • Carefully put everything back into position. Re-solder the power connector, if it had to be de-soldered before. Fix it back into the round hole.

    • Close the case with the clip 1. The black and silver case can be fixed best using some transparent tape around the case.

Conclusion

Test loading the new battery as usual.

One other person completed this guide.

jo fixit

Member since: 04/14/19

438 Reputation

3 Guides authored

0 Comments

Add Comment

View Statistics:

Past 24 Hours: 0

Past 7 Days: 17

Past 30 Days: 117

All Time: 346