Free Shipping on Domestic Orders $75+

Piston Rings Removal

Prerequisite Only
This is a prerequisite-only guide! This guide is part of another procedure and isn’t meant to be used alone.

What you need

    1. Piston Rings Removal, Turn off the engine: step 1, image 1 of 2 Piston Rings Removal, Turn off the engine: step 1, image 2 of 2
      • Before you begin, make sure the device is powered down and cool to the touch.

      • Flip the engine switch into the OFF position.

      Ask FixBot

      Add Comment

    2. Piston Rings Removal, Disconnect the spark plug: step 2, image 1 of 2 Piston Rings Removal, Disconnect the spark plug: step 2, image 2 of 2
      • Grab the plastic housing at the end of the spark plug wire.

      • Pull firmly to disconnect the wire from the spark plug.

      Ask FixBot

      Add Comment

    3. Piston Rings Removal, Drain the compressor tank: step 3, image 1 of 2 Piston Rings Removal, Drain the compressor tank: step 3, image 2 of 2
      • Pull the ring on the safety relief valve away from the compressor tank to drain the air from the compressor.

      • Ensure the tank is completely depressurized before starting repairs.

      Ask FixBot

      Add Comment

    1. Piston Rings Removal, Disconnect the pump discharge line: step 4, image 1 of 1
      • Use a 7/8 inch wrench to loosen the nut securing the pump discharge line to the elbow on the cylinder head.

      Ask FixBot

      Add Comment

    2. Piston Rings Removal: step 5, image 1 of 2 Piston Rings Removal: step 5, image 2 of 2
      • Remove the pump discharge line from the elbow.

      Ask FixBot

      Add Comment

    1. Piston Rings Removal, Remove the belt guard cover bolt: step 6, image 1 of 1
      • Use a 10 mm socket to remove the bolt securing the belt guard.

      Ask FixBot

      Add Comment

    2. Piston Rings Removal, Remove the belt guard cover: step 7, image 1 of 3 Piston Rings Removal, Remove the belt guard cover: step 7, image 2 of 3 Piston Rings Removal, Remove the belt guard cover: step 7, image 3 of 3
      • Tilt the belt guard away from the device and lift it out to remove it.

      Ask FixBot

      Add Comment

    1. Piston Rings Removal, Remove the belt guard bracket bolts: step 8, image 1 of 1
      • Use a 7/16 inch socket to remove the nuts and accompanying bolts securing the belt guard bracket to the rear belt guard.

      • You may need to hold the bolts in place with a 7/16 inch wrench during removal.

      • Don't misplace the washers that are removed during this step.

      • During reassembly, you may need to slightly loosen the two head bolts securing the belt guard bracket in order to properly align the bracket with the mounting holes in the rear belt guard.

      Ask FixBot

      Add Comment

    2. Piston Rings Removal: step 9, image 1 of 1
      • Use a 1/2 inch socket to remove the two bolts securing the belt guard bracket to the cylinder head.

      • Don't lose the loosened spacers underneath the belt guard bracket.

      • Don't misplace the washers that are removed during this step.

      Ask FixBot

      Add Comment

    3. Piston Rings Removal, Remove the belt guard bracket: step 10, image 1 of 2 Piston Rings Removal, Remove the belt guard bracket: step 10, image 2 of 2
      • Lift the belt guard bracket straight up to remove it.

      Ask FixBot

      Add Comment

    4. Piston Rings Removal, Remove the spacers: step 11, image 1 of 2 Piston Rings Removal, Remove the spacers: step 11, image 2 of 2
      • Remove the four spacers from the top of the cylinder head.

      Ask FixBot

      Add Comment

    1. Piston Rings Removal, Remove the cylinder bolts: step 12, image 1 of 2 Piston Rings Removal, Remove the cylinder bolts: step 12, image 2 of 2
      • Use a 1/2 inch socket to remove the six bolts and washers securing the cylinder to the crankcase.

      • You may need to use a larger size socket if the coating on the bolts prevents the 1/2 inch socket from fitting.

      • You may need to use a 1/2 inch wrench if a socket is obstructed by the fin stacks on the cylinder.

      Ask FixBot

      Add Comment

    2. Piston Rings Removal, Remove the cylinder: step 13, image 1 of 3 Piston Rings Removal, Remove the cylinder: step 13, image 2 of 3 Piston Rings Removal, Remove the cylinder: step 13, image 3 of 3
      • Lift the cylinder from the air compressor and set it aside.

      • You may need to loosen the gasket between the cylinder and the air compressor.

      • The two pistons will fall to the sides when you lift off the cylinder.

      Ask FixBot

      Add Comment

    3. Piston Rings Removal, Remove the compression ring and wiper ring: step 14, image 1 of 2 Piston Rings Removal, Remove the compression ring and wiper ring: step 14, image 2 of 2
      • The piston rings are oily, so wear gloves to keep the piston as clean as possible and to avoid having the rings slip while you work.

      • Rotate the top compression ring until its gap is facing you.

      • Push the left side of the compression ring completely into the compression ring groove.

      Ask FixBot

      Add Comment

    4. Piston Rings Removal: step 15, image 1 of 3 Piston Rings Removal: step 15, image 2 of 3 Piston Rings Removal: step 15, image 3 of 3
      • Bending the compression ring in the horizontal direction may cause it to break.

      • Avoid scratching the top surface of the piston.

      • Grasp the right edge of the top compression ring and lift the end up and over the top edge of the piston.

      • Lift the piston ring as you rotate the entire ring counterclockwise (looking at the piston from above) to guide the ring out of its groove.

      Ask FixBot

      Add Comment

    5. Piston Rings Removal: step 16, image 1 of 3 Piston Rings Removal: step 16, image 2 of 3 Piston Rings Removal: step 16, image 3 of 3
      • With the top compression ring out of its groove, swing it out and off of the piston.

      • Remove the compression ring and set it aside.

      • Repeat the last three steps to remove the wiper ring (the second ring from the top).

      Ask FixBot

      Add Comment

    6. Piston Rings Removal, Remove the top oil ring rail: step 17, image 1 of 2 Piston Rings Removal, Remove the top oil ring rail: step 17, image 2 of 2
      • Rotate the top oil ring rail so that its gap is facing you.

      • Use a pair of needle nose pliers to lift up the left end of the top oil ring rail enough to grip it with your fingers.

      • Avoid scratching the top surface of the piston.

      Ask FixBot

      Add Comment

    7. Piston Rings Removal: step 18, image 1 of 2 Piston Rings Removal: step 18, image 2 of 2
      • Use your fingers to lift the top oil ring rail clockwise around the piston.

      • Remove the top oil ring rail and set it aside.

      Ask FixBot

      Add Comment

    8. Piston Rings Removal, Remove the oil ring expander: step 19, image 1 of 3 Piston Rings Removal, Remove the oil ring expander: step 19, image 2 of 3 Piston Rings Removal, Remove the oil ring expander: step 19, image 3 of 3
      • Rotate the oil ring expander so that its gap is facing you.

      • Use a pair of needle nose pliers to lift up the left end of the top oil ring expander enough to grip it with your fingers.

      • Avoid scratching the top surface of the piston.

      • Use your fingers to lift the oil ring expander out of its groove, working your way clockwise around the piston.

      • Remove the oil ring expander and set it aside.

      Ask FixBot

      Add Comment

    9. Piston Rings Removal, Remove the bottom oil ring rail: step 20, image 1 of 3 Piston Rings Removal, Remove the bottom oil ring rail: step 20, image 2 of 3 Piston Rings Removal, Remove the bottom oil ring rail: step 20, image 3 of 3
      • Rotate the bottom oil ring rail so that its gap is facing you.

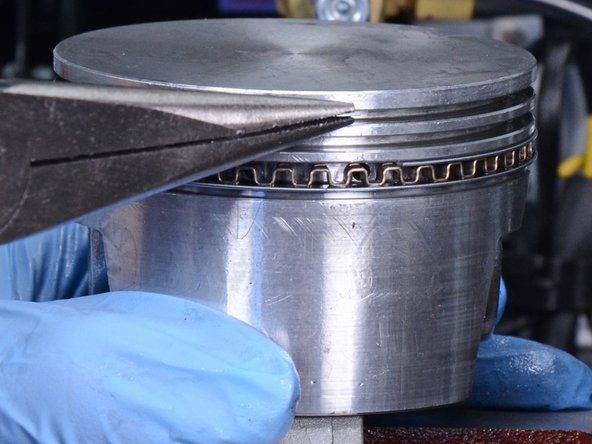
      • Use a pair of needle nose pliers to lift up the left end of the bottom oil ring rail enough to grip it with your fingers.

      • Avoid scratching the top surface of the piston.

      • Use your fingers to lift up the bottom oil ring rail, working your way clockwise around the piston.

      • Remove the bottom oil ring rail and set it aside.

      • Repeat the last seven steps to remove the piston rings from the second piston.

      Ask FixBot

      Add Comment

Conclusion

To reassemble your device, follow these instructions in reverse order.

Cancel: I did not complete this guide.

Kyle Smith

Member since: 02/01/21

53,242 Reputation

124 Guides authored

0 Guide Comments

Add Comment

View Statistics:

Past 24 Hours: 1

Past 7 Days: 5

Past 30 Days: 15

All Time: 212