Pioneer MXT-X366BT Metal Case Replacement

What you need

  1. Pioneer MXT-X366BT Metal Case Replacement, Metal Casing: step 1, image 1 of 2 Pioneer MXT-X366BT Metal Case Replacement, Metal Casing: step 1, image 2 of 2
    • Apply small amount of pressure inward with a plastic opening tool to release bottom clip.

    • Pry the top clip with the plastic opening tool to release it.

    • The head unit is symmetrical and has the same amount of clips on the other side.

  2. Pioneer MXT-X366BT Metal Case Replacement: step 2, image 1 of 1
    • Remove the face plate holder.

  3. Pioneer MXT-X366BT Metal Case Replacement: step 3, image 1 of 1
    • Remove the six 5mm Phillips-head screws with Philips #2 screwdriver.

  4. Pioneer MXT-X366BT Metal Case Replacement: step 4, image 1 of 2 Pioneer MXT-X366BT Metal Case Replacement: step 4, image 2 of 2
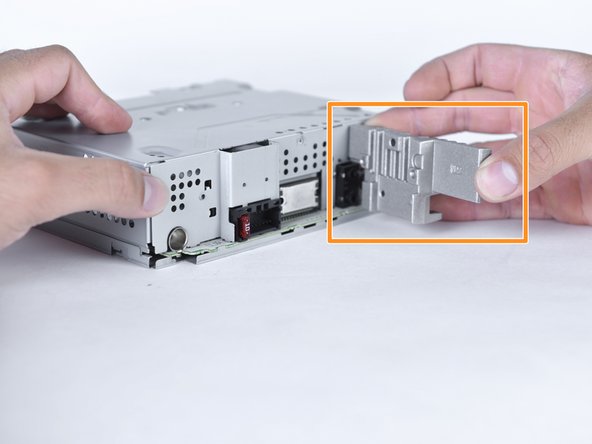
    • Remove the inner three 5mm Phillips head screws, with a Phillips #2 screwdriver, attached to the metal backing.

    • Remove the metal backing that is now free.

  5. Pioneer MXT-X366BT Metal Case Replacement: step 5, image 1 of 1
    • Carefully slide the metal casing forward.

    • Metal piece standing is the rear of the head unit.

    • Edges are sharp.

  6. Pioneer MXT-X366BT Metal Case Replacement: step 6, image 1 of 1
    • Lift the metal casing from the rear and pull it away.

    • Edges are sharp.

  7. Pioneer MXT-X366BT Metal Case Replacement: step 7, image 1 of 1
    • The metal casing is now fully removed.

Conclusion

To reassemble your device, follow these instructions in reverse order.

One other person completed this guide.

Blaine Kaiser

Member since: 03/22/18

169 Reputation

1 Guide authored

0 Comments

Add Comment

View Statistics:

Past 24 Hours: 0

Past 7 Days: 0

Past 30 Days: 4

All Time: 274