Free Shipping on Domestic Orders $75+

Pentax PZ-10 Back Cover Locking Switch Spring Replacement

What you need

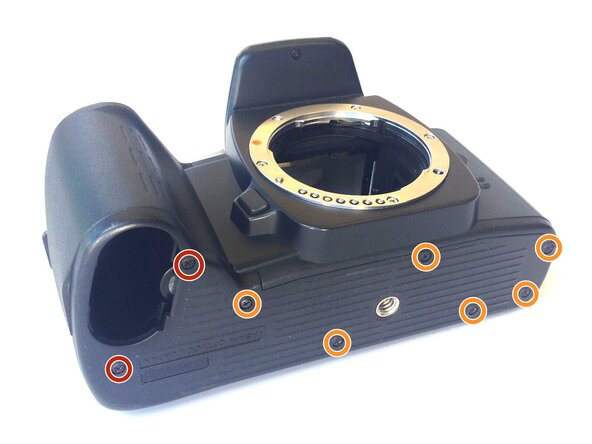
    1. Pentax PZ-10 Back Cover Locking Switch Spring Replacement, Removing the Bottom Cover: step 1, image 1 of 1
      • With the lens face up and the bottom panel of the camera facing you, remove the two 7mm screws on the left using the J0 screwdriver.

      • Remove the six 4.3mm screws in the middle and right of the panel using the J0 screwdriver.

      • Pull off the bottom casing to remove.

      Ask FixBot

      Add Comment

    2. Pentax PZ-10 Back Cover Locking Switch Spring Replacement, Removing Bottom Casing: step 2, image 1 of 1
      • With the screws removed, the bottom casing should come off very easily by pulling on the casing.

      Ask FixBot

      Add Comment

    3. Pentax PZ-10 Back Cover Locking Switch Spring Replacement, Removing the Back Cover: step 3, image 1 of 1
      • Place the camera on its side so the lens is facing left.

      • Press down on the locking switch on the side panel facing you.

      Ask FixBot

      Add Comment

    4. Pentax PZ-10 Back Cover Locking Switch Spring Replacement: step 4, image 1 of 1
      • With the door unlocked, rotate the device to access the bottom.

      Ask FixBot

      Add Comment

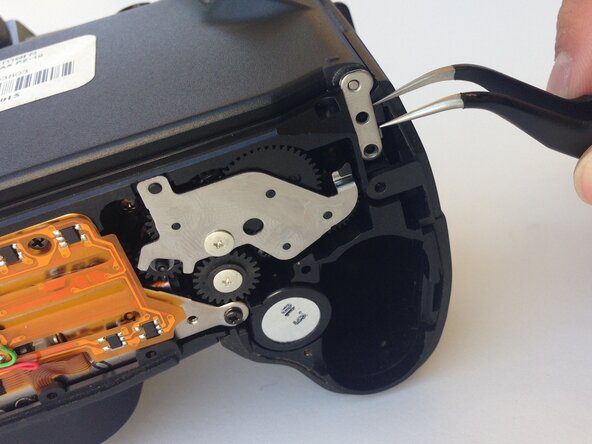
    5. Pentax PZ-10 Back Cover Locking Switch Spring Replacement: step 5, image 1 of 1
      Tool used on this step:
      Tweezers
      $4.99
      Buy
      • Using a pair of tweezers, gently remove the metal tab securing the back door axle.

      • The door will come loose at this point, watch for any loose parts that may also come out.

      Ask FixBot

      Add Comment

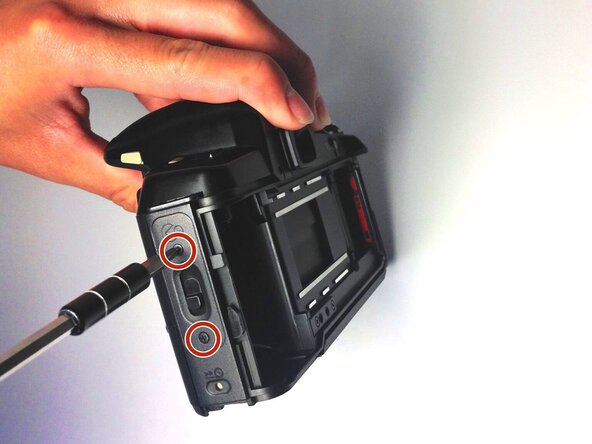
    6. Pentax PZ-10 Back Cover Locking Switch Spring Replacement, Removing the Side Panel: step 6, image 1 of 1
      • Once the back cover is fully removed, remove the two 4.35mm screws attaching the cover of the unlocking switch, and remove the plate.

      Ask FixBot

      Add Comment

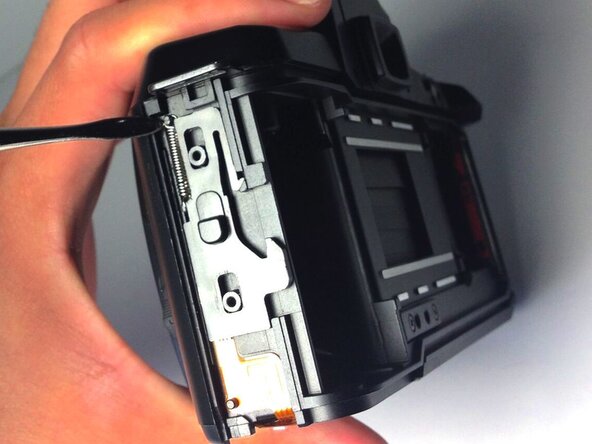
    7. Pentax PZ-10 Back Cover Locking Switch Spring Replacement, Removing the Spring: step 7, image 1 of 1
      • Locate the spring at the upper left corner of the face, and pull the rings of the spring off of the pins to remove it using plastic opening tools.

      • You are now ready to replace the spring.

      Ask FixBot

      Add Comment

Conclusion

To reassemble your device, follow these instructions in reverse order.

Cancel: I did not complete this guide.

One other person completed this guide.

Ryan Su

Member since: 04/20/15

107 Reputation

1 Guide authored

0 Guide Comments

Add Comment

View Statistics:

Past 24 Hours: 1

Past 7 Days: 5

Past 30 Days: 19

All Time: 743