
Installing PSP Go Display

What you need

  1. Installing PSP Go Display, Back Cover: step 1, image 1 of 2 Installing PSP Go Display, Back Cover: step 1, image 2 of 2
    • Unscrew the four Phillips screws on the back of the PSP Go.

    • Rotate the PSP so you can see the top of the device.

    • Unscrew the two Phillips screws next to the volume buttons.

  2. Installing PSP Go Display: step 2, image 1 of 2 Installing PSP Go Display: step 2, image 2 of 2
    • Use a plastic opening tool around the perimeter of the back cover to loosen it on all sides.

    • Open the back cover by gently lifting the right side, and rotating it to the left side (as if you were opening a book).

    • Be careful not to rotate the back cover from the bottom, as you will break the plastic screw holes on top of the device.

  3. Installing PSP Go Display, Top Cover: step 3, image 1 of 1
    • Pull the top cover upwards gently from its housing.

  4. Installing PSP Go Display, Left Trigger: step 4, image 1 of 1
    • Use a plastic opening tool to gently flip up the left trigger connector.

  5. Installing PSP Go Display: step 5, image 1 of 2 Installing PSP Go Display: step 5, image 2 of 2
    • Unscrew the lone Phillips screw holding the trigger in place. Remove both trigger and retaining plate from the PSP Go.

    • If necessary, repeat steps 2 and 3 to remove the right trigger button.

  6. Installing PSP Go Display, Battery: step 6, image 1 of 3 Installing PSP Go Display, Battery: step 6, image 2 of 3 Installing PSP Go Display, Battery: step 6, image 3 of 3
    • Do not peel the sticker away from the left EMI shield. It will expose the "VOID VOID" lettering that will void your warranty!

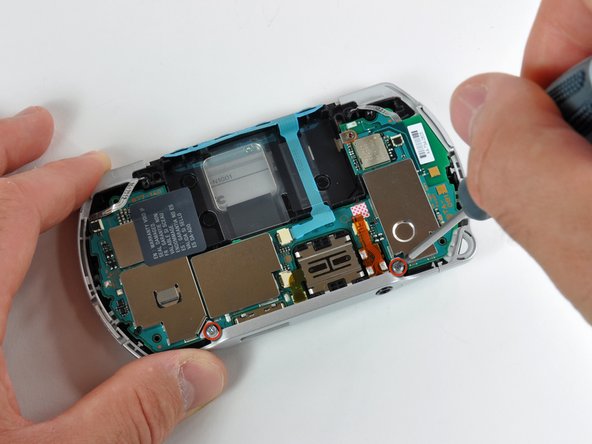
    • Use the plastic opening tool to gently peel away at the "Warranty Void" sticker. Start on one edge, as shown, and slide the tool from side to side until the sticker is removed from just the battery.

  7. Installing PSP Go Display: step 7, image 1 of 1
    • Gently pull the sticker away from the battery connector, just enough so that the connector is visible.

    • Wedge a plastic opening tool in between the connector and logic board, and gently pull the connector upwards.

    • Make sure not to disconnect the white connector socket on the logic board, and just the connector itself.

  8. Installing PSP Go Display: step 8, image 1 of 2 Installing PSP Go Display: step 8, image 2 of 2
    • Use a plastic opening tool to pop out the battery, being careful not to snag the "Warranty Void" sticker in the process.

    • When putting a new battery into the PSP Go, make sure you hold the "Warranty Sticker" so you don't put the battery on top of it.

  9. Installing PSP Go Display, Logic Board: step 9, image 1 of 1
    • Remove the single Phillips screw securing the logic board to the inner case.

  10. Installing PSP Go Display: step 10, image 1 of 2 Installing PSP Go Display: step 10, image 2 of 2
    • Use a plastic opening tool to gently flip up the right trigger connector.

    • Unscrew the lone Phillips screw holding the trigger in place. Remove both trigger and retaining plate from the PSP Go.

  11. Installing PSP Go Display: step 11, image 1 of 2 Installing PSP Go Display: step 11, image 2 of 2
    • Use a #00 Phillips screwdriver to unscrew both bottom plate screws.

    • Remove the bottom plate by lifting it away from the device.

  12. Installing PSP Go Display: step 12, image 1 of 1
    • Remove both headphone jack and analog joystick screws using your #00 Phillips screwdriver.

  13. Installing PSP Go Display: step 13, image 1 of 2 Installing PSP Go Display: step 13, image 2 of 2
    Tool used on this step:
    Tweezers
    $4.99
    Buy
    • Be very careful when disconnecting the following cables. The connectors do not have flip-up tabs; just hold each cable steady and pull it out of the connector.

    • Unplug the volume button cable using a pair of tweezers. Be careful not to damage the cable.

    • Unplug the Start/Select button cable the same way. Make sure to grasp the black plastic pull tab of the cable.

  14. Installing PSP Go Display: step 14, image 1 of 1
    • Use a pair of tweezers to pull out the battery's clear plastic cover.

    • Notice the little metal tab and slot (marked in red) where the clear plastic cover slides into. Make sure you slide the cover into place properly when reassembling the PSP Go.

  15. Installing PSP Go Display: step 15, image 1 of 1
    • The logic board is still connected to the display, so do not fully remove it from its housing!

    • Gently lift the logic board slightly out of its housing.

  16. Installing PSP Go Display: step 16, image 1 of 2 Installing PSP Go Display: step 16, image 2 of 2
    • Use a plastic opening tool to disconnect the display cable from the logic board.

    • The D-pad may come loose while prying the logic board.

    • The logic board should now be free from the rest of the device.

    • During reassembly, make sure to properly line up the power button with the power button lever on the logic board.

  17. Installing PSP Go Display, Display: step 17, image 1 of 1
    • Use a #00 Phillips screwdriver to remove the four display screws.

  18. Installing PSP Go Display: step 18, image 1 of 3 Installing PSP Go Display: step 18, image 2 of 3 Installing PSP Go Display: step 18, image 3 of 3
    • Wedge a plastic opening tool in the location shown in the first picture, and slightly separate the metal frame from the plastic front panel.

    • Slide the plastic opening tool around the perimeter of the display, increasing the gap between the metal frame and the front panel.

    • The front panel should now be free from the metal frame. However, it is still connected to the frame, so don't remove it completely.

  19. Installing PSP Go Display: step 19, image 1 of 2 Installing PSP Go Display: step 19, image 2 of 2
    • Use a plastic opening tool to disconnect the display cable from the rest of the device.

    • The PSP Go should now look similar to the second picture.

  20. Installing PSP Go Display: step 20, image 1 of 2 Installing PSP Go Display: step 20, image 2 of 2
    • Be very careful when performing this procedure! If you put too much pressure on the display, you risk cracking it.

    • Wedge a plastic opening tool between the plastic front panel and display. Be very careful that you wedge it in the same location shown in the first picture.

    • Slide the plastic opening tool across the length of the display. This should loosen the glue binding the display to the plastic front panel.

    • Rotate the display 180 degrees and free the bottom side of the display in the same manner.

  21. Installing PSP Go Display: step 21, image 1 of 1
    • Gently separate the display from the front panel.

    • Match the orientation of the PSP logo on the display with the Sony logo on the front panel when reassembling the PSP Go.

View Statistics:

Past 24 Hours: 8

Past 7 Days: 75

Past 30 Days: 351

All Time: 58,694