
Free Shipping on Domestic Orders $75+

PSP Go Bottom Plate Replacement

What you need

  1. PSP Go Bottom Plate Replacement, Back Cover: step 1, image 1 of 2 PSP Go Bottom Plate Replacement, Back Cover: step 1, image 2 of 2
    • Unscrew the four Phillips screws on the back of the PSP Go.

    • Rotate the PSP so you can see the top of the device.

    • Unscrew the two Phillips screws next to the volume buttons.

    Ask FixBot

    Add Comment

  2. PSP Go Bottom Plate Replacement: step 2, image 1 of 2 PSP Go Bottom Plate Replacement: step 2, image 2 of 2
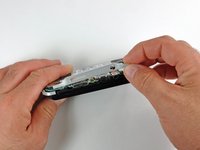
    • Use a plastic opening tool around the perimeter of the back cover to loosen it on all sides.

    • Open the back cover by gently lifting the right side, and rotating it to the left side (as if you were opening a book).

    • Be careful not to rotate the back cover from the bottom, as you will break the plastic screw holes on top of the device.

    Ask FixBot

    Add Comment

  3. PSP Go Bottom Plate Replacement, Top Cover: step 3, image 1 of 1
    • Pull the top cover upwards gently from its housing.

    Ask FixBot

    Add Comment

  4. PSP Go Bottom Plate Replacement, Bottom Plate: step 4, image 1 of 2 PSP Go Bottom Plate Replacement, Bottom Plate: step 4, image 2 of 2
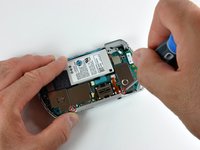
    • Remove the two Phillips screws holding the bottom plate.

    • Gently lift the bottom plate away from the device.

    Ask FixBot

    Add Comment

Conclusion

To reassemble your device, follow these instructions in reverse order.

Cancel: I did not complete this guide.

3 other people completed this guide.

0 Guide Comments

Add Comment

View Statistics:

Past 24 Hours: 2

Past 7 Days: 13

Past 30 Days: 61

All Time: 8,062