Introduction
PSP E1000 / E1004
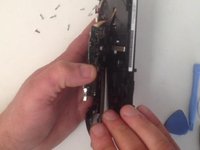
not read UMD games and you haven't indication for insertion games. The problem probably is in UMD switch.
You can see the video:
What you need
Video Overview
-
-
If you haven't indication for inserted disk the problem probably is in UMD switch.
-
-


Conclusion
To reassemble your device, follow these instructions in reverse order.
Cancel: I did not complete this guide.
6 other people completed this guide.

Team
