
Olympus VR-350 Back Plate Replacement

What you need

  1. Olympus VR-350 Back Plate Replacement, Front Plate: step 1, image 1 of 2 Olympus VR-350 Back Plate Replacement, Front Plate: step 1, image 2 of 2
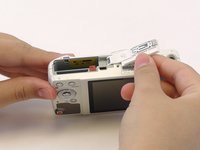
    • Remove the two 4mm screws from each side of the camera with a Phillips PH000 screwdriver.

  2. Olympus VR-350 Back Plate Replacement: step 2, image 1 of 1
    • Remove the four 4mm screws from the bottom of the camera with a Phillips PH000 screwdriver.

  3. Olympus VR-350 Back Plate Replacement: step 3, image 1 of 3 Olympus VR-350 Back Plate Replacement: step 3, image 2 of 3 Olympus VR-350 Back Plate Replacement: step 3, image 3 of 3
    • Use the plastic opening tools and your fingers to pry the front plate from the camera.

    • You might need to open the battery cover to remove the front plate.

  4. Olympus VR-350 Back Plate Replacement, Back Plate: step 4, image 1 of 2 Olympus VR-350 Back Plate Replacement, Back Plate: step 4, image 2 of 2
    • Use your fingers to pry open the back cover.

    • When you remove the back of the camera, the button membrane might fall out. Don’t lose this sheet.

    • The LCD screen is connected to the body of the camera by an orange ribbon cable. Don’t pull this ribbon cable out.

Conclusion

To reassemble your device, follow these instructions in reverse order.

Adri

Member since: 02/23/15

456 Reputation

3 Guides authored

Team

USF Tampa, Team 1-3, Leahy Winter 2015 Member of USF Tampa, Team 1-3, Leahy Winter 2015

USFT-LEAHY-W15S1G3

3 Members

10 Guides authored

0 Comments

Add Comment

View Statistics:

Past 24 Hours: 0

Past 7 Days: 3

Past 30 Days: 9

All Time: 675