
Nook Color Front Cover Replacement

Prerequisite Only
This guide is only intended to be used as a prerequisite for other guides. It's incomplete by itself.

What you need

  1. Nook Color Front Cover Replacement, Back Cover: step 1, image 1 of 2 Nook Color Front Cover Replacement, Back Cover: step 1, image 2 of 2
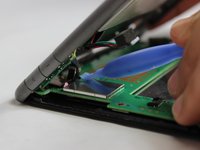
    • Remove the two 3.8 mm screws located in the back right corner of the device using the T5 Torx screwdriver.

  2. Nook Color Front Cover Replacement: step 2, image 1 of 2 Nook Color Front Cover Replacement: step 2, image 2 of 2
    • Pry off the back cover with the plastic opening tool. Go around the device with the tool to ensure complete detachment.

  3. Nook Color Front Cover Replacement, Front Cover: step 3, image 1 of 1
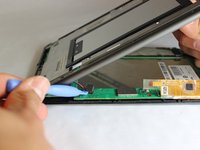
    • Remove the ten 4.0 mm screws from the device's perimeter using the T5 Torx screwdriver.

  4. Nook Color Front Cover Replacement: step 4, image 1 of 2 Nook Color Front Cover Replacement: step 4, image 2 of 2
    • Pry off the front panel using the plastic opening tool.

  5. Nook Color Front Cover Replacement: step 5, image 1 of 2 Nook Color Front Cover Replacement: step 5, image 2 of 2
    • Lift up on the connectors to disconnect them using the plastic opening tool.

Conclusion

To reassemble your device, follow these instructions in reverse order.

Matthew Perdomo

Member since: 01/20/15

497 Reputation

3 Guides authored

Team

USF Tampa, Team 11-5, Blackwell Winter 2015 Member of USF Tampa, Team 11-5, Blackwell Winter 2015

USFT-BLACKWELL-W15S11G5

3 Members

14 Guides authored

0 Comments

Add Comment

View Statistics:

Past 24 Hours: 0

Past 7 Days: 0

Past 30 Days: 0

All Time: 31