
Nokia 6310i Back Cover Replacement

What you need

  1. Nokia 6310i Back Cover Replacement, Battery: step 1, image 1 of 2 Nokia 6310i Back Cover Replacement, Battery: step 1, image 2 of 2
    • Press and hold the battery release button and slide the battery away from the Nokia logo

  2. Nokia 6310i Back Cover Replacement, SIM card: step 2, image 1 of 3 Nokia 6310i Back Cover Replacement, SIM card: step 2, image 2 of 3 Nokia 6310i Back Cover Replacement, SIM card: step 2, image 3 of 3
    • Slide the SIM card lock away from the SIM card.

    • The SIM card pops out. Remove the SIM card.

  3. Nokia 6310i Back Cover Replacement, Back Cover: step 3, image 1 of 1
    • Unscrew and remove the four T6 Torx screws.

  4. Nokia 6310i Back Cover Replacement: step 4, image 1 of 3 Nokia 6310i Back Cover Replacement: step 4, image 2 of 3 Nokia 6310i Back Cover Replacement: step 4, image 3 of 3
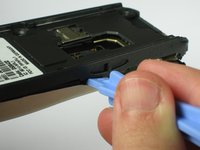
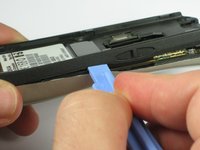
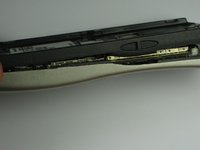
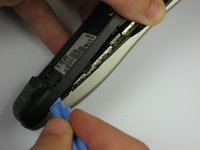
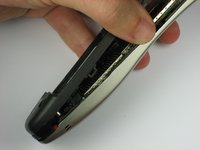
    • Insert a plastic opening tool between the faceplate and the black backplate. Gently pry them apart, working from the lower end to the upper side of the phone.

  5. Nokia 6310i Back Cover Replacement: step 5, image 1 of 3 Nokia 6310i Back Cover Replacement: step 5, image 2 of 3 Nokia 6310i Back Cover Replacement: step 5, image 3 of 3
    • Use the plastic opening tool to separate the top part of the backplate.

    • The plastic clips at the top require slightly more force to separate.

Conclusion

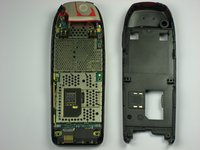
To reassemble your device, follow these instructions in reverse order.

2 other people completed this guide.

Mustafa

Member since: 09/23/10

156 Reputation

4 Guides authored

Team

Cal Poly, Team 14-41, Forte Fall 2010 Member of Cal Poly, Team 14-41, Forte Fall 2010

CPSU-FORTE-F10S14G41

5 Members

16 Guides authored

0 Comments

Add Comment

View Statistics:

Past 24 Hours: 0

Past 7 Days: 0

Past 30 Days: 8

All Time: 4,428