
Nokia 6102i Keyboard Replacement

What you need

  1. Nokia 6102i Keyboard Replacement, Battery: step 1, image 1 of 3 Nokia 6102i Keyboard Replacement, Battery: step 1, image 2 of 3 Nokia 6102i Keyboard Replacement, Battery: step 1, image 3 of 3
    • Press and hold the button at the bottom of the back side of the phone while sliding the back plate down to remove the back cover.

    • Note: Images on the right side may be hovered over to reveal larger versions.

  2. Nokia 6102i Keyboard Replacement: step 2, image 1 of 1
    • Lift up the battery from the inside of the phone.

    • Make sure to lift up from the bottom of the battery as shown.

  3. Nokia 6102i Keyboard Replacement, Logic Board: step 3, image 1 of 2 Nokia 6102i Keyboard Replacement, Logic Board: step 3, image 2 of 2
    Tool used on this step:
    T6 Torx Screwdriver
    $9.99
    Buy
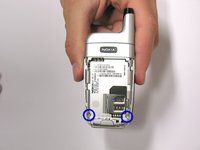
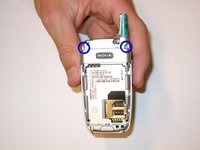
    • Using a .208 head T-6 Screwdriver remove the two screws at the bottom of the battery cavity.

  4. Nokia 6102i Keyboard Replacement: step 4, image 1 of 2 Nokia 6102i Keyboard Replacement: step 4, image 2 of 2
    • Use a plastic opening tool to remove the silver cover over the antenna.

    • The covering may not pop right off. It may require some prying in different locations around the top covering.

  5. Nokia 6102i Keyboard Replacement: step 5, image 1 of 2 Nokia 6102i Keyboard Replacement: step 5, image 2 of 2
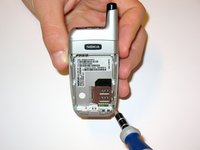
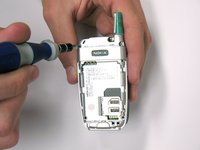
    • Remove the two newly revealed .208 inch screws at the top using a T-6 screwdriver.

  6. Nokia 6102i Keyboard Replacement: step 6, image 1 of 2 Nokia 6102i Keyboard Replacement: step 6, image 2 of 2
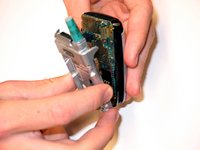
    • WARNING: Use extreme caution when removing and handling the logic board as it is very fragile.

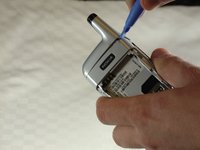
    • With caution, use a plastic prier to separate the back silver casing from the front of the phone. This may require force.

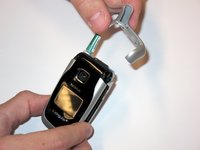
    • Disconnect the logic board from the small orange chip.

  7. Nokia 6102i Keyboard Replacement, Keyboard: step 7, image 1 of 2 Nokia 6102i Keyboard Replacement, Keyboard: step 7, image 2 of 2
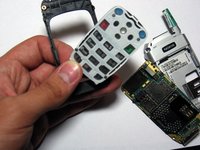
    • Pop out the keyboard from the frame.

    • Once the logic board is removed, the keypad can be easily popped out from the frame with very little force.

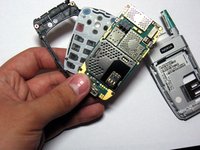
    • The picture is showing the three layers: the frame, the keyboard, and the logic board.

Conclusion

To reassemble your device, follow these instructions in reverse order.

Jonathan Brophy

Member since: 04/14/10

1 Reputation

3 Guides authored

Team

Cal Poly, Team 23-78, Johann Spring 2010 Member of Cal Poly, Team 23-78, Johann Spring 2010

CPSU-JOHANN-S10S23G78

4 Members

5 Guides authored

0 Comments

Add Comment

View Statistics:

Past 24 Hours: 1

Past 7 Days: 1

Past 30 Days: 3

All Time: 1,914