
Nokia 2610 Circuit Board Replacement

What you need

  1. Nokia 2610 Circuit Board Replacement, Battery and Sim Card: step 1, image 1 of 3 Nokia 2610 Circuit Board Replacement, Battery and Sim Card: step 1, image 2 of 3 Nokia 2610 Circuit Board Replacement, Battery and Sim Card: step 1, image 3 of 3
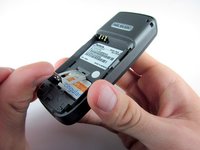
    • Place your thumb on the middle of the back cover and push it toward the bottom of the phone to slide the cover off.

  2. Nokia 2610 Circuit Board Replacement: step 2, image 1 of 3 Nokia 2610 Circuit Board Replacement: step 2, image 2 of 3 Nokia 2610 Circuit Board Replacement: step 2, image 3 of 3
    • Use a plastic opening tool (or your finger) to gently pry the battery out of the battery slot on the back of the phone.

  3. Nokia 2610 Circuit Board Replacement: step 3, image 1 of 3 Nokia 2610 Circuit Board Replacement: step 3, image 2 of 3 Nokia 2610 Circuit Board Replacement: step 3, image 3 of 3
    • Lift the metal sim card holder (at the bottom of the battery slot) up and carefully pry the sim card out of its slot with a plastic opening tool or your finger.

    • After removal, lower the metal sim card holder into its original position.

  4. Nokia 2610 Circuit Board Replacement, Front Pannel: step 4, image 1 of 2 Nokia 2610 Circuit Board Replacement, Front Pannel: step 4, image 2 of 2
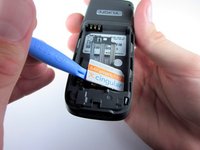
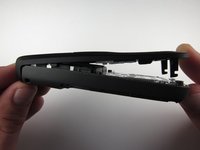
    • Insert the plastic opening tool into the crack between the front and back panels.

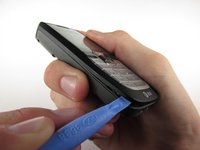
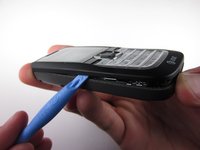
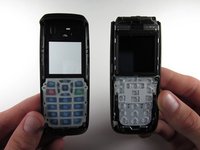
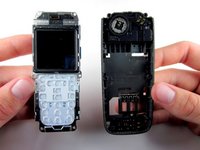
    • Gently pry the front cover away from the back cover while sliding the plastic opening tool towards the top of the phone.

  5. Nokia 2610 Circuit Board Replacement: step 5, image 1 of 2 Nokia 2610 Circuit Board Replacement: step 5, image 2 of 2
    • Lift the bottom of the front cover away from the phone.

    • Continue lifting until the top of the front cover is fully removed from the phone.

    • Note: To replace the Keypad, gently lift it out of the front cover. It is located below the clear viewing window.

  6. Nokia 2610 Circuit Board Replacement, Circuit Board: step 6, image 1 of 1
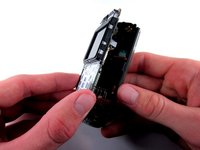
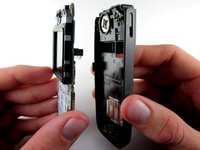
    • Use the Torx screwdriver with the T6 attachmet to remove the 6 .4 mm screws around the outside of the circuit board.

    • Note: Removing the 4 T6 screws around the screen will loosen it, so don't worry if the screen also separates from the circuit board.

  7. Nokia 2610 Circuit Board Replacement: step 7, image 1 of 3 Nokia 2610 Circuit Board Replacement: step 7, image 2 of 3 Nokia 2610 Circuit Board Replacement: step 7, image 3 of 3
    • Lift the circuit board out of the back cover.

Conclusion

To reassemble your device, follow these instructions in reverse order.

5 other people completed this guide.

Andrew Wood

Member since: 10/05/10

336 Reputation

3 Guides authored

Team

Cal Poly, Team 7-52, Amido Fall 2010 Member of Cal Poly, Team 7-52, Amido Fall 2010

CPSU-AMIDO-F10S7G52

4 Members

12 Guides authored

One Comment

This is so cool tom!

Mo Chiggle - Reply

Add Comment

View Statistics:

Past 24 Hours: 0

Past 7 Days: 9

Past 30 Days: 16

All Time: 3,179