
Nokia 1010 Screen Replacement

What you need

  1. Nokia 1010 Screen Replacement, Battery: step 1, image 1 of 2 Nokia 1010 Screen Replacement, Battery: step 1, image 2 of 2
    • Using your thumbs, press and slide down the back cover of the Nokia 1010.

  2. Nokia 1010 Screen Replacement: step 2, image 1 of 3 Nokia 1010 Screen Replacement: step 2, image 2 of 3 Nokia 1010 Screen Replacement: step 2, image 3 of 3
    • Insert the prying tool in the notch above the battery.

    • Once the prying tool is inserted, lift up the battery.

  3. Nokia 1010 Screen Replacement, Faceplate: step 3, image 1 of 2 Nokia 1010 Screen Replacement, Faceplate: step 3, image 2 of 2
    • Insert the prying tool between the seam of the faceplate and the body.

  4. Nokia 1010 Screen Replacement: step 4, image 1 of 3 Nokia 1010 Screen Replacement: step 4, image 2 of 3 Nokia 1010 Screen Replacement: step 4, image 3 of 3
    • Starting from the bottom of the phone, begin prying around the base of the phone alternating form left to right.

  5. Nokia 1010 Screen Replacement: step 5, image 1 of 3 Nokia 1010 Screen Replacement: step 5, image 2 of 3 Nokia 1010 Screen Replacement: step 5, image 3 of 3
    • As the base loosens, slowly increase the separation between the plates and the body of the phone.

  6. Nokia 1010 Screen Replacement, Motherboard: step 6, image 1 of 3 Nokia 1010 Screen Replacement, Motherboard: step 6, image 2 of 3 Nokia 1010 Screen Replacement, Motherboard: step 6, image 3 of 3
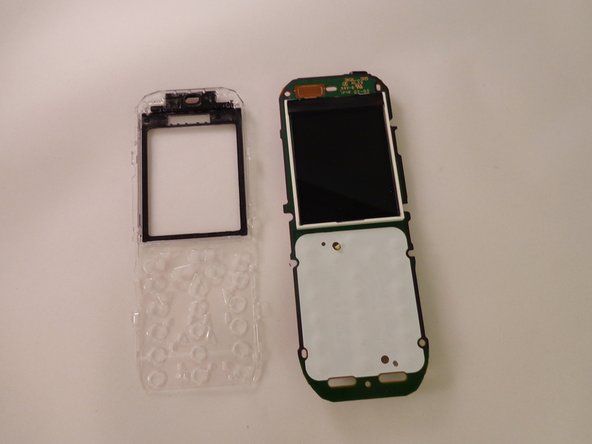
    • Using the spudger, pry back three tabs located on the left edge and three tabs located on the right edge of the body.

  7. Nokia 1010 Screen Replacement: step 7, image 1 of 3 Nokia 1010 Screen Replacement: step 7, image 2 of 3 Nokia 1010 Screen Replacement: step 7, image 3 of 3
    • Once detached, lift and remove the faceplate from the motherboard.

  8. Nokia 1010 Screen Replacement, Screen: step 8, image 1 of 3 Nokia 1010 Screen Replacement, Screen: step 8, image 2 of 3 Nokia 1010 Screen Replacement, Screen: step 8, image 3 of 3
    • Locate the four clear tabs that connect the screen to the motherboard.

  9. Nokia 1010 Screen Replacement: step 9, image 1 of 3 Nokia 1010 Screen Replacement: step 9, image 2 of 3 Nokia 1010 Screen Replacement: step 9, image 3 of 3
    • Insert the prying tool between the tabs and the motherboard. Loosen and separate slowly.

Conclusion

To reassemble your device, follow these instructions in reverse order.

9 other people completed this guide.

2 Comments

يبقه على الشعار مال النوكيه بس

حيدر حمود - Reply

You didn't even removed the screen you just removed the glass.

Macro Man - Reply

Add Comment

View Statistics:

Past 24 Hours: 2

Past 7 Days: 20

Past 30 Days: 54

All Time: 1,867