
Nokero N400 Switch Replacement

What you need

  1. Nokero N400 Switch Replacement, Remove Battery Cover: step 1, image 1 of 3 Nokero N400 Switch Replacement, Remove Battery Cover: step 1, image 2 of 3 Nokero N400 Switch Replacement, Remove Battery Cover: step 1, image 3 of 3
    • Press down firmly to remove the battery cover and display battery.

    • Then remove the battery.

  2. Nokero N400 Switch Replacement, Unscrew Back Cover: step 2, image 1 of 2 Nokero N400 Switch Replacement, Unscrew Back Cover: step 2, image 2 of 2
    • Remove the 7mm Phillips #1 screw.

  3. Nokero N400 Switch Replacement, Pry Open Back Cover: step 3, image 1 of 2 Nokero N400 Switch Replacement, Pry Open Back Cover: step 3, image 2 of 2
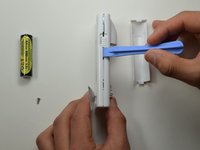
    • Place the plastic opening tool in between the two plastic panels and slowly work your way around the device.

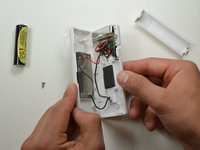
    • Unlatch the clips on the inside and pull device apart.

    • Some clips will break when forced open.

  4. Nokero N400 Switch Replacement, Remove Switch From Housing: step 4, image 1 of 1
    • Using a spudger carefully pry switch from housing.

  5. Nokero N400 Switch Replacement, Cut Old Switch Free: step 5, image 1 of 1
    • Use wire cutters to cut the two black wires attached to the old switch.

    • You must use a splicer or a soldering gun to reattach the wires of the new switch.

    • If you splice the new switch wires together in the opposite order of the old switch wires, the new switch will still work.

Conclusion

To reassemble your device, follow these instructions in reverse order.

Benjamin franklin

Member since: 01/20/15

101 Reputation

1 Guide authored

Team

USF Tampa, Team 19-2, Blackwell Winter 2015 Member of USF Tampa, Team 19-2, Blackwell Winter 2015

USFT-BLACKWELL-W15S19G2

4 Members

5 Guides authored

0 Comments

Add Comment

View Statistics:

Past 24 Hours: 0

Past 7 Days: 2

Past 30 Days: 12

All Time: 139