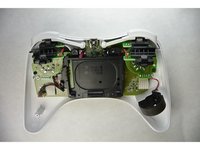
Nintendo Wii U Pro Controller D-Pad Replacement

What you need

  1. Nintendo Wii U Pro Controller D-Pad Replacement, Battery: step 1, image 1 of 1
    • Turn the controller over to reveal the battery cover.

    • Use the J000 screwdriver to remove the screw that secures the battery cover.

  2. Nintendo Wii U Pro Controller D-Pad Replacement: step 2, image 1 of 2 Nintendo Wii U Pro Controller D-Pad Replacement: step 2, image 2 of 2
    • Remove the battery from the controller by inserting the plastic spudger into the small gap on the bottom right of the battery.

    • Use the spudger as a lever to pry up and remove the battery from the compartment.

  3. Nintendo Wii U Pro Controller D-Pad Replacement, Joystick: step 3, image 1 of 1
    • Remove the eight 5.5 mm Y0 screws.

  4. Nintendo Wii U Pro Controller D-Pad Replacement: step 4, image 1 of 2 Nintendo Wii U Pro Controller D-Pad Replacement: step 4, image 2 of 2
    • Now that you have removed all of the screws, carefully separate and remove the bottom half of the controller shell from the top half.

    • If you feel any resistance when pulling the shells apart, use a spudger to separate the left and right trigger contact assemblies from the bottom shell.

  5. Nintendo Wii U Pro Controller D-Pad Replacement: step 5, image 1 of 1
    • Move the right trigger and sensor out of the way.

    • Remove the 4 mm JIS #0 screw.

  6. Nintendo Wii U Pro Controller D-Pad Replacement: step 6, image 1 of 1
    • Move the left trigger and sensor out of the way.

    • Remove the 4 mm JIS #0 screw.

  7. Nintendo Wii U Pro Controller D-Pad Replacement: step 7, image 1 of 1
    • Remove the joysticks and motherboard from the controller’s shell.

  8. Nintendo Wii U Pro Controller D-Pad Replacement: step 8, image 1 of 1
    • Carefully pull the rubber thumbsticks off of the electronic bearings to remove the joysticks.

  9. Nintendo Wii U Pro Controller D-Pad Replacement, D-Pad: step 9, image 1 of 1
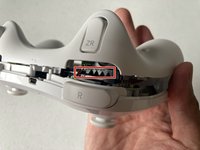
    • Locate the two 4 mm motherboard screws, shown circled in red, with the J0 screwdriver.

  10. Nintendo Wii U Pro Controller D-Pad Replacement: step 10, image 1 of 1
    • Remove the motherboard and connected components. The rubber pad of the D-Pad is indicated in the image by the red arrow.

  11. Nintendo Wii U Pro Controller D-Pad Replacement: step 11, image 1 of 1
    • Remove the rubber pad and D-Pad button. The D-Pad can be replaced by the new D-Pad or be cleaned to improve condition.

Conclusion

To reassemble your device, follow these instructions in reverse order.

3 other people completed this guide.

Jesse Burton

Member since: 09/17/15

586 Reputation

3 Guides authored

Team

IUPUI, Team 2-2, Harley Fall 2015 Member of IUPUI, Team 2-2, Harley Fall 2015

IUPUI-HARLEY-F15S2G2

4 Members

13 Guides authored

0 Comments

Add Comment

View Statistics:

Past 24 Hours: 0

Past 7 Days: 4

Past 30 Days: 41

All Time: 4,418