
Nintendo Wii Remote & Wii Nunchuk Accessory Disassembly/Reassembly

What you need

  1. Nintendo Wii Remote & Wii Nunchuk Accessory Disassembly/Reassembly, Nintendo Wii Remote & Wii Nunchuk Accessory Disassembly/Reassembly: step 1, image 1 of 3 Nintendo Wii Remote & Wii Nunchuk Accessory Disassembly/Reassembly, Nintendo Wii Remote & Wii Nunchuk Accessory Disassembly/Reassembly: step 1, image 2 of 3 Nintendo Wii Remote & Wii Nunchuk Accessory Disassembly/Reassembly, Nintendo Wii Remote & Wii Nunchuk Accessory Disassembly/Reassembly: step 1, image 3 of 3
    • Remove the battery cover from the remote and batteries inside.

    • Unscrew the four visible screws on the remote.

  2. Nintendo Wii Remote & Wii Nunchuk Accessory Disassembly/Reassembly: step 2, image 1 of 3 Nintendo Wii Remote & Wii Nunchuk Accessory Disassembly/Reassembly: step 2, image 2 of 3 Nintendo Wii Remote & Wii Nunchuk Accessory Disassembly/Reassembly: step 2, image 3 of 3
    • Use a tool to gently pry apart the white tabs near the top of the controller.

    • Once you open up the remote, there should now be two separate pieces.

    • The tabs may break off, but the remote will still be able to function without them.

  3. Nintendo Wii Remote & Wii Nunchuk Accessory Disassembly/Reassembly: step 3, image 1 of 2 Nintendo Wii Remote & Wii Nunchuk Accessory Disassembly/Reassembly: step 3, image 2 of 2
    • Use a tool or your fingers to remove the speaker piece from the remote.

  4. Nintendo Wii Remote & Wii Nunchuk Accessory Disassembly/Reassembly: step 4, image 1 of 1
    • Simply remove the rest of the buttons and the flexible plastic covering.

    • These buttons are very small and easily lost so be sure to keep them organized and close for easy access.

  5. Nintendo Wii Remote & Wii Nunchuk Accessory Disassembly/Reassembly: step 5, image 1 of 3 Nintendo Wii Remote & Wii Nunchuk Accessory Disassembly/Reassembly: step 5, image 2 of 3 Nintendo Wii Remote & Wii Nunchuk Accessory Disassembly/Reassembly: step 5, image 3 of 3
    • Go back to the side of the remote with the motherboard.

    • Gently lift and remove it from the base.

    • Be gentle while pulling out, being sure not to rip off the wires from the rumble motor.

  6. Nintendo Wii Remote & Wii Nunchuk Accessory Disassembly/Reassembly: step 6, image 1 of 2 Nintendo Wii Remote & Wii Nunchuk Accessory Disassembly/Reassembly: step 6, image 2 of 2
    • Pull out the sensor screen.

  7. Nintendo Wii Remote & Wii Nunchuk Accessory Disassembly/Reassembly: step 7, image 1 of 3 Nintendo Wii Remote & Wii Nunchuk Accessory Disassembly/Reassembly: step 7, image 2 of 3 Nintendo Wii Remote & Wii Nunchuk Accessory Disassembly/Reassembly: step 7, image 3 of 3
    • Find the white tabs facing where the sensor screen was.

    • Place a tool under one tab and push up until both tabs pop out of place, and remove the B trigger.

  8. Nintendo Wii Remote & Wii Nunchuk Accessory Disassembly/Reassembly: step 8, image 1 of 2 Nintendo Wii Remote & Wii Nunchuk Accessory Disassembly/Reassembly: step 8, image 2 of 2
    • Use a tool and place it under the rumble motor. Gently lift and remove it from the plastic housing.

    • Be careful while removing. Do not remove any of the wires from the rumble motor.

  9. Nintendo Wii Remote & Wii Nunchuk Accessory Disassembly/Reassembly: step 9, image 1 of 2 Nintendo Wii Remote & Wii Nunchuk Accessory Disassembly/Reassembly: step 9, image 2 of 2
    • To remove the plastic housing, you have to locate the two white tabs. Use your thumbs to gently pull them apart and remove the plastic housing.

    • Remove the rubber button from the plastic housing.

  10. Nintendo Wii Remote & Wii Nunchuk Accessory Disassembly/Reassembly: step 10, image 1 of 2 Nintendo Wii Remote & Wii Nunchuk Accessory Disassembly/Reassembly: step 10, image 2 of 2
    • You should now have all the pieces detached from the Wii remote.

    • You should have all the piece shown in the photos to the left.

  11. Nintendo Wii Remote & Wii Nunchuk Accessory Disassembly/Reassembly: step 11, image 1 of 3 Nintendo Wii Remote & Wii Nunchuk Accessory Disassembly/Reassembly: step 11, image 2 of 3 Nintendo Wii Remote & Wii Nunchuk Accessory Disassembly/Reassembly: step 11, image 3 of 3
    • My partner will now be putting back together the remote while only following the previous instructions I have made.

    • Return the the buttons back to their original spot along with the flexible plastic covering on top.

  12. Nintendo Wii Remote & Wii Nunchuk Accessory Disassembly/Reassembly: step 12, image 1 of 1
    • Place the rubber button under the plastic housing.

    • Align the two white tabs with the two indents on the sides and slide the plastic housing into place.

    • Put back the rumble motor back to its original spot.

    • Make sure your are putting the white plastic housing on the correct side of the motherboard as it was at the start.

  13. Nintendo Wii Remote & Wii Nunchuk Accessory Disassembly/Reassembly: step 13, image 1 of 2 Nintendo Wii Remote & Wii Nunchuk Accessory Disassembly/Reassembly: step 13, image 2 of 2
    • Return the sensor screen to its spot and slide it back into place.

    • Make sure the sensor screen is facing the right way.

  14. Nintendo Wii Remote & Wii Nunchuk Accessory Disassembly/Reassembly: step 14, image 1 of 2 Nintendo Wii Remote & Wii Nunchuk Accessory Disassembly/Reassembly: step 14, image 2 of 2
    • Place the B trigger back into its spot and click the two white tabs into place.

  15. Nintendo Wii Remote & Wii Nunchuk Accessory Disassembly/Reassembly: step 15, image 1 of 3 Nintendo Wii Remote & Wii Nunchuk Accessory Disassembly/Reassembly: step 15, image 2 of 3 Nintendo Wii Remote & Wii Nunchuk Accessory Disassembly/Reassembly: step 15, image 3 of 3
    • Lay the motherboard on top of the back side of the remote and push down gently til in place.

    • Be sure that the rumble motor is facing down while putting it back in place.

  16. Nintendo Wii Remote & Wii Nunchuk Accessory Disassembly/Reassembly: step 16, image 1 of 3 Nintendo Wii Remote & Wii Nunchuk Accessory Disassembly/Reassembly: step 16, image 2 of 3 Nintendo Wii Remote & Wii Nunchuk Accessory Disassembly/Reassembly: step 16, image 3 of 3
    • Lay the side of the remote with the motherboard on top of the side with the buttons.

    • Align the sides and press together until firmly in place.

    • Screw back in the screws.

  17. Nintendo Wii Remote & Wii Nunchuk Accessory Disassembly/Reassembly, Now for the Wii Nunchuk: step 17, image 1 of 2 Nintendo Wii Remote & Wii Nunchuk Accessory Disassembly/Reassembly, Now for the Wii Nunchuk: step 17, image 2 of 2
    • there are two small screws that need to be unscrewed on the bottom of the remote.

  18. Nintendo Wii Remote & Wii Nunchuk Accessory Disassembly/Reassembly: step 18, image 1 of 2 Nintendo Wii Remote & Wii Nunchuk Accessory Disassembly/Reassembly: step 18, image 2 of 2
    • Once the screws are removed, you can pop the top off.

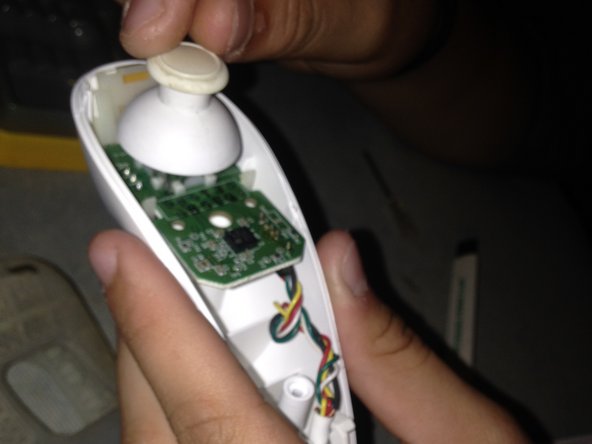
    • Next take the thumb stick and very gently take it off.

  19. Nintendo Wii Remote & Wii Nunchuk Accessory Disassembly/Reassembly: step 19, image 1 of 2 Nintendo Wii Remote & Wii Nunchuk Accessory Disassembly/Reassembly: step 19, image 2 of 2
    • The wire that plugs into the actual remote needs to be pulled apart from the whole nunchuk.

    • The wires can be by its self without the plastic controller housing.

  20. Nintendo Wii Remote & Wii Nunchuk Accessory Disassembly/Reassembly: step 20, image 1 of 2 Nintendo Wii Remote & Wii Nunchuk Accessory Disassembly/Reassembly: step 20, image 2 of 2
    • Flip the wires over and remove the shoulder buttons (white plastic).

    • It'll be easier to slide the other piece out to so make sure to gently slide it out.

  21. Nintendo Wii Remote & Wii Nunchuk Accessory Disassembly/Reassembly: step 21, image 1 of 2 Nintendo Wii Remote & Wii Nunchuk Accessory Disassembly/Reassembly: step 21, image 2 of 2
    • Then remove the plastic that connects the sensor and the shoulder buttons.

  22. Nintendo Wii Remote & Wii Nunchuk Accessory Disassembly/Reassembly: step 22, image 1 of 3 Nintendo Wii Remote & Wii Nunchuk Accessory Disassembly/Reassembly: step 22, image 2 of 3 Nintendo Wii Remote & Wii Nunchuk Accessory Disassembly/Reassembly: step 22, image 3 of 3
    • Now start to attach all of the pieces back starting with the hard plastic first.

    • Make sure not to force the sensor in the spot and slide it upwards.

    • The shoulder buttons are easy to put in but don't push it.

    • Example of my partner.

  23. Nintendo Wii Remote & Wii Nunchuk Accessory Disassembly/Reassembly: step 23, image 1 of 2 Nintendo Wii Remote & Wii Nunchuk Accessory Disassembly/Reassembly: step 23, image 2 of 2
    • Be careful when putting the wires back in because they are easy to fall out.

  24. Nintendo Wii Remote & Wii Nunchuk Accessory Disassembly/Reassembly: step 24, image 1 of 2 Nintendo Wii Remote & Wii Nunchuk Accessory Disassembly/Reassembly: step 24, image 2 of 2
    • She then attaches the analog stick to get it going again.

  25. Nintendo Wii Remote & Wii Nunchuk Accessory Disassembly/Reassembly: step 25, image 1 of 1
    • Lastly she easily popped the top back on and screwed the bottom to back on and got it to work as it used to.

Linda Bowers

Member since: 10/24/16

859 Reputation

1 Guide authored

View Statistics:

Past 24 Hours: 19

Past 7 Days: 88

Past 30 Days: 345

All Time: 41,059