
Nintendo Wii Classic Controller Disassembly

What you need

  1. Nintendo Wii Classic Controller Disassembly, Nintendo Wii Classic Controller Disassembly: step 1, image 1 of 3 Nintendo Wii Classic Controller Disassembly, Nintendo Wii Classic Controller Disassembly: step 1, image 2 of 3 Nintendo Wii Classic Controller Disassembly, Nintendo Wii Classic Controller Disassembly: step 1, image 3 of 3
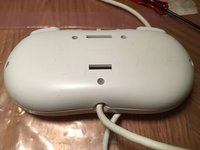
    • Released alongside the Wii on November 19, 2006, the Wii Classic Controller is a great alternative to the Wii Remote for Virtual Console games, however, it has some compatibility with regular Wii games, like Mario Kart Wii.

    • It features 2 analog sticks, a digital d-pad, 7 digital face buttons, 2 digital shoulder buttons, and 2 analog shoulder buttons. The controller connects through the extension plug in the Wii Remote, just like a Nunchuk.

    • The model number is "RVL-005." "RVL", found on all official Wii products, references the Wii's development codename "Revolution."

    • I found this Classic Controller at a thrift store for a few dollars, which is a pretty good deal, however it is kind of dirty, so I'm going to disassemble it in order to clean it.

  2. Nintendo Wii Classic Controller Disassembly: step 2, image 1 of 2 Nintendo Wii Classic Controller Disassembly: step 2, image 2 of 2
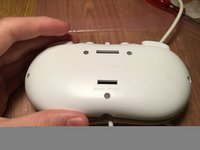
    • First things first: remove the 5 triwing screws on the back. Ensure you have a proper triwing screwdriver, as a Phillips or flathead screwdriver will strip the screw pretty easily.

  3. Nintendo Wii Classic Controller Disassembly, Remove Rear Panel Assembly: step 3, image 1 of 3 Nintendo Wii Classic Controller Disassembly, Remove Rear Panel Assembly: step 3, image 2 of 3 Nintendo Wii Classic Controller Disassembly, Remove Rear Panel Assembly: step 3, image 3 of 3
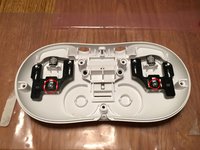
    • Upon removal of triwing screws, the rear panel assembly should lift right off.

  4. Nintendo Wii Classic Controller Disassembly, Remove Shoulder Buttons: step 4, image 1 of 3 Nintendo Wii Classic Controller Disassembly, Remove Shoulder Buttons: step 4, image 2 of 3 Nintendo Wii Classic Controller Disassembly, Remove Shoulder Buttons: step 4, image 3 of 3
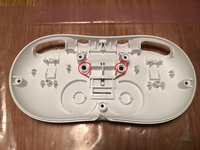
    • We now focus our attention on the ZL and ZR shoulder buttons inside the rear panel assembly.

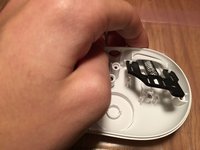
    • Push the tab for each on sticking straight up towards the top of the rear case and thr button should fall out.

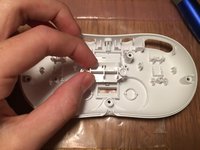
    • And now for the bigger, plain ol' L and R shoulder buttons. Remove the two silver screws holding the shoulder button assemblies to the rear panel.

    • Push down on the each button, then pull the black part of it towards you to free them from the rear panel.

  5. Nintendo Wii Classic Controller Disassembly, One More Thing: step 5, image 1 of 3 Nintendo Wii Classic Controller Disassembly, One More Thing: step 5, image 2 of 3 Nintendo Wii Classic Controller Disassembly, One More Thing: step 5, image 3 of 3
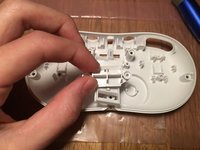
    • Remove the two black Phillips head screws pictured.

    • Lift the piece up and out of the rear panel.

  6. Nintendo Wii Classic Controller Disassembly, To The Logic Board: step 6, image 1 of 1
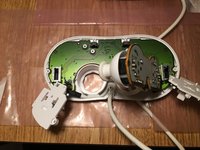
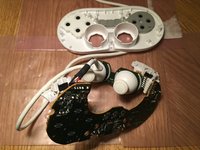
    • Set the rear panel aside and turn your attention to the other half of the Classic Controller with the logic board, analog sticks, and buttons.

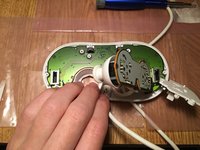
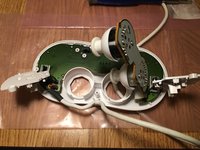
    • To start, remove two more black Phillips head screws holding the two Z shoulder button assemblies to the board.

  7. Nintendo Wii Classic Controller Disassembly, Reroute The Cord: step 7, image 1 of 3 Nintendo Wii Classic Controller Disassembly, Reroute The Cord: step 7, image 2 of 3 Nintendo Wii Classic Controller Disassembly, Reroute The Cord: step 7, image 3 of 3
    • Next, reroute the cord on the bottom.

    • Be careful not to pull the cord too hard or it could be separated from the board, requiring soldering to get back on. That said, the cord required more force to reroute than it looked, so just take it slow.

  8. Nintendo Wii Classic Controller Disassembly, Remove The Logic Board: step 8, image 1 of 2 Nintendo Wii Classic Controller Disassembly, Remove The Logic Board: step 8, image 2 of 2
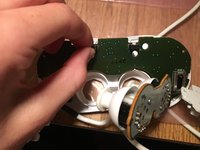
    • Now it's time to remove the logic board. Just pull it straight out; a good place to grip is where the ZL button lies on the board.

    • Be careful with the logic board and only place it on an anti-staic mat or bag, like I have in the picture. It's probably fine to just lay it on the table, but it's better to lay it on something anti-static if you have it.

  9. Nintendo Wii Classic Controller Disassembly, Remove The Analog Stick Covers: step 9, image 1 of 1
    • The analog stick covers just pull straight off from the stick on the logic board.

Conclusion

To reassemble your device, follow these instructions in reverse order.

3 other people completed this guide.

Talon Overstreet

Member since: 05/12/15

268 Reputation

1 Guide authored

0 Comments

Add Comment

View Statistics:

Past 24 Hours: 3

Past 7 Days: 27

Past 30 Days: 96

All Time: 6,488