Free Shipping on Domestic Orders $75+

PS4 Dualshock 4 trigger reassembly

What you need

    1. PS4 Dualshock 4 trigger reassembly, Preparing the triggers: step 1, image 1 of 2 PS4 Dualshock 4 trigger reassembly, Preparing the triggers: step 1, image 2 of 2
      • Remove these two triggers and springs from the backplate.

      • Find which trigger goes on which side and put the springs in the trigger part facing towards the inside of the controller.

      Ask FixBot

      Add Comment

    2. PS4 Dualshock 4 trigger reassembly, Attaching the triggers.: step 2, image 1 of 2 PS4 Dualshock 4 trigger reassembly, Attaching the triggers.: step 2, image 2 of 2
      • On these two clips...

      • Push down the trigger until it clicks on both sides.

      • Make sure that the one spring part is inside the rail (marked cyan) and the other outside the whole assembly (green).

      Ask FixBot

      Add Comment

    3. PS4 Dualshock 4 trigger reassembly, Connecting the light bar: step 3, image 1 of 1
      • Connect the light bar cable using your fingers. Make sure it is fully pushed down and that is plugged in the right way.

      Ask FixBot

      Add Comment

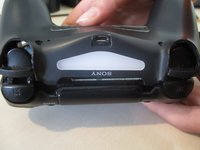
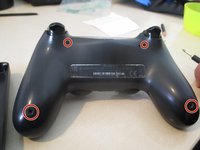
    4. PS4 Dualshock 4 trigger reassembly, Closing the cover: step 4, image 1 of 2 PS4 Dualshock 4 trigger reassembly, Closing the cover: step 4, image 2 of 2
      • close the cover starting from the side of the triggers. Don't worry if it's a bit hard to do so, but be careful so you don't break the plastic between the trigger and the bumper.

      • Push down until it clicks everywhere.

      • Finally, screw in these four screws using a PH0 screwdriver.

      Ask FixBot

      Add Comment

Finish Line

Cancel: I did not complete this guide.

26 other people completed this guide.

Devnol

Member since: 12/01/18

2,966 Reputation

4 Guides authored

3 Guide Comments

Thank you so much! I had a ps4 controller that had a broken r2 button and i had gotten a replacement (which is now having battery issues) Today I took the old controller apart… the spring had come out of the rail. That was it!

Dee - Reply Share

This guide is wrong. The top part spring should be inside the trigger, if you look at the other trigger it’s not exposed.

https://pureplaystation.com/wp-content/u...

Angus Yung - Reply Share

Thanks for pointing it out. I do not have this controller anymore as it was from a repair job so unfortunately, I cannot correct it. If you or someone else happens to have one and is able to take high-quality pictures I’d be more than grateful to accept your correction.

Devnol - Reply Share

Add Comment

View Statistics:

Past 24 Hours: 14

Past 7 Days: 108

Past 30 Days: 566

All Time: 53,844