
Nintendo Game Boy Advance SP Screen Replacement

What you need

  1. Nintendo Game Boy Advance SP Screen Replacement, Battery: step 1, image 1 of 3 Nintendo Game Boy Advance SP Screen Replacement, Battery: step 1, image 2 of 3 Nintendo Game Boy Advance SP Screen Replacement, Battery: step 1, image 3 of 3
    • Turn your GBA upside down so that the battery compartment is facing up.

    • Remove the one Phillips screw holding the battery compartment cover in place.

    • Remove the battery compartment cover.

  2. Nintendo Game Boy Advance SP Screen Replacement, Battery: step 2, image 1 of 3 Nintendo Game Boy Advance SP Screen Replacement, Battery: step 2, image 2 of 3 Nintendo Game Boy Advance SP Screen Replacement, Battery: step 2, image 3 of 3
    • Pry the battery up with your fingernail or Spudger.

  3. Nintendo Game Boy Advance SP Screen Replacement, Lower Case: step 3, image 1 of 2 Nintendo Game Boy Advance SP Screen Replacement, Lower Case: step 3, image 2 of 2
    • Remove the 6 Tripoint screws holding the case together.

    • Pry the 2 halves apart. Do not force it though, or you may break your GBA.

    • Set the bottom half away for later.

  4. Nintendo Game Boy Advance SP Screen Replacement, Motherboard: step 4, image 1 of 3 Nintendo Game Boy Advance SP Screen Replacement, Motherboard: step 4, image 2 of 3 Nintendo Game Boy Advance SP Screen Replacement, Motherboard: step 4, image 3 of 3
    • Unscrew the three Phillips screws holding the motherboard to the mid case.

    • WARNING!!! Do NOT Take the motherboard off yet. It is still Secured with A Ribbon Cable.

    • Turn the GBA so that it is like the Third photo.

  5. Nintendo Game Boy Advance SP Screen Replacement, Screen ZIF Connector: step 5, image 1 of 3 Nintendo Game Boy Advance SP Screen Replacement, Screen ZIF Connector: step 5, image 2 of 3 Nintendo Game Boy Advance SP Screen Replacement, Screen ZIF Connector: step 5, image 3 of 3
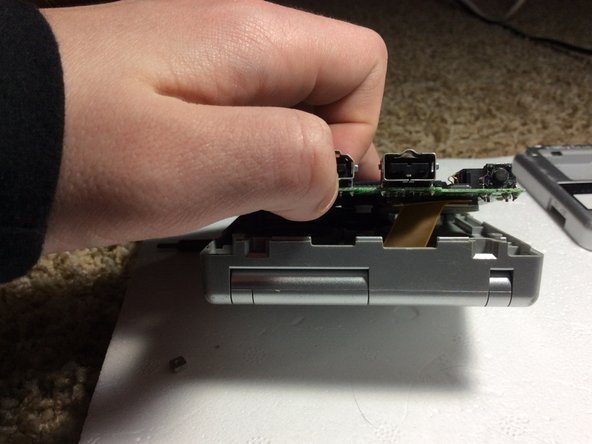
    • Fold the motherboard down like in the first photo. Be sure that the case is ON TOP of the motherboard.

    • Use a screwdriver or tweezers to unplug the ZIF Connector from the motherboard.

    • Take the Screen ribbon cable out of the motherboard.

  6. Nintendo Game Boy Advance SP Screen Replacement: step 6, image 1 of 3 Nintendo Game Boy Advance SP Screen Replacement: step 6, image 2 of 3 Nintendo Game Boy Advance SP Screen Replacement: step 6, image 3 of 3
    • Use a flat-blade screwdriver or the pointed side of a spudger to remove the 5 rubber screw covers.

    • Unscrew the 5 tri point screws under the rubber pads.

    • Close the GBA and unscrew the single Phillips screw on the bottom.

    • We are done with the screws now!

  7. Nintendo Game Boy Advance SP Screen Replacement, Screen: step 7, image 1 of 2 Nintendo Game Boy Advance SP Screen Replacement, Screen: step 7, image 2 of 2
    • Open up the GBA and everything should fall apart. Thread the ribbon cable through the opening and lift the screen out of the upper case.

    • You are done!!

Lucas Hoekstra (Lucas9810)

Member since: 02/21/17

1,351 Reputation

1 Guide authored

Team

OPEN Member of OPEN

Community

82 Members

25 Guides authored

View Statistics:

Past 24 Hours: 28

Past 7 Days: 260

Past 30 Days: 1,081

All Time: 73,359