
Installing Nintendo DSi Wi-Fi Antenna Board

What you need

  1. Installing Nintendo DSi Wi-Fi Antenna Board, Battery Cover Removal: step 1, image 1 of 2 Installing Nintendo DSi Wi-Fi Antenna Board, Battery Cover Removal: step 1, image 2 of 2
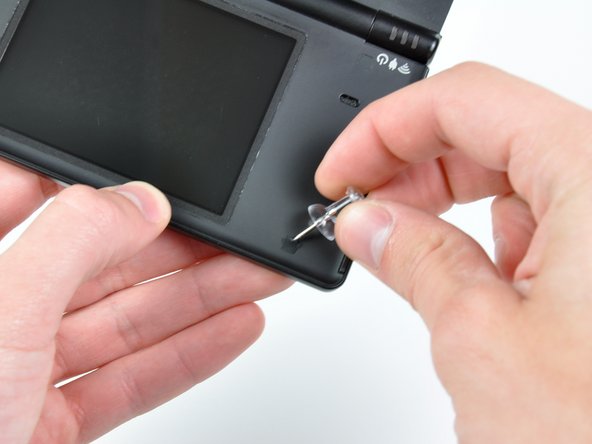
    • Unscrew the two Phillips screws securing the battery cover to the lower case.

    • The screws remain captive to the battery cover.

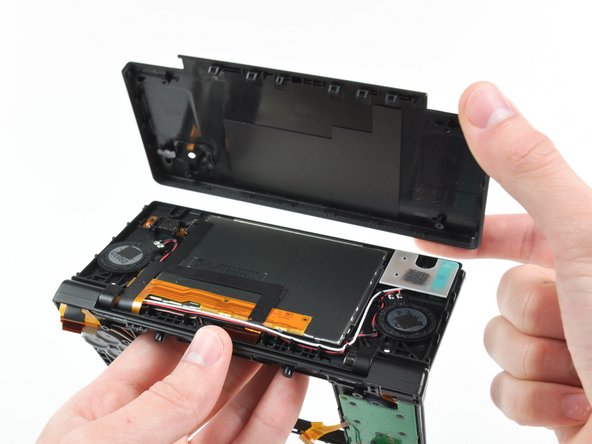
    • Grasp the battery cover and lift it out of the lower case.

    • If it's difficult to grasp, lightly tap the opposite side of the device.

  2. Installing Nintendo DSi Wi-Fi Antenna Board, Taking out the Battery: step 2, image 1 of 2 Installing Nintendo DSi Wi-Fi Antenna Board, Taking out the Battery: step 2, image 2 of 2
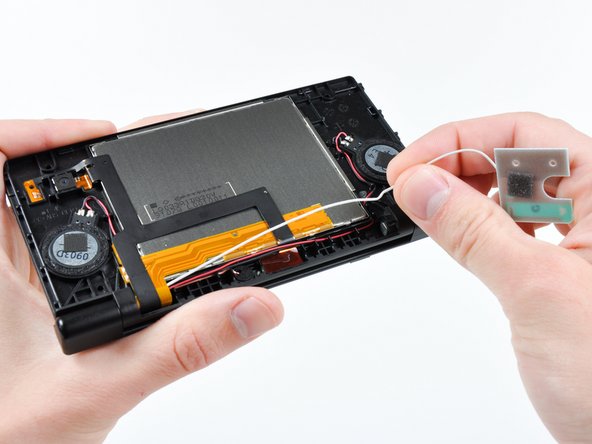
    • Using a spudger tool (or your fingernail), lift up the battery from the top.

    • There's a small tab on the top of the battery to make removal easier.

    • The liquid damage indicator sits underneath the battery. Pry gently, or you may damage the indicator.

    • Grasp the battery and remove it from the DSi.

  3. Installing Nintendo DSi Wi-Fi Antenna Board, Lower Case Assembly: step 3, image 1 of 2 Installing Nintendo DSi Wi-Fi Antenna Board, Lower Case Assembly: step 3, image 2 of 2
    • Two screws are hidden underneath two rubber feet highlighted in red.

    • Use the tip of a spudger to pry the rubber feet out of the lower case.

    • Depending on the age of your device, the rubber feet may crumble apart as you pry them out. If so, use a fine-tipped tool to scrape out any stuck pieces of rubber.

  4. Installing Nintendo DSi Wi-Fi Antenna Board: step 4, image 1 of 1
    • Remove the following screws securing the lower case to the body of the DSi:

    • Six 5.2 mm Phillips #00 screws.

    • One 2.7 mm Phillips #00 screw.

  5. Installing Nintendo DSi Wi-Fi Antenna Board: step 5, image 1 of 3 Installing Nintendo DSi Wi-Fi Antenna Board: step 5, image 2 of 3 Installing Nintendo DSi Wi-Fi Antenna Board: step 5, image 3 of 3
    • Insert the spudger in between the lower casing and lower panel near the top right corner of the DSi.

    • Carefully run the spudger along the edge of the outer casing, creating an opening between the body and the casing.

    • Continue running the spudger around the body of the DSi until the majority of the lower case has been separated.

  6. Installing Nintendo DSi Wi-Fi Antenna Board: step 6, image 1 of 2 Installing Nintendo DSi Wi-Fi Antenna Board: step 6, image 2 of 2
    • Carefully lift the lower casing from its bottom edge.

    • The lower case is still attached to the motherboard by the volume and SD board cable highlighted in red. Do not try to completely remove the lower case of the DSi yet.

    • Pry the volume and SD board cable up from its socket on the motherboard using a spudger.

    • Once the cable is completely removed, then you may take off the entire outer casing.

  7. Installing Nintendo DSi Wi-Fi Antenna Board, Wi-Fi Board: step 7, image 1 of 1
    • Pull the Wi-Fi board away from the motherboard by its edge closest to the headphone jack.

  8. Installing Nintendo DSi Wi-Fi Antenna Board: step 8, image 1 of 1
    • Pry the Wi-Fi antenna connector straight up from its socket on the Wi-Fi board.

  9. Installing Nintendo DSi Wi-Fi Antenna Board, Motherboard: step 9, image 1 of 1
    • Use the tip of a spudger to pry the power board connector out of its socket on the motherboard.

  10. Installing Nintendo DSi Wi-Fi Antenna Board: step 10, image 1 of 2 Installing Nintendo DSi Wi-Fi Antenna Board: step 10, image 2 of 2
    • Use your fingernail or the edge of a plastic opening tool to flip up the retaining flap on the following three ZIF sockets:

    • Lower touchscreen cable

    • Lower LCD cable

    • Power board cable

    • Be sure you are prying up on the hinged retaining flaps, not the sockets themselves.

    • After flipping up the locking tabs on all three sockets, use your fingers or a pair of tweezers to gently pull the cables straight out of their sockets.

  11. Installing Nintendo DSi Wi-Fi Antenna Board: step 11, image 1 of 2 Installing Nintendo DSi Wi-Fi Antenna Board: step 11, image 2 of 2
    • Use your fingernail or the edge of a plastic opening tool to carefully flip up the touchscreen ribbon cable retaining flap.

    • Make sure you are flipping up the retaining flap, not the socket itself.

    • Use the tip of a spudger to pull the touchscreen ribbon cable straight out of its socket.

  12. Installing Nintendo DSi Wi-Fi Antenna Board: step 12, image 1 of 2 Installing Nintendo DSi Wi-Fi Antenna Board: step 12, image 2 of 2
    • Use your fingernail or the edge of a plastic opening tool to carefully flip up the dual camera ribbon cable retaining flap.

    • Make sure you are flipping up the retaining flap, not the socket itself.

    • Use the tip of a spudger to pull the dual camera ribbon cable straight out of its socket.

  13. Installing Nintendo DSi Wi-Fi Antenna Board: step 13, image 1 of 1
    • With the tip of a spudger, Pry the microphone antenna up off its socket on the motherboard.

  14. Installing Nintendo DSi Wi-Fi Antenna Board: step 14, image 1 of 1
    • Remove the following four Phillips screws securing the motherboard to the DSi framework.

    • Three longer screws.

    • One short screw.

    • Pull the microphone and Wi-Fi antenna cables out of the notch cut into the motherboard near the headphone jack.

  15. Installing Nintendo DSi Wi-Fi Antenna Board: step 15, image 1 of 3 Installing Nintendo DSi Wi-Fi Antenna Board: step 15, image 2 of 3 Installing Nintendo DSi Wi-Fi Antenna Board: step 15, image 3 of 3
    • Slightly lift the motherboard upwards to reveal the upper LCD ribbon cable above the ABXY buttons .

    • Use your fingernail or the edge of a plastic opening tool to carefully flip up the upper LCD ribbon cable retaining flap.

    • Make sure you are flipping up the retaining flap, not the socket itself.

    • Remove the motherboard from the DSi.

  16. Installing Nintendo DSi Wi-Fi Antenna Board, Lower LCD Assembly: step 16, image 1 of 2 Installing Nintendo DSi Wi-Fi Antenna Board, Lower LCD Assembly: step 16, image 2 of 2
    • Use the tip of a spudger to pry the metal backing of the lower LCD up from the DSi's framework.

    • Lift the lower LCD assembly out of the DSi.

  17. Installing Nintendo DSi Wi-Fi Antenna Board, Wi-Fi Antenna Board: step 17, image 1 of 2 Installing Nintendo DSi Wi-Fi Antenna Board, Wi-Fi Antenna Board: step 17, image 2 of 2
    • Use a pushpin to remove the four plastic screw covers (highlighted in red) on the front bezel.

  18. Installing Nintendo DSi Wi-Fi Antenna Board: step 18, image 1 of 1
    • Remove the four Phillips screws securing the rear bezel to the front bezel.

  19. Installing Nintendo DSi Wi-Fi Antenna Board: step 19, image 1 of 3 Installing Nintendo DSi Wi-Fi Antenna Board: step 19, image 2 of 3 Installing Nintendo DSi Wi-Fi Antenna Board: step 19, image 3 of 3
    • Using two hands, gently slide the rear bezel upwards.

    • The rear bezel will move only about 2 mm.

    • Lift the rear bezel straight up out of the DSi.

  20. Installing Nintendo DSi Wi-Fi Antenna Board: step 20, image 1 of 1
    • De-route the Wi-Fi antenna cable from its slot in the bottom front bezel.

  21. Installing Nintendo DSi Wi-Fi Antenna Board: step 21, image 1 of 2 Installing Nintendo DSi Wi-Fi Antenna Board: step 21, image 2 of 2
    • Lift the Wi-Fi board off its mounting posts on the top front bezel.

    • De-route the Wi-Fi antenna cable through the hinge and remove it from the DSi.

View Statistics:

Past 24 Hours: 4

Past 7 Days: 14

Past 30 Days: 34

All Time: 8,731