Introduction
This guide has been updated by iFixit staff! Read the new, official guide here.
This guide will help you replace a broken touch sensor or bottom LCD on your DSi. Follow this guide if the system does not respond to input on the touch screen, or if the lower screen becomes cracked. You will need a new bottom LCD and/or touch screen sensor.
What you need
-
Step 1 Battery
Careful: steps 1-2 are sourced from a guide that's marked as in-progress.
-
Loosen the two screws on the battery panel. Then lift the panel up to remove it.
-
-
-
L Button.
-
Top of the battery pack.
-
To remove the battery pack, place your fingernail or a spudger at the top of the battery near the L button. Gently lift the battery out.
-
-
-
Two screws are hidden underneath two rubber feet highlighted in red.
-
Use the tip of a spudger to pry the rubber feet out of the lower case.
-
-
-
Remove the following screws securing the lower case to the body of the DSi:
-
Six 5.2 mm Phillips #00 screws.
-
One 2.7 mm Phillips #00 screw.
-
-
-
Insert the spudger in between the lower casing and lower panel near the top right corner of the DSi.
-
Carefully run the spudger along the edge of the outer casing, creating an opening between the body and the casing.
-
Continue running the spudger around the body of the DSi until the majority of the lower case has been separated.
-
-
-
Carefully lift the lower casing from its bottom edge.
-
Pry the volume and SD board cable up from its socket on the motherboard using a spudger.
-
Once the cable is completely removed, then you may take off the entire outer casing.
-
-
-
-
Pull the Wi-Fi board away from the motherboard by its edge closest to the headphone jack.
-
-
Step 9 Disconnecting Nintendo DSi Battery Board
Careful: steps 9-10 are sourced from a guide that's marked as in-progress.
-
Flip up the black latch and disconnect the D-Pad/Power Button ribbon cable.
-
-
-
The connector is two pieces -- a white "male" piece (connected to the wires), and a beige "female" part (soldered to the main board).
-
There is a small "notch" in the female part, to give you a place to insert a small flat-head screwdriver. Put the corner of your screwdriver in there, and twist it gently to push the white part up (away from the main board). Do not try to pull it to the right (towards the battery board).
-
-
-
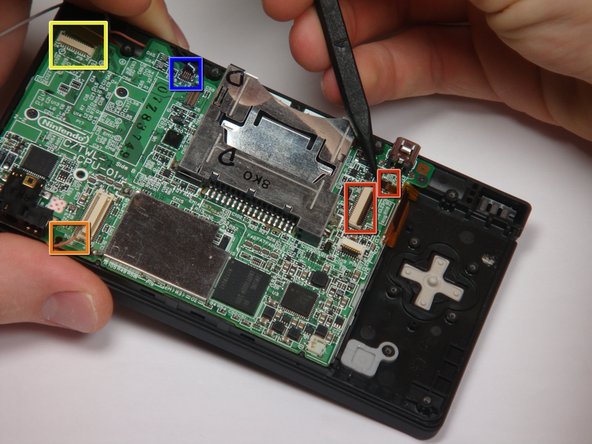
If you have not already done so, disconnect the two bottom-LCD ribbon cables from the main board by prying up the black latches and pulling the cable out to the side.
-
The ribbon cable (marked in blue) for the touch screen is particularly thin and fragile; be careful to avoid bending it more than necessary.
-
Flip up the latch and remove the touch screen cable.
-
Flip up the latch and remove the top-screen ribbon cable.
-
Pry up on the orange cable to disconnect it from the main board, much like the antenna cable on the Wi-Fi module.
-
-
-
Remove 4 Phillips screws from the board.
-
Lift the main board from the bottom end and flip it over to reveal the last connector.
-
-
-
Reach under the front of the device, and push the bottom screen towards you, out of the frame.
-
-
-
The bottom LCD assembly is actually two pieces which are glued together; if you replace one, you need to keep the working part and use it with the new part.
-
Carefully separate the two pieces by inserting a spudger into the groove between the metal piece and the darker piece, then pry them apart.
-
Set aside the broken piece; you should now have one working touch screen and one working bottom LCD, as two separate pieces.
-
-
-
Lay the working touch screen down into the frame from the back side, with the ribbon cable oriented as shown.
-
-
-
Place the LCD on top of the touch screen, with the two ribbon cables pointing towards the battery board (as shown in the picture).
-
Make sure that both the white and pink cables are tucked into the "groove" formed by small plastic pegs; they must not overlap the screw threads or the buttons, or you may damage them while reassembling the device.
-


