
Nikon D7100 LCD Screen Replacement

What you need

  1. Nikon D7100 LCD Screen Replacement, LCD Screen: step 1, image 1 of 1
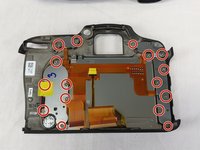
    • Remove the five screws on the bottom of the camera with a JIS #000 head screwdriver.

  2. Nikon D7100 LCD Screen Replacement: step 2, image 1 of 1
    • Remove the 3 screws under the battery flap and remove the bottom cover.

  3. Nikon D7100 LCD Screen Replacement: step 3, image 1 of 1
    • Remove the 2 screws inside the camera on the back corners.

  4. Nikon D7100 LCD Screen Replacement: step 4, image 1 of 1
    • Open the HDMI flap and remove the 2 screws.

  5. Nikon D7100 LCD Screen Replacement: step 5, image 1 of 1
    • Remove the screw next to the camera strap loop.

  6. Nikon D7100 LCD Screen Replacement: step 6, image 1 of 1
    • Remove the 2 screws on each side of the view finder.

  7. Nikon D7100 LCD Screen Replacement: step 7, image 1 of 1
    • Remove the 2 screws above and below the SD card flap.

  8. Nikon D7100 LCD Screen Replacement: step 8, image 1 of 1
    • Peel off the adhesive leather screw cover and remove the 2 screws under it.

  9. Nikon D7100 LCD Screen Replacement: step 9, image 1 of 2 Nikon D7100 LCD Screen Replacement: step 9, image 2 of 2
    • Remove the Diopter adjustment control sticker and remove the screw under it.

  10. Nikon D7100 LCD Screen Replacement: step 10, image 1 of 1
    • Separate the back panel of the camera from the actual camera.

    • Be careful not to tear any of the ribbon cables.

  11. Nikon D7100 LCD Screen Replacement: step 11, image 1 of 1
    • Disconnect the LCD ribbon cables and power cable from the motherboard.

  12. Nikon D7100 LCD Screen Replacement: step 12, image 1 of 2 Nikon D7100 LCD Screen Replacement: step 12, image 2 of 2
    • Unscrew all 16 screws around the back plate of the camera.

  13. Nikon D7100 LCD Screen Replacement: step 13, image 1 of 1
    • Then unscrew the remaining screws holding the back plate to the LCD.

    • Then simply remove the plate with the LCD.

Conclusion

To reassemble your device, follow these instructions in reverse order.

11 other people completed this guide.

Wesley Eveld

Member since: 02/20/18

731 Reputation

4 Guides authored

Team

USF Tampa, Team S11-G6, Cheng Spring 2018 Member of USF Tampa, Team S11-G6, Cheng Spring 2018

USFT-CHENG-S18S11G6

4 Members

5 Guides authored

9 Comments

I DID IT! A couple notes: 1) You don’t need to disconnect the ribbon cables from the body. I’m new to fine electronics repair like this and I didn’t want to mess around with more cables than necessary. 2) My body doesn’t have a plastic cover over the LCD (probably why it broke…) and as such I had to reallllly pry it off. 3) Learn how to reconnect ribbon cables - I had no idea.

Patrick O'Hare - Reply

Are all screws the same size ?

trevee359 - Reply

A couple of points. This is listed as a LCD display replacement. Says only said to buy tools… Need the LCD screen as well. No idea of cost or a link to buy same. Also, you do not show removing the screen and remounting. I appreciate all the instructions on screws, but do not feel this was complete. Thanks for your instructions to this point.

Carl Bryant II - Reply

That’s very easy guide to understand. I hope to see a full guide for the Nikon D7200. thank you http://www.nikonbundle.com/nikon-d7200-b...

Deve Marko - Reply

My replacement screen cost about £44 gbp pounds from China on Ebay. The main ribbon cable is released by flipping up the thin dark grey strip opposite the ribbon using a finger nail or plastic tool on the socket then you just gently pull the cable out, the thin cable is wee bit different, using a small screw driver or dentist tool just unclip and pull/push it down towards the thin ribbon cable then slide ribbon out. When all done clean the screen on the camera and fit a thin glass protector from JJC on ebay to give more protection.

a.brown.1 - Reply

Add Comment

View Statistics:

Past 24 Hours: 5

Past 7 Days: 28

Past 30 Days: 79

All Time: 7,250