
Nikon Coolpix S3100 Camera LCD Screen Replacement

What you need

  1. Nikon Coolpix S3100 Camera LCD Screen Replacement, Nikon Coolpix S3100 disassembly: step 1, image 1 of 3 Nikon Coolpix S3100 Camera LCD Screen Replacement, Nikon Coolpix S3100 disassembly: step 1, image 2 of 3 Nikon Coolpix S3100 Camera LCD Screen Replacement, Nikon Coolpix S3100 disassembly: step 1, image 3 of 3
    • Remove 8-2.46 mm screws from both sides and bottom of camera using a #000 Phillips screwdriver.

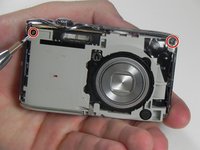
    • Remove 2 screws from left side. (picture 1)

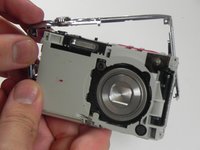
    • Remove 4 screws from bottom. (picture 2)

    • Remove 2 screws from right side. (picture 3)

  2. Nikon Coolpix S3100 Camera LCD Screen Replacement: step 2, image 1 of 2 Nikon Coolpix S3100 Camera LCD Screen Replacement: step 2, image 2 of 2
    • Remove black cover pulling up with left thumb. Hold silver cover with right thumb.

    • Remove silver cover lifting up with left thumb. Hold the camera with right thumb.

    • Once internal circuit board is exposed, the red and blue wire terminals at top center can provide a nasty shock from the charged flash capacitor (silver can to left of terminals). BE CAREFUL!

  3. Nikon Coolpix S3100 Camera LCD Screen Replacement: step 3, image 1 of 2 Nikon Coolpix S3100 Camera LCD Screen Replacement: step 3, image 2 of 2
    • Remove 2-2.10mm screws in the front of the camera using a #000 Phillips screwdriver.

    • Remove the two screws.

    • Gently pull up to detach the frame. (picture 2)

  4. Nikon Coolpix S3100 Camera LCD Screen Replacement, LCD Screen: step 4, image 1 of 1
    • Remove 2-2.10mm screws using a #000 Phillips screwdriver.

  5. Nikon Coolpix S3100 Camera LCD Screen Replacement: step 5, image 1 of 1
    • Gently pull the orange board to the right.

  6. Nikon Coolpix S3100 Camera LCD Screen Replacement: step 6, image 1 of 1
    • Lift screen up holding both corners.

  7. Nikon Coolpix S3100 Camera LCD Screen Replacement: step 7, image 1 of 1
    • Gently pull to the left to release from ZIF connector.

Conclusion

To reassemble your device, follow these instructions in reverse order.

3 other people completed this guide.

Jorge

Member since: 03/11/15

1,170 Reputation

7 Guides authored

Team

4 Comments

No mention of getting an electric shock while removing the case.Bit of a tingle anyway.I held the camera in a plastic bag after that.

Sindento 1 - Reply

This will probably not be replied to, but is there any reliable way to discharge the flash capacitor? Got shocked once, but I thought it was already discharged lol.

Anirban Bhattacharyya - Reply

Connect a 1k ohm resister between the black and red wire from the capacitor. Give it a few moments to discharge through the resistor. Don't discharge the capacitor without a resistor as you run a good chance of destroying the electronics. Wear your latex gloves too.

gary.grant - Reply

Easy to follow

Janet Miles - Reply

Add Comment

View Statistics:

Past 24 Hours: 0

Past 7 Days: 4

Past 30 Days: 11

All Time: 2,334