Introduction
Use this guide to replace the battery in the Nexus 4's battery or to disconnect the battery before accessing the internal components. This short repair will only take a few minutes.
What you need
-
Tool used on this step:SIM Card Eject Tool$2.99
-
Power off the phone, by long-pressing the power button and touching Power off.
-
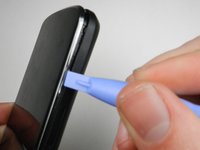
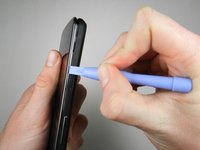
Remove the SIM tray using the SIM Card Eject Tool.
 Ask FixBot
-
-
Tool used on this step:T5 Torx Screwdriver$5.49
-
Remove the two screws from the bottom of the phone with a T5 Torx Screwdriver.
-
-
-
-
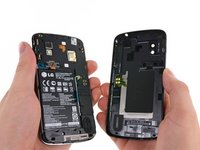
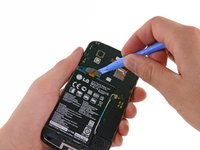
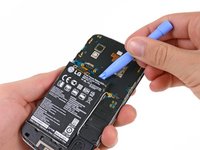
Gently open the back case by prying along the edge of the cover, starting at a corner of the phone and circling around the phone using a plastic opening tool.
-
-
-
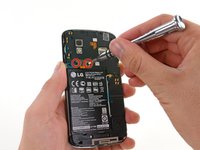
Remove the two 1.8 mm Phillips screws holding down the battery connector.
-
Using a plastic opening tool, disconnect the battery cable from its socket on the motherboard.
-
-
Tool used on this step:Plastic Cards$2.99
-
Remove the blue tape that secures the white antenna cable to the battery.
-
Using a spudger, carefully disconnect the white antenna cable.
-
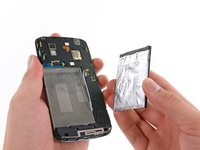
Carefully pry the battery out with a Plastic Opening Tool, starting at the top left-hand corner and working down towards the bottom right-hand corner.
-


To reassemble your device, follow these instructions in reverse order. Start by seating the top of the back to the phone, then gently snap the back in place working from the top to the bottom.
Cancel: I did not complete this guide.
153 other people completed this guide.
Team

Cal Poly, Team 3-32, Amido Winter 2013 Member of Cal Poly, Team 3-32, Amido Winter 2013
CPSU-AMIDO-W13S3G32
4 Members
8 Guides authored
14 Guide Comments
If you can't power on after battery replace:
Charge for an hour
Try holding down power plus volume down while plugging in power
If that doesn't work replug inside battery connector (this fixed for me)
Recommend data backup before in case you can't get it booting.
Just did this - thanks for all the instructions, easy if you have the right tools
followed these instructions and the device boots up OK but then immediately shuts down. getting into recovery mode and checking the logs I can see that the phone thinks the battery is over temperature (790C vs max of 68C). Hopefully it's just a poor connection where I fitted it. I'll take it apart and try again later.