Introduction
Steps for back cover removal.
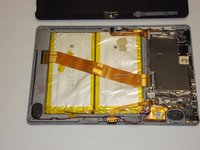
You will need to remove the cover to do internal repairs on the Flexx 10. It is held in place by plastic clips that are integrated into the cover. Care should be taken to try to leave these clips intact so the cover will stay on when reassembled.
What you need
-
-
To begin, turn off the power to the device and remove the screen from the keyboard.
-
Open the 2-in-1, and hold the screen.
-
Press the silver button at the top of the keyboard.
-
When the screen lifts up, gently lift the screen away from the keyboard.
 Ask FixBot
-
-
-
-
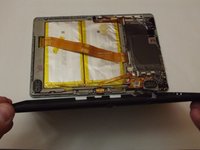
You may use your fingers, or a spudger. Be careful not to break your cover OR your fingernail. Removing the cover requires good judgement.
-
The goal is to separate the black from the silver. Start in a corner, or a flat edge -- whichever works best for you. Remember to not use too much force.
-
Once you start the initial separation, keep going until you free one edge. The goal now is to free three edges of the rectangle.
-
If your progress stops on one side of the rectangle, go to the other side and try there.
-


To reassemble your device, follow these instructions in reverse order.
Cancel: I did not complete this guide.
One other person completed this guide.
Team

Western Carolina University, Team S1-G4, Virtue Fall 2017 Member of Western Carolina University, Team S1-G4, Virtue Fall 2017
WCU-VIRTUE-F17S1G4
5 Members
12 Guides authored