
New Klipper Bed Mesh Update

What you need

  1. New Klipper Bed Mesh Update, Add New Macro To Existing Macro Group: step 1, image 1 of 3 New Klipper Bed Mesh Update, Add New Macro To Existing Macro Group: step 1, image 2 of 3 New Klipper Bed Mesh Update, Add New Macro To Existing Macro Group: step 1, image 3 of 3
    • Under Update Manger, make sure Elements is up to date

    • You will start at Step 1 or Step 2 depending on your configuration

    • If you don't have Macro Groups setup, go to Step 2

    • Open Mainsail Settings

    • Select Macros

    • Edit Standby Only Macros

    • Click Edit

    • Add Build_Bed_Mesh

  2. New Klipper Bed Mesh Update, Add New Macro without Macro Groups: step 2, image 1 of 2 New Klipper Bed Mesh Update, Add New Macro without Macro Groups: step 2, image 2 of 2
    • Open Mainsail settings

    • Select Macros

    • Under Management, make sure "Simple" is selected

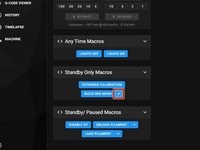
    • Make sure Build Bed Mesh macro is turned on as shown

  3. New Klipper Bed Mesh Update, Set Macro Visibility (Macro Groups Only): step 3, image 1 of 1
    • This macro should only be performed outside of printing so, limited visibility should be set.

    • Visibility can only be set with Macro Groups.

    • Click the diagonal Zs to set visibility to standby only.

  4. New Klipper Bed Mesh Update, Creating A Bed Mesh: step 4, image 1 of 3 New Klipper Bed Mesh Update, Creating A Bed Mesh: step 4, image 2 of 3 New Klipper Bed Mesh Update, Creating A Bed Mesh: step 4, image 3 of 3
    • Make sure the bed is clear before starting this macro!

    • The Build Bed Mesh macro must be ran for each bed temperature. So, you'll have one that matches the temperature in each of your filament profiles. For example: ABS/ASA(110C), PETG(80C), PLA (60C), TPU (35C)

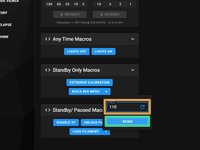
    • To start the macro, select the dropdown arrow and enter the bed temperature (orange) that matches what's in your slicer profile. For Super Slicer, it's in the filament profile. Press Send (green)

    • The process is fully automated and will auto-save once complete, then the firmware restarts. To reiterate, This process will need to be repeated for each material bed temperature.

    • You can create all profiles sequentially, starting with the lowest temperature.

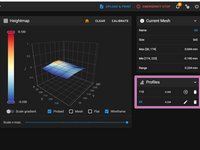
    • You should now see each mesh saved/ displayed as a mesh profile with the bed temperature as the name.

    • Do not change this name as the Print_Start macro is looking for specific parameters.

Finish Line

AJ Pereira

Member since: 05/29/20

2,679 Reputation

16 Guides authored

Team

Tiny Machines 3D Member of Tiny Machines 3D

Community

5 Members

40 Guides authored

0 Comments

Add Comment

View Statistics:

Past 24 Hours: 1

Past 7 Days: 8

Past 30 Days: 57

All Time: 2,509