
Netgear WGR614v9 Lower Case Replacement

What you need

  1. Netgear WGR614v9 Lower Case Replacement, Lower Case: step 1, image 1 of 1
    • Rotate the device so that the bottom is facing up.

  2. Netgear WGR614v9 Lower Case Replacement: step 2, image 1 of 2 Netgear WGR614v9 Lower Case Replacement: step 2, image 2 of 2
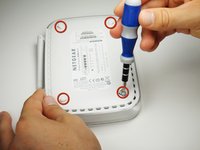
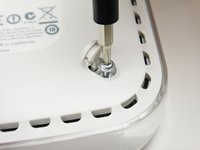
    • Lift up all four rubber pads on the bottom of the router with the plastic opening tool.

    • Be careful not to pull the rubber pads all the way out when lifting as they are difficult to reinsert.

  3. Netgear WGR614v9 Lower Case Replacement: step 3, image 1 of 2 Netgear WGR614v9 Lower Case Replacement: step 3, image 2 of 2
    • Unscrew the four 11.8 mm T-8 torx screws from the bottom of the router.

  4. Netgear WGR614v9 Lower Case Replacement: step 4, image 1 of 1
    • Lift the bottom casing straight up from the router.

Conclusion

To reassemble your device, follow these instructions in reverse order.

One other person completed this guide.

Ryan Murphy

Member since: 10/03/11

488 Reputation

4 Guides authored

Team

Cal Poly, Team 21-24, Maness Fall 2011 Member of Cal Poly, Team 21-24, Maness Fall 2011

CPSU-MANESS-F11S21G24

4 Members

11 Guides authored

0 Comments

Add Comment

View Statistics:

Past 24 Hours: 1

Past 7 Days: 5

Past 30 Days: 13

All Time: 1,635