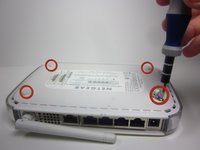
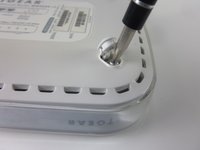
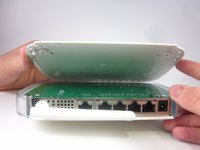
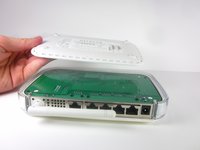
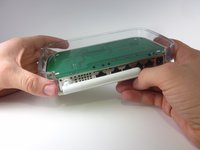
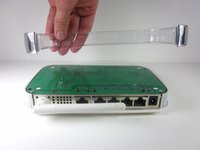
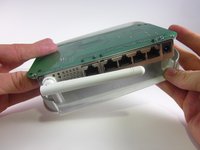
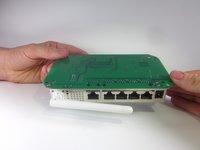
NETGEAR WGT624 v3 Motherboard Replacement

What you need

  1. NETGEAR WGT624 v3 Motherboard Replacement, Lower Case: step 1, image 1 of 1
    • Turn the device so that the bottom is facing up.

  2. NETGEAR WGT624 v3 Motherboard Replacement: step 2, image 1 of 3 NETGEAR WGT624 v3 Motherboard Replacement: step 2, image 2 of 3 NETGEAR WGT624 v3 Motherboard Replacement: step 2, image 3 of 3
    • Use the plastic opening tool to carefully lift the rubber stops in each corner.

    • Do not completely remove the rubber stops, because they are difficult to replace.

  3. NETGEAR WGT624 v3 Motherboard Replacement: step 3, image 1 of 2 NETGEAR WGT624 v3 Motherboard Replacement: step 3, image 2 of 2
    • Unscrew the 4 11.8 mm T-8 Torx screws from each corner of the device.

  4. NETGEAR WGT624 v3 Motherboard Replacement: step 4, image 1 of 2 NETGEAR WGT624 v3 Motherboard Replacement: step 4, image 2 of 2
    • Lift the lower case straight up from the rest of the router.

  5. NETGEAR WGT624 v3 Motherboard Replacement, Motherboard: step 5, image 1 of 2 NETGEAR WGT624 v3 Motherboard Replacement, Motherboard: step 5, image 2 of 2
    • Remove the clear plastic casing by lifting it straight up from the router.

  6. NETGEAR WGT624 v3 Motherboard Replacement: step 6, image 1 of 2 NETGEAR WGT624 v3 Motherboard Replacement: step 6, image 2 of 2
    • Separate the motherboard from the top shell by lifting it straight up from the router.

Conclusion

To reassemble your device, follow these instructions in reverse order.

One other person completed this guide.

Corey Worthington

Member since: 01/24/13

50 Reputation

1 Guide authored

Team

Cal Poly, Team 3-31, Amido Winter 2013 Member of Cal Poly, Team 3-31, Amido Winter 2013

CPSU-AMIDO-W13S3G31

3 Members

12 Guides authored

0 Comments

Add Comment

View Statistics:

Past 24 Hours: 2

Past 7 Days: 9

Past 30 Days: 11

All Time: 535