
Motorola Moto G5s Plus Battery Replacement

What you need

  1. Motorola Moto G5s Plus Battery Replacement, Display: step 1, image 1 of 3 Motorola Moto G5s Plus Battery Replacement, Display: step 1, image 2 of 3 Motorola Moto G5s Plus Battery Replacement, Display: step 1, image 3 of 3
    • Power off the phone before you begin.

    • Bring the heat gun one to two inches from the edges of the display to melt the display adhesive.

    • Spend equal amounts of time applying heat around the entire edge of the phone.

    The screen is not coming off. I have set the temperature at 125 Celsius on my smd rework station and have tried heating up to 3 minutes. I am focusing heat on the lower part. The Adhesive doesn't become loose even a bit. I do not want to increase temperature further or heat for a longer time period before asking experts. Does moto g5 sPlus use a stronger adhesive?

    Sahil Singh - Reply

  2. Motorola Moto G5s Plus Battery Replacement: step 2, image 1 of 2 Motorola Moto G5s Plus Battery Replacement: step 2, image 2 of 2
    • Attach the suction cup to the display slightly to the left of center.

    • Exert a moderate force to pull on the suction cup. The display will come loose.

  3. Motorola Moto G5s Plus Battery Replacement: step 3, image 1 of 3 Motorola Moto G5s Plus Battery Replacement: step 3, image 2 of 3 Motorola Moto G5s Plus Battery Replacement: step 3, image 3 of 3
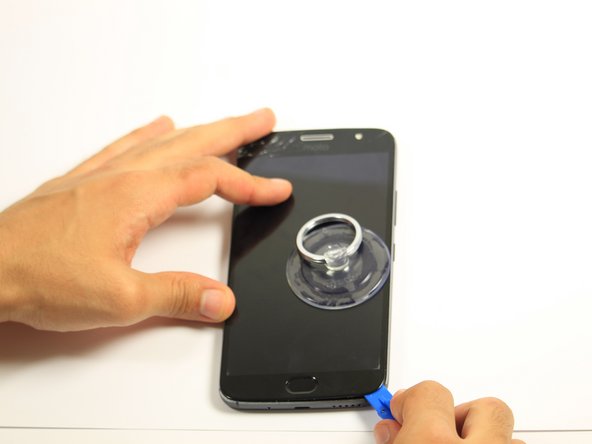
    • Insert the opening tool inside the loosened edge.

    • Gradually work the opening tool around the edge of the entire screen to cut through the adhesive.

    • Do not wedge the opening tool too far beneath the screen. Using too much force can result in torn connector cables.

    Note that the adhesive is much wider at top and bottom than along the sides. Cut deeper there, except for the fingerprint sensor.

    Mark I - Reply

  4. Motorola Moto G5s Plus Battery Replacement: step 4, image 1 of 3 Motorola Moto G5s Plus Battery Replacement: step 4, image 2 of 3 Motorola Moto G5s Plus Battery Replacement: step 4, image 3 of 3
    • The display should now be entirely loose, attached only by the connectors at the top of the device and the fingerprint sensor connector at the bottom of the device.

    • Press down on the fingerprint sensor with the display slightly raised to disconnect it from the display.

    • If the fingerprint sensor does not come loose, use the heat gun to loosen its adhesive.

  5. Motorola Moto G5s Plus Battery Replacement: step 5, image 1 of 2 Motorola Moto G5s Plus Battery Replacement: step 5, image 2 of 2
    • The cables at the top of the device are fragile. If you are using this guide as a prerequisite for replacing another part, be careful not to tear the cables while lifting the screen.

    • Remove the one 5mm Torx-5 screw located by the connector cables in the top right corner of the device.

  6. Motorola Moto G5s Plus Battery Replacement: step 6, image 1 of 2 Motorola Moto G5s Plus Battery Replacement: step 6, image 2 of 2
    • Grab the unscrewed metal plate with your blunt tweezers.

    • Slide the metal plate to the left and then out to remove it.

    • Removing the plate will expose the display assembly's connection to the phone's motherboard.

  7. Motorola Moto G5s Plus Battery Replacement: step 7, image 1 of 2 Motorola Moto G5s Plus Battery Replacement: step 7, image 2 of 2
    • Disengage the two cable connectors by gently prying beneath the edge of the connector with the opening tool.

  8. Motorola Moto G5s Plus Battery Replacement: step 8, image 1 of 2 Motorola Moto G5s Plus Battery Replacement: step 8, image 2 of 2
    • Lift up the detached right connector from its housing using blunt tweezers.

    • The housing has light adhesive underneath it. Use a small amount of force to remove the connector from the housing.

  9. Motorola Moto G5s Plus Battery Replacement, Fingerprint Sensor: step 9, image 1 of 1
    • Remove the nine black 5mm Torx-5 screws.

    • Remove the seven silver 5mm Torx-5 screws.

    it took me an hour just to get the display open and I ended damaginging up the screen in the process so I do not recommend anyone doing it by themselves unless they are ok with wasting money on a new battery and the phone.

    George Jetson - Reply

  10. Motorola Moto G5s Plus Battery Replacement: step 10, image 1 of 2 Motorola Moto G5s Plus Battery Replacement: step 10, image 2 of 2
    • Remove the metal cover by prying underneath it with the opening tool.

  11. Motorola Moto G5s Plus Battery Replacement: step 11, image 1 of 3 Motorola Moto G5s Plus Battery Replacement: step 11, image 2 of 3 Motorola Moto G5s Plus Battery Replacement: step 11, image 3 of 3
    • Grab ahold of the fingerprint sensor and push it through the opening in the metal cover.

  12. Motorola Moto G5s Plus Battery Replacement: step 12, image 1 of 2 Motorola Moto G5s Plus Battery Replacement: step 12, image 2 of 2
    • Remove the fingerprint connector by gently prying underneath the connector with the opening tool.

  13. Motorola Moto G5s Plus Battery Replacement, Battery: step 13, image 1 of 1
    • The battery is now fully exposed and ready to be removed.

  14. Motorola Moto G5s Plus Battery Replacement: step 14, image 1 of 2 Motorola Moto G5s Plus Battery Replacement: step 14, image 2 of 2
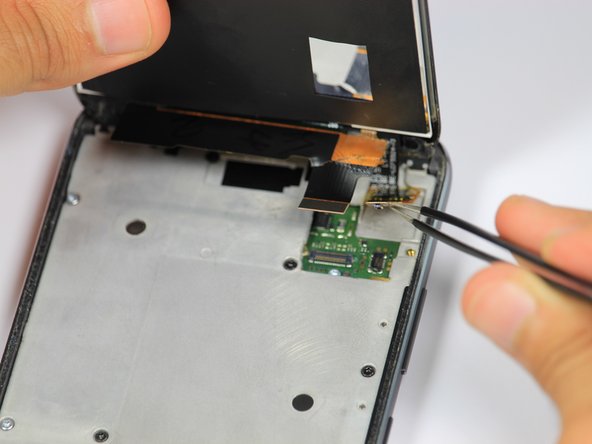
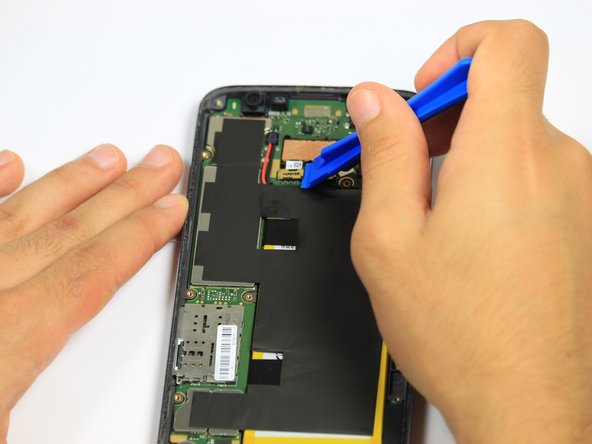
    • Use the opening tool to remove the two metal connectors located above the battery.

    • Apply a gentle upward pressure to loosen the metal plates.

    These connectors are for the cameras. There’s no need to remove them if you are simply replacing the battery. Step 14 can be deleted.

    Nigel Giles - Reply

  15. Motorola Moto G5s Plus Battery Replacement: step 15, image 1 of 3 Motorola Moto G5s Plus Battery Replacement: step 15, image 2 of 3 Motorola Moto G5s Plus Battery Replacement: step 15, image 3 of 3
    • Using the spudger, cut downwards along the black tape on left side of the battery.

  16. Motorola Moto G5s Plus Battery Replacement: step 16, image 1 of 1
    • Use the opening tool to disengage the black connector located above the battery.

  17. Motorola Moto G5s Plus Battery Replacement: step 17, image 1 of 1
    • Heating up the battery excessively could cause the battery to ignite

    • Use the heat gun along the back of the phone to loosen the adhesive that holds the battery in place.

    • Spend equal intervals of time on each area applying heat.

  18. Motorola Moto G5s Plus Battery Replacement: step 18, image 1 of 3 Motorola Moto G5s Plus Battery Replacement: step 18, image 2 of 3 Motorola Moto G5s Plus Battery Replacement: step 18, image 3 of 3
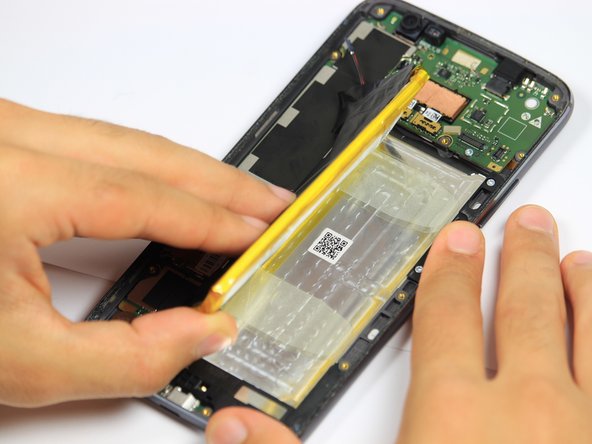
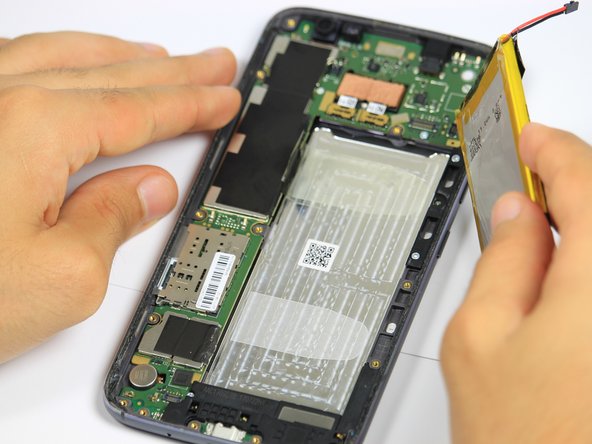
    • Insert the spudger underneath the right side of the battery.

    • Apply a moderate upward force along the length of battery, until the battery lifts out of place.

    • Remove the battery with your hand.

    It may be better to lift the battery by pulling up on the two back tape tabs at the left, rather than digging under it with the spudger to lift from the right. The top tab shows up well in the last photo.

    Mark I - Reply

Conclusion

To reassemble your device, follow these instructions in reverse order.

11 other people completed this guide.

Kevin George

Member since: 10/08/18

1,072 Reputation

4 Guides authored

Team

Cal Poly, Team S4-G5, White Fall 2018 Member of Cal Poly, Team S4-G5, White Fall 2018

CPSU-WHITE-F18S4G5

4 Members

5 Guides authored

One Comment

Hello,

I would like to chance the battery.

But for me it isn’t not clear how to glue the screen back again. I can not find any sealing at the market

Thanks

Jirik - Reply

Add Comment

View Statistics:

Past 24 Hours: 4

Past 7 Days: 19

Past 30 Days: 92

All Time: 12,529