
15% Off Selected iFixit Tools — Limited Time
Free Shipping on Domestic Orders $75+

Motorola Droid X Camera Replacement

What you need

  1. Motorola Droid X Camera Replacement, Battery: step 1, image 1 of 2 Motorola Droid X Camera Replacement, Battery: step 1, image 2 of 2
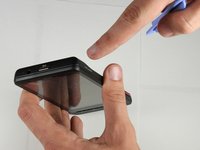
    • Locate the power button at the top of the phone. Depress power button for 2 seconds until a menu appears.

    Ask FixBot

    Add Comment

  2. Motorola Droid X Camera Replacement: step 2, image 1 of 2 Motorola Droid X Camera Replacement: step 2, image 2 of 2
    • Once the menu appears, select the "power off" option. Wait until the phone is completely off.

    Ask FixBot

    Add Comment

  3. Motorola Droid X Camera Replacement: step 3, image 1 of 2 Motorola Droid X Camera Replacement: step 3, image 2 of 2
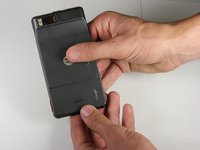
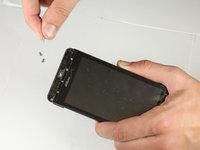
    • Place thumb on the back cover, and push down towards the bottom of the device. Once the cover releases, pull it away from the phone and set it aside.

    Ask FixBot

    Add Comment

  4. Motorola Droid X Camera Replacement: step 4, image 1 of 2 Motorola Droid X Camera Replacement: step 4, image 2 of 2
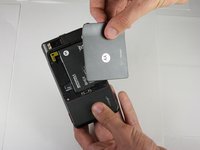
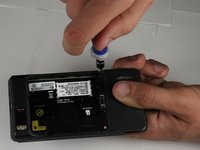
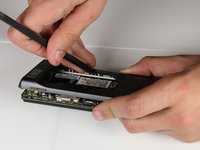
    • Find the yellow pull tab located in the upper left corner. Pull the tab until the battery dislodges. Grab the battery by the raised edge, and remove it from the case.

    Ask FixBot

    Add Comment

  5. Motorola Droid X Camera Replacement: step 5, image 1 of 1
    • The battery has been successfully removed.

    Ask FixBot

    Add Comment

  6. Motorola Droid X Camera Replacement, Motorola Droid X Rear Housing: step 6, image 1 of 1
    • Remove the micro SD card from its connector.

    Ask FixBot

    Add Comment

  7. Motorola Droid X Camera Replacement: step 7, image 1 of 3 Motorola Droid X Camera Replacement: step 7, image 2 of 3 Motorola Droid X Camera Replacement: step 7, image 3 of 3
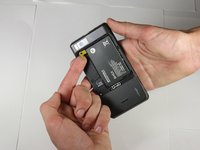
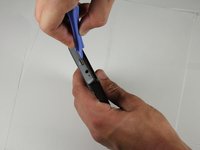
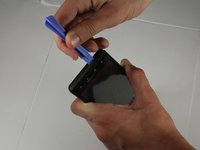
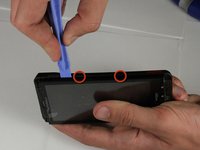
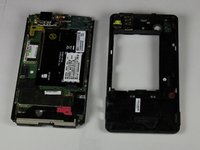
    • Locate the seam between the back case and the end cover on the top edge of the phone.

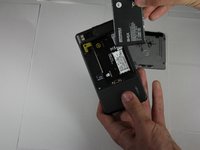
    • Use the plastic opening tool to detach the two clips by wedging the tool into the right side of the seam and moving right to left. Once the cover comes off set it aside

    Ask FixBot

    Add Comment

  8. Motorola Droid X Camera Replacement: step 8, image 1 of 3 Motorola Droid X Camera Replacement: step 8, image 2 of 3 Motorola Droid X Camera Replacement: step 8, image 3 of 3
    • Repeat step 2 on the bottom cover.

    Ask FixBot

    Add Comment

  9. Motorola Droid X Camera Replacement: step 9, image 1 of 3 Motorola Droid X Camera Replacement: step 9, image 2 of 3 Motorola Droid X Camera Replacement: step 9, image 3 of 3
    • Use a T5 Torx screwdriver to remove the screws in each corner of the phone.

    • The screws are very small so make sure not to lose them.

    Ask FixBot

    Add Comment

  10. Motorola Droid X Camera Replacement: step 10, image 1 of 2 Motorola Droid X Camera Replacement: step 10, image 2 of 2
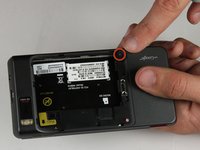
    • Flip the phone over and locate the screw on the middle of the left side. Unscrew it using the T5 Torx screwdriver and set it aside.

    Ask FixBot

    Add Comment

  11. Motorola Droid X Camera Replacement: step 11, image 1 of 2 Motorola Droid X Camera Replacement: step 11, image 2 of 2
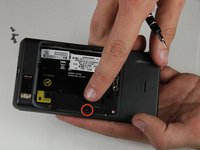
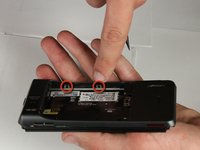
    • Identify the screw located in the bottom right corner of the battery case. Remove the screw with a T5 (or in some cases T6) torx screwdriver and set it aside.

    Ask FixBot

    Add Comment

  12. Motorola Droid X Camera Replacement: step 12, image 1 of 2 Motorola Droid X Camera Replacement: step 12, image 2 of 2
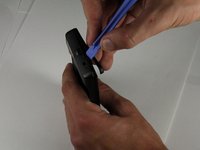
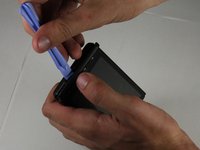
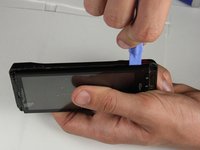
    • Locate the seam along the right edge of the phone. Use the prying tool to disconnect the two clips along the edge.

    Ask FixBot

    Add Comment

  13. Motorola Droid X Camera Replacement: step 13, image 1 of 3 Motorola Droid X Camera Replacement: step 13, image 2 of 3 Motorola Droid X Camera Replacement: step 13, image 3 of 3
    • Locate the two clips on the inside of the case and use the spudger tool to detach them from the case. To detach each clip, use the sharp end to press the small, black plastic in the center of the clip.

    Ask FixBot

    Add Comment

  14. Motorola Droid X Camera Replacement: step 14, image 1 of 2 Motorola Droid X Camera Replacement: step 14, image 2 of 2
    • After the clips are detached, remove the back case and set it aside.

    Ask FixBot

    Add Comment

  15. Motorola Droid X Camera Replacement, Motherboard: step 15, image 1 of 1
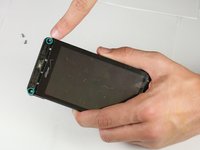
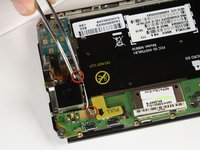
    • Remove the screws along both sides of the motherboard using a T3 Torx screwdriver. On some phones this may require a #1 Phillips Screw Driver.

    Ask FixBot

    Add Comment

  16. Motorola Droid X Camera Replacement: step 16, image 1 of 2 Motorola Droid X Camera Replacement: step 16, image 2 of 2
    Tool used on this step:
    Tweezers
    $4.99
    Buy
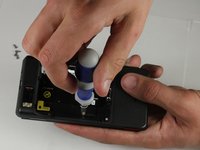
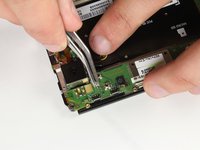
    • Carefully remove the white connecting wire from the motherboard using tweezers.

    • Use caution, this wire is delicate.

    Ask FixBot

    Add Comment

  17. Motorola Droid X Camera Replacement: step 17, image 1 of 2 Motorola Droid X Camera Replacement: step 17, image 2 of 2
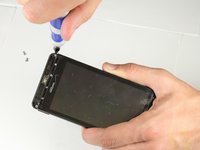
    • Scrape away the electrical tape that covers the LCD and digitizer cable using the spudger tool or a fingernail.

    Ask FixBot

    Add Comment

  18. Motorola Droid X Camera Replacement: step 18, image 1 of 1
    • Use the spudger tool to pop the Digitizer cable off of the motherboard.

    Ask FixBot

    Add Comment

  19. Motorola Droid X Camera Replacement: step 19, image 1 of 1
    • Carefully flip the small white connector up and away from the motherboard.

    Ask FixBot

    Add Comment

  20. Motorola Droid X Camera Replacement: step 20, image 1 of 1
    • Gently pull the flat gold cable out from the connector.

    Ask FixBot

    Add Comment

  21. Motorola Droid X Camera Replacement: step 21, image 1 of 1
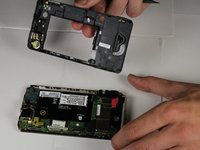
    • Carefully lift the motherboard and camera module up. Do not remove it from the phone!

    Ask FixBot

    Add Comment

  22. Motorola Droid X Camera Replacement: step 22, image 1 of 1
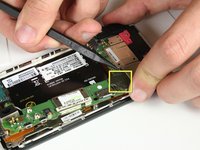
    • Using the spudger tool, pop the black cable connector off of the motherboard.

    Ask FixBot

    Add Comment

  23. Motorola Droid X Camera Replacement: step 23, image 1 of 1
    • It is to safe remove the motherboard from the phone.

    Ask FixBot

    Add Comment

  24. Motorola Droid X Camera Replacement, Camera: step 24, image 1 of 1
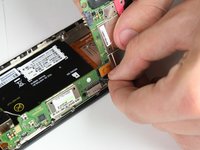
    • Gently peel the camera's orange and gold connection cable from the motherboard.

    Ask FixBot

    Add Comment

  25. Motorola Droid X Camera Replacement: step 25, image 1 of 1
    • Remove the black electrical tape covering the cameras connection cable.

    Ask FixBot

    Add Comment

  26. Motorola Droid X Camera Replacement: step 26, image 1 of 1
    • Flip up the small white connector. Then gently pull the orange cable out of the connecter.

    Ask FixBot

    Add Comment

  27. Motorola Droid X Camera Replacement: step 27, image 1 of 1
    • Reconnect the camera module by pushing the black end of the flat cable on the camera module into the white connector on the motherboard.

    Ask FixBot

    Add Comment

Conclusion

To reassemble your device, follow these instructions in reverse order.

Cancel: I did not complete this guide.

One other person completed this guide.

Sam Johnston

Member since: 10/03/12

576 Reputation

4 Guides authored

Team

Cal Poly, Team 18-40, Regan Fall 2012 Member of Cal Poly, Team 18-40, Regan Fall 2012

CPSU-REGAN-F12S18G40

3 Members

10 Guides authored

0 Guide Comments

Add Comment

View Statistics:

Past 24 Hours: 2

Past 7 Days: 7

Past 30 Days: 43

All Time: 2,526