Introduction
The rear chassis of the phone is constructed of plastic which if dropped or subject to other impacts can crack or chip. It also houses the loud speaker. If you have damage to either of these components, this guide will show you how to replace them
What you need
-
-
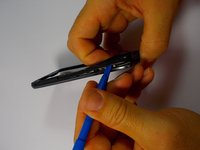
Begin by removing the back cover using the plastic opening tool. There are adhesive strips attached to the back cover, so take care when prying case to prevent cracking
-
The adhesive strips may stay on the back cover or the battery.
 Ask FixBot
-
-
-
-
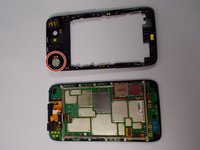
Now with the screws removed, use the plastic opening tool to lift the edges of the front assembly.
-
Continue to use the plastic opening tool around the edges of the device to remove the front assembly.
-
The speaker is located in the upper corner of the case. It it attached with adhesive and can be removed by gently prying with the plastic opening tool
-


To reassemble your device, follow these instructions in reverse order.
Cancel: I did not complete this guide.
2 other people completed this guide.
Team

UMass Dartmouth, Team 1-8, Miles Fall 2015 Member of UMass Dartmouth, Team 1-8, Miles Fall 2015
UMASSD-MILES-F15S1G8
3 Members
20 Guides authored