
Minolta QTsi Maxxum Shutter Button Replacement

What you need

  1. Minolta QTsi Maxxum Shutter Button Replacement, Shutter Button: step 1, image 1 of 1
    • Locate the battery compartment on the bottom panel of the camera.

    • Open the battery door by using a coin.

    • In the counterclockwise direction, twist the coin in the battery door groove to open it.

  2. Minolta QTsi Maxxum Shutter Button Replacement: step 2, image 1 of 1
    • Two batteries are located inside the battery chamber.

    • Remove the two batteries from the battery chamber by picking them up.

  3. Minolta QTsi Maxxum Shutter Button Replacement: step 3, image 1 of 1
    • There is a screw located underneath the batteries in the battery compartment.

    • Unscrew and remove the (1) black Phillips #00 5mm screw from the battery compartment.

    • Ensure good lighting before attempting to remove this screw because it is hard to see inside the compartment.

  4. Minolta QTsi Maxxum Shutter Button Replacement: step 4, image 1 of 1
    • From underneath the flash assembly, remove the (1) black Phillips #00 5mm screw

    • Be careful because you can lose the screw

  5. Minolta QTsi Maxxum Shutter Button Replacement: step 5, image 1 of 1
    • The only screws remaining that hold the top panel of the camera in place are located next to the view finder.

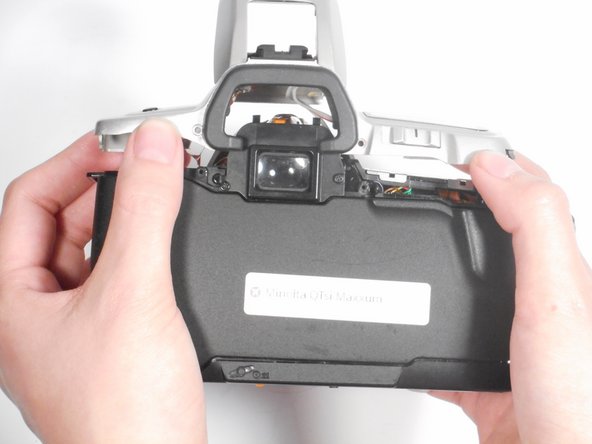
    • Remove the (2) black Phillips #00 5mm screws from both sides of the view finder.

    • Be careful because you can lose the screw

  6. Minolta QTsi Maxxum Shutter Button Replacement: step 6, image 1 of 2 Minolta QTsi Maxxum Shutter Button Replacement: step 6, image 2 of 2
    • The top panel of the camera should now be easy to lift off. If it is not, make sure that all screws and attachments, listed in steps 1-5, have been removed.

    • Once all screws are removed, lift the top panel from the camera.

    • Be careful when removing the top panel because there are wires connected to it.

  7. Minolta QTsi Maxxum Shutter Button Replacement: step 7, image 1 of 1
    • Use a metal spudger to push the button out of its socket so that you can place a new one in its place.

Conclusion

To reassemble your device, follow these instructions in reverse order.

One other person completed this guide.

Jordan Ellery

Member since: 10/10/16

388 Reputation

3 Guides authored

0 Comments

Add Comment

View Statistics:

Past 24 Hours: 0

Past 7 Days: 0

Past 30 Days: 4

All Time: 479