Introduction
This guide will demonstrate how to replace the Electric Motor on the Milwaukee Hex Impact Driver 2656-20. The first two steps will cover disassembly of the drill. The tools required for this repair consists of a T-10 Torx Screwdriver and a Soft Plastic Pick. The repair is considered Difficult in difficulty and will take approximately 25 minutes.
The steps in this guide are the same as the brush block assembly replacement guide.
What you need
-
-
Squeeze the red buttons on the battery.
-
While squeezing the red buttons, slide the battery forward and out to remove it from the device.
-
-
-
Lay the impact driver on its side.
-
Remove eight 16 mm and a single 19 mm screws using the T10 Torx Screwdriver.
-
Separate the two halves by pulling up on the top half.
-
Lay the top half to the side.
-
-
-
-
Remove the two 6mm screws on the back of the brush card assembly using the T10 Torx screwdriver.
-
-
-
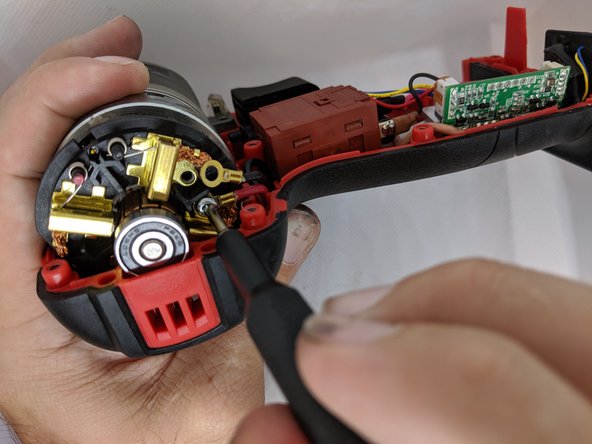
Insert the opening pick between one of the carbon brushes and the electric motor to help compress the spring.
-
While compressing the spring slide that section of the brush block assembly over the bearing.
-
The brush block assembly should easily slide over the bearing now , if it does not repeat the above process as needed for the other three carbon brushes.
-


To reassemble your device, follow these instructions in reverse order.
To reassemble your device, follow these instructions in reverse order.
Team

Embry-Riddle Aeronautical University, Team S24-G2, McClure Fall 2019 Member of Embry-Riddle Aeronautical University, Team S24-G2, McClure Fall 2019
ERAU-MCCLURE-F19S24G2
4 Members
9 Guides authored