Free Shipping on Domestic Orders $75+

Microsoft Surface Pro 5 Screen Replacement

Archived Guide
This guide is retained solely for historical purposes. Use the updated version of the guide to perform your repair.

What you need

    1. Microsoft Surface Pro 5 Screen Replacement, Screen: step 1, image 1 of 1
      • Before you begin, discharge the Surface Pro's battery below 25%. A charged lithium-ion battery can catch fire and/or explode if accidentally damaged during the repair.

      • The display is strongly glued to the frame of the device.

      • To remove the display, first soften the adhesive by applying heat. You can use a heat pad, heat gun, or iOpener. In a pinch, a hair dryer can also work.

      • Be careful when using a heat gun, as too much heat can permanently damage the display and/or battery.

      • Steadily and evenly heat the perimeter of the display until it's too hot to touch, and try to maintain that temperature for several minutes.

      Ask FixBot

      Add Comment

    2. Microsoft Surface Pro 5 Screen Replacement: step 2, image 1 of 3 Microsoft Surface Pro 5 Screen Replacement: step 2, image 2 of 3 Microsoft Surface Pro 5 Screen Replacement: step 2, image 3 of 3
      • Use a suction cup or an iSclack to pull up on the glass and create a slight gap between the glass and the metal frame.

      • If your display is badly cracked, a suction cup may not adhere. It may help to first cover the display with a layer of packing tape. Alternatively, you can superglue your suction cup to the display.

      • Insert an opening pick into the gap.

      • Slide the pick around the sides and bottom of the display to cut the adhesive. Apply more heat as needed.

      • Work carefully—the glass is thin and will crack easily if you try to force it.

      • Separate the top edge last. There are antennas on both sides, so be careful not to damage them. Use more heat or a bit of isopropyl alcohol to help weaken the adhesive.

      Ask FixBot

      Add Comment

    3. Microsoft Surface Pro 5 Screen Replacement: step 3, image 1 of 2 Microsoft Surface Pro 5 Screen Replacement: step 3, image 2 of 2
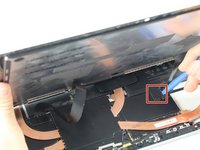
      • Pry up the metal shield covering the smaller ribbon cable port using the plastic opening tool.

      • Disconnect the smaller ribbon cable by prying up with the nylon spudger.

      Ask FixBot

      Add Comment

    4. Microsoft Surface Pro 5 Screen Replacement: step 4, image 1 of 2 Microsoft Surface Pro 5 Screen Replacement: step 4, image 2 of 2
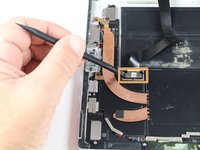
      • Pry up the metal shield covering the larger ribbon cable port using the plastic opening tool and remove.

      • Disconnect the larger ribbon cable by prying up with the nylon spudger.

      Ask FixBot

      Add Comment

    5. Microsoft Surface Pro 5 Screen Replacement: step 5, image 1 of 1
      Tool used on this step:
      Tesa 61395 Tape
      $8.95
      Buy
      • Remove the screen from the rest of the device .

      • To replace the adhesive securing the screen, carefully remove any old adhesive from both the device and the back of the display. Clean and prep the surface with isopropyl alcohol and a lint-free cloth, swiping the cloth in one direction (not back and forth). Apply a strong double-sided tape, such as 2 mm Tesa 61395.

      Ask FixBot

      Add Comment

Conclusion

To reassemble your device, follow these instructions in reverse order.

Cancel: I did not complete this guide.

Caleb Granch

Member since: 10/02/17

1,022 Reputation

2 Guides authored

Team

Cal Poly, Team S15-G3, Livingston Fall 2017 Member of Cal Poly, Team S15-G3, Livingston Fall 2017

CPSU-LIVINGSTON-F17S15G3

3 Members

97 Guides authored

0 Guide Comments

Add Comment

View Statistics:

Past 24 Hours: 0

Past 7 Days: 3

Past 30 Days: 13

All Time: 315