
Microsoft Surface Pro 3

What you need

  1. Microsoft Surface Pro 3, 显示屏: step 1, image 1 of 2 Microsoft Surface Pro 3, 显示屏: step 1, image 2 of 2
    • 开始之前,请将 Surface Pro 的电池电量放电至 25% 以下。如果在维修过程中意外损坏,充电的锂离子电池可能会起火或爆炸。

    • 显示屏与设备边框紧密粘合。

    • 要移除显示屏,首先要加热软化粘合剂。可以使用热垫、热风枪或 iOpener。如沒有以上工具,也可以使用吹风机。

    • 使用热风枪时要小心,因为过热可能会永久损坏显示屏和电池。

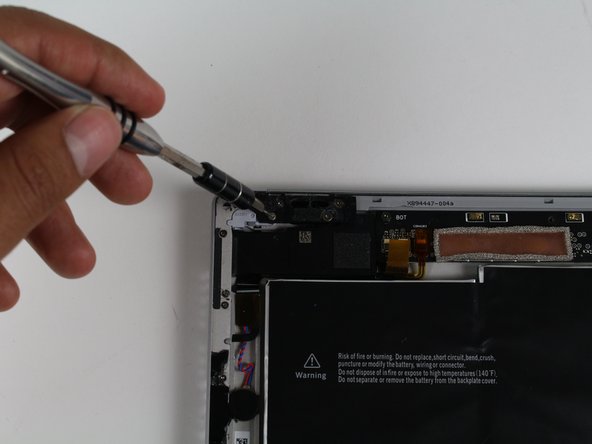
    • 稳步均匀地加热显示屏四周,直到热到无法触摸为止,并尽量将温度维持几分钟。
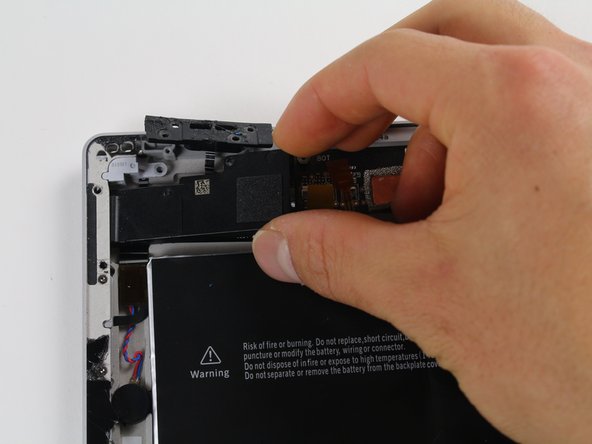
  2. Microsoft Surface Pro 3: step 2, image 1 of 2 Microsoft Surface Pro 3: step 2, image 2 of 2
    • 用吸盘或iSlack拉起玻璃,在玻璃和金属框之间形成一个小缝隙。

    • 如果显示屏严重破裂,吸盘可能无法吸附。首先在显示屏上覆盖一层胶带可能会有帮助。或者,你也可以将吸盘粘在显示屏上。

    • 小心地将三角撬片插入屏幕和设备之间的缝隙中,切割粘合剂。

    • 在显示屏的侧面和底部滑动三角撬片以切割粘合剂。必要时再加热。

    • 小心操作—显示屏的玻璃很薄,如果用力很容易破裂。

    • Wi-Fi 天线粘在屏幕上沿的边框下面(在摄像头的两侧),很容易损坏。分离顶边时要格外小心,必要时要多加热。

  3. Microsoft Surface Pro 3: step 3, image 1 of 3 Microsoft Surface Pro 3: step 3, image 2 of 3 Microsoft Surface Pro 3: step 3, image 3 of 3
    • 继续用热风枪加显示屏的各个部分。

    • 使用热风枪加热显示屏并且同时使用三角塑料撬片小心的撬开你的屏幕。

    • 显示屏极度容易破碎,小心处理破碎的玻璃。

  4. Microsoft Surface Pro 3: step 4, image 1 of 2 Microsoft Surface Pro 3: step 4, image 2 of 2
    • 小心提起已分离的屏幕。注意不要伤到连接线。

  5. Microsoft Surface Pro 3: step 5, image 1 of 2 Microsoft Surface Pro 3: step 5, image 2 of 2
    • 卸下固定电池的3 mm T3梅花螺丝,并断开电池连接器。

    • 小心不要弄丢连接线和接头之间的小型连接板。

  6. Microsoft Surface Pro 3: step 6, image 1 of 3 Microsoft Surface Pro 3: step 6, image 2 of 3 Microsoft Surface Pro 3: step 6, image 3 of 3
    • 移除显示屏连接线上的 4mm T3 梅花螺丝。

    • 提起连接器以断开排线连接。

    • 小心不要弄丢连接线和接头之间的小型连接板。

  7. Microsoft Surface Pro 3: step 7, image 1 of 3 Microsoft Surface Pro 3: step 7, image 2 of 3 Microsoft Surface Pro 3: step 7, image 3 of 3
    • 抓住银色连接器的橘黄色连接线

    • 小心地拔出橘黄色的连接线直到脱离连接器

    • 屏幕已完全断开连接

    • 用于替换的屏幕上可能没有所有需要安装回去的零件。保存好拆下的屏幕上所有的零件,如果需要的话将其替换到新屏幕上。

  8. Microsoft Surface Pro 3, 耳机接口: step 8, image 1 of 2 Microsoft Surface Pro 3, 耳机接口: step 8, image 2 of 2
    • 移除1个 4mm T5 螺丝

    • 移除4个 4mm T3 螺丝

    • 移除1个 7mm T3 螺丝

  9. Microsoft Surface Pro 3: step 9, image 1 of 1
    • 移除4mm螺母

  10. Microsoft Surface Pro 3: step 10, image 1 of 2 Microsoft Surface Pro 3: step 10, image 2 of 2
    • 使用塑料Opening工具移除黑色零件

  11. Microsoft Surface Pro 3: step 11, image 1 of 1
    • 小心的移除灰色耳机接口

  12. Microsoft Surface Pro 3: step 12, image 1 of 1
    • 使用金属撬棒移除设备中的黑色连接线

  13. Microsoft Surface Pro 3: step 13, image 1 of 1
    • 移除2个4mm T3 六角螺丝

  14. Microsoft Surface Pro 3: step 14, image 1 of 2 Microsoft Surface Pro 3: step 14, image 2 of 2
    • 使用金属撬棒完成耳机接口的移除

Conclusion

跟随说明反向安装你的设备

4 other people completed this guide.

Special thanks to these translators:

en zh

100%

CoikVollin is helping us fix the world! Want to contribute?
Start translating ›

Erik Snyder

Member since: 10/01/15

5,221 Reputation

5 Guides authored

Team

Cal Poly, Team 12-18, Maness Fall 2015 Member of Cal Poly, Team 12-18, Maness Fall 2015

CPSU-MANESS-F15S12G18

5 Members

31 Guides authored

One Comment

Very good instructions. But where is the difference between Headphone Jack Assembly with P/N

0801-35U00QS, 0801-35U01QS and 0801-2W900QS? On some of them is also X894488-001 printed in an extra row.

Daniel - Reply

Add Comment

View Statistics:

Past 24 Hours: 0

Past 7 Days: 2

Past 30 Days: 14

All Time: 7,252