This translation was generated by a machine and has not been reviewed by a person yet. Speak this language? Review it.

Engelbert Strauss Motion Work Pants: Replacing the Flexbelt Elastic Bands

HowThingsWork and one other contributor
Last updated on Sep 2, 2026
Views: 2.2K
View statistics:
- Past 24 Hours:
- 3
- Past 7 Days:
- 155
- Past 30 Days:
- 250
- All Time:
- 2,165
Comments: 0
No one has left comments on this guide. Will you be first?
Go to guide commentsCompleted: 1 2
1 person has marked this guide "completed." Will you be next?
2 people have marked this guide "completed." Including you — great job!
Favorites: 0 1
No one has favorited (and subscribed to) this guide. Will you be the first?
1 person has favorited (and subscribed to) this guide — and that's you!
Featured Guide
This guide has been found to be exceptionally cool by the iFixit staff.
Community-Contributed Guide
An awesome member of our community made this guide. It was not created by iFixit staff.
-
-
-
The trousers in these series are held in place by the Flexbelt® System with 4 hidden elastic bands.
-
Here you can see a new pair of trousers on top and a pair that has been worn for a long time in the same size below. The stretched-out elastic is clearly visible.
-
Spare parts: Approx. 60 cm of strong elastic band, 25 mm wide for the Motion 2020 series, 20 mm wide for the Motion series. If using a sewing machine, use the upper thread in the trouser color and the bobbin thread in the contrast color.
-
Tool: Seam ripper, tailor's chalk or a washable marker. Sewing machine or hand sewing with needle and thread.
 Ask FixBot
-
-
-
Release the double seam to the left of the pants button. To do this, start at the bezel, insert your tool into a stitch loop, and cut the threads loop by loop. Do not use force, so that the fabric does not tear.
-
Remove the cut threads.
-
-
-
Further to the left, the elastic is secured with a bar tack.
-
On these pants, a torn elastic was provisionally repaired with an additional seam.
-
Undo the bar tack (and any additional repair seams, if necessary).
-
The original seam consists of many stitches perpendicular to the direction of the seam: move the seam ripper in a longitudinal direction.
-
Underneath this, there is a multiple longitudinal seam: rotate the seam ripper 90° and cut the stitches here.
-
Remove the threads.
-
-
-
The second elastic band starts further out and is only visible when stretching the waistband.
-
Carefully insert between the fabric and the elastic band and cut the seam thread by thread.
-
A few mm deeper is another seam, which is also cut. Because of the two seams side by side, access is a bit difficult. Stretch repeatedly, turn over, and try to catch a seam loop with the seam ripper.
-
-
-
The other end of the outer elastic band is also attached further out in the fabric tunnel with a bar tack.
-
Remove the bar tack here as well and remove any loose threads.
-
The outer elastic band also has a non-elastic strap as a fuse. Detach it and sew it onto the new elastic band. You can also omit this fixed strap.
-
The other side of the pants is constructed the same way. Remove both elastic bands here as well.
-
-
-
Above is a piece of new elastic band. Below is the old one that was removed. Look at the seams of the old band.
-
Because the old band was overstretched, the new one should be shorter.
-
Make two marks on the new band at a distance about 1 cm shorter.
-
The band itself can be slightly longer, which makes sewing it on easier. What is important is the distance between the seams.
-
If you have a new pair of trousers of the same size, you can also measure the distance.
-
You also have the option of adjusting the trousers individually. If they were always a bit loose, you can choose a tighter distance. Make sure that the adjustment is roughly the same for all elastic bands.
-
-
-
-
Start with the longer outer band (with safety band) and insert it into the open end up to your marking.
-
If the band is not lying flat inside the fabric sleeve, use a flat object to slide it in.
-
A household sewing machine might struggle to sew over the edge due to the number of fabric layers. Therefore, I recommend leaving the new band a little longer and inserting it deeper instead.
-
Sew it firmly in place using a machine or by hand. It is recommended (unlike in the picture) to use the main color of the trousers for the top thread and the contrast color for the bobbin thread, and to sew from the outside. This is because the outer seam may be visible when stretched, and the machine seam is usually neater from the top.
-
-
-
Note the distance between the end of the elastic band and your seam marker.
-
Push the elastic band into the fabric tunnel using a flat object. Feel with your finger to ensure it is centered in the fabric tunnel and positioned deep enough so that the marked line is aligned with the former bar tack.
-
Bend the belt loop slightly to the side. Mark the former seam with chalk. Sew the bar tack from the outside.
-
For the first step, a straight stitch of 2 - 3 mm is good, sewing forward once, then back. Afterwards, you can switch to buttonhole mode and use a setting of less than 1 mm to create a bar tack. If the machine does not have a buttonhole function, sew over the area a few more times with a straight stitch.
-
-
-
Start on the side with the button. Mark the seam. Place the elastic band under the pants so that the markings match.
-
Sew neatly from the top side. This seam will be visible when wearing the pants.
-
Insert the other end into the fabric tunnel again and sew it in place. Proceed as in step 8.
-
-


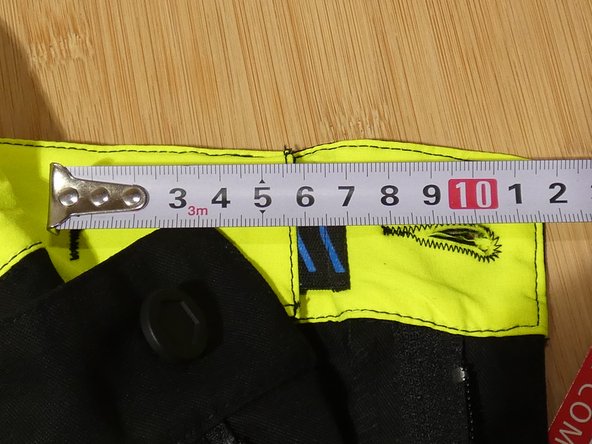


Both sides of the pants (right and left) are very similar. Now perform the same steps on the other side.
Cancel: I did not complete this guide.
One other person completed this guide.

