Merch Source Projector Entertainment II Outer Casing Replacement

Prerequisite Only
This guide is only intended to be used as a prerequisite for other guides. It's incomplete by itself.

What you need

  1. Merch Source Projector Entertainment II Outer Casing Replacement, Outer Casing: step 1, image 1 of 2 Merch Source Projector Entertainment II Outer Casing Replacement, Outer Casing: step 1, image 2 of 2
    • Flip the projector onto its back and unscrew the nine 15mm screws using the Phillips #0 screw driver.

  2. Merch Source Projector Entertainment II Outer Casing Replacement: step 2, image 1 of 1
    • Flip the projector right side up and unscrew the two 12mm screws on the light bulb panel located at the rear of the projector with a Phillips #0 screw head.

    • The bottom right panel screw does not come completely out the panel door.

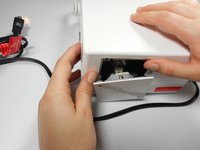
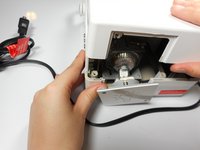
  3. Merch Source Projector Entertainment II Outer Casing Replacement: step 3, image 1 of 2 Merch Source Projector Entertainment II Outer Casing Replacement: step 3, image 2 of 2
    • Using your hands, gently pry the top and bottom of the projector casing apart.

Conclusion

To reassemble your device, follow these instructions in reverse order.

Winthrop Townsend

Member since: 01/08/15

281 Reputation

1 Guide authored

Team

Cal Poly, Team 18-3, Maness Winter 2015 Member of Cal Poly, Team 18-3, Maness Winter 2015

CPSU-MANESS-W15S18G3

3 Members

4 Guides authored

0 Comments

Add Comment

View Statistics:

Past 24 Hours: 0

Past 7 Days: 0

Past 30 Days: 0

All Time: 86