
Mercedes W123 Turn Signal Bulb, Front Replacement

What you need

  1. Mercedes W123 Turn Signal Bulb, Front Replacement, Turn Signal Bulb, Front: step 1, image 1 of 1
    • Begin by removing the white plastic thumb screw that holds the turn signal to the body of the car.

    • You will find this screw just forward of the inside of the wheel well.

  2. Mercedes W123 Turn Signal Bulb, Front Replacement: step 2, image 1 of 3 Mercedes W123 Turn Signal Bulb, Front Replacement: step 2, image 2 of 3 Mercedes W123 Turn Signal Bulb, Front Replacement: step 2, image 3 of 3
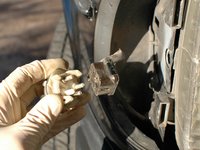
    • With the screw removed, pull the turn signal straight out away from the front of the car.

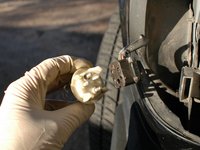
    • Do not pull the signal out and away from the headlight housing without first pulling it forwards as shown in the first picture. There are plastic tabs that fit in the openings highlighted in the second picture. These tabs can be easily broken if this step is not followed.

    • Once the tabs are clear of their slots you can move the tail light away from the headlight housing to get access to the bulb socket and wiring.

  3. Mercedes W123 Turn Signal Bulb, Front Replacement: step 3, image 1 of 1
    • Unplug the wiring harness from the bulb socket connection.

    • Then turn the bulb socket counterclockwise and pull it out of the turn signal housing to access the bulb.

  4. Mercedes W123 Turn Signal Bulb, Front Replacement: step 4, image 1 of 1
    • Remove the bulb from the socket by turning it counterclockwise.

  5. Mercedes W123 Turn Signal Bulb, Front Replacement: step 5, image 1 of 2 Mercedes W123 Turn Signal Bulb, Front Replacement: step 5, image 2 of 2
    • While we have the bulb out, you can see here that the connection area between the plug and the socket is rather dirty. Use a soft metal brush such as a brass brush, and some electric contact cleaner, to clean the components. The two pictures show before and after cleaning.

  6. Mercedes W123 Turn Signal Bulb, Front Replacement: step 6, image 1 of 2 Mercedes W123 Turn Signal Bulb, Front Replacement: step 6, image 2 of 2
    • Additionally, consider using a soft metal brush such as the ones shown to clean the inside of the bulb socket as well as the insides of the plug connections to remove any corrosion.

  7. Mercedes W123 Turn Signal Bulb, Front Replacement: step 7, image 1 of 1
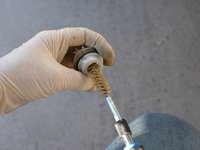
    • In the interest of preventing future corrosion consider also replacing the o-ring on the socket where it enters the housing.

    • On this car the o-rings were likely original and were fitting very loosely. They were likely allowing moisture to enter the housing.

    • Find a suitable replacement in your o-ring kit or at the local hardware store.

    • Coat the o-ring with a light coating of silicone grease to ease re-installation as the new o-ring may be a very snug fit. Also, the grease will help improve the seal and preserve the o-ring over time.

  8. Mercedes W123 Turn Signal Bulb, Front Replacement: step 8, image 1 of 1
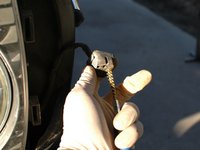
    • Install your new #1157 bulb in the socket, place the socket back in the housing and turn it clockwise to secure it, and the proceed to reconnect the socket to the plug and re-install the housing in the car.

    • Be sure to test the turn signals before going for a drive. The key will need to be all the way in the "ON" position in the ignition switch for the turn signals to function.

Conclusion

To reassemble your device, follow these instructions in reverse order.

8 other people completed this guide.

Nicolas Siemsen

Member since: 12/06/13

38,983 Reputation

79 Guides authored

Team

Master Techs Member of Master Techs

Community

322 Members

2,506 Guides authored

0 Comments

Add Comment

View Statistics:

Past 24 Hours: 2

Past 7 Days: 9

Past 30 Days: 34

All Time: 8,558