
MaxWest TAB-7360DC Screen Replacement

What you need

  1. MaxWest TAB-7360DC Screen Replacement, Back Hard Case: step 1, image 1 of 3 MaxWest TAB-7360DC Screen Replacement, Back Hard Case: step 1, image 2 of 3 MaxWest TAB-7360DC Screen Replacement, Back Hard Case: step 1, image 3 of 3
    • Insert plastic opening tool at the corner of the screen, in between the back case and the front.

    • Volume buttons will fall out during removal.

    • When opening up the case, have the I/O ports facing you and turn the back case towards the right. There is a short wire connecting the speaker to the logic board.

  2. MaxWest TAB-7360DC Screen Replacement: step 2, image 1 of 2 MaxWest TAB-7360DC Screen Replacement: step 2, image 2 of 2
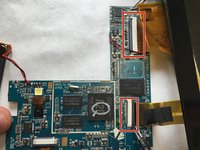
    • Carefully pry the tape from the battery, the bottom left chip, and the ribbon cable towards the bottom-right of the board. The bottom left has a little silver square component that must also be unclipped and untaped.

    • The battery is glued to the back of the screen; therefore pull the battery off of the back with caution. There will be resistance but that's okay.

  3. MaxWest TAB-7360DC Screen Replacement: step 3, image 1 of 1
    • Gently unclip the data cable retainers and remove the wires from the junctions.

    • Peel the tape off the wire near the bottom of the case.

  4. MaxWest TAB-7360DC Screen Replacement: step 4, image 1 of 1
    • Remove the two 4mm screws (circled in orange) with a 00 Phillips head driver.

    • Unclip the black plastic retainer near the data port. The PCB should now be able to be gently pulled off.

  5. MaxWest TAB-7360DC Screen Replacement: step 5, image 1 of 1
    • Make contact with the battery terminals with the hot tip of the soldering iron for a few seconds while slowly pulling the wire away.

    • DO NOT TOUCH BOTH THE BLACK AND RED LEADS AT THE SAME TIME WITH THE SOLDERING IRON

  6. MaxWest TAB-7360DC Screen Replacement, Motherboard: step 6, image 1 of 2 MaxWest TAB-7360DC Screen Replacement, Motherboard: step 6, image 2 of 2
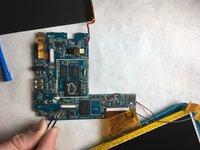
    • With the tweezers, grab onto the gray part of the ribbon clamps and pull away from the ribbons.

    • Once the ribbons are unclamped, they are able to slide out.

  7. MaxWest TAB-7360DC Screen Replacement, Screen: step 7, image 1 of 1
    • Pick up the motherboard and carefully place adjacent to the battery.

  8. MaxWest TAB-7360DC Screen Replacement: step 8, image 1 of 1
    • Use plastic prying tool to lift the metallic surface upward. ( It doesn't matter where)

    • Make sure to work the prying tool around the entire screen edge. Lift screen when completely loose.

  9. MaxWest TAB-7360DC Screen Replacement: step 9, image 1 of 1
    • Remove screen and place to the side.

Conclusion

To reassemble your device, follow these instructions in reverse order.

2 other people completed this guide.

Sam Cook

Member since: 03/21/18

109 Reputation

1 Guide authored

Team

IUPUI, Team S4-G3, Baechle Spring 2018 Member of IUPUI, Team S4-G3, Baechle Spring 2018

IUPUI-BAECHLE-S18S4G3

4 Members

6 Guides authored

0 Comments

Add Comment

View Statistics:

Past 24 Hours: 3

Past 7 Days: 12

Past 30 Days: 40

All Time: 1,489