Introduction
A damaged or old mailbox flag can make the entire mailbox look worn. Luckily, it is easy to replace just the flag.
-
-
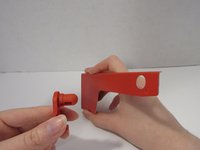
Place the bracket into the flag - this will help to secure it to the mailbox.
 Ask FixBot
-
-
-
-
Insert the bracket of the assembled flag through the holes on the outside of the mailbox.
-
-
-
Push the flag keeper through the bracket until the flag reaches the desired tightness.
-
-
-
You are finished! Stand your flag up to ensure it works and is at the desired tightness.
-
If you would like your flag tighter, push the flag keeper in further.
-


To take the flag off your mailbox, follow these instructions in reverse order.
Cancel: I did not complete this guide.
2 other people completed this guide.
Team

Pasco Hernando, Team S5-G75, Prince Fall 2018 Member of Pasco Hernando, Team S5-G75, Prince Fall 2018
PHSC-PRINCE-F18S5G75
1 Member
1 Guide authored
3 Guide Comments
so where do I buy the ‘flag keeper” to insert in the bracket?
Do you have one with 3 holes, maybe an older style?