
MacBook Unibody Model A1278 Fan Replacement

What you need

  1. MacBook Unibody Model A1278 Fan Replacement, Access Door: step 1, image 1 of 1
    • With the case closed, place the Unibody top-side down on a flat surface.

    • Depress the grooved side of the access door release latch enough to grab the free end. Lift the release latch until it is vertical.

  2. MacBook Unibody Model A1278 Fan Replacement: step 2, image 1 of 1
    • The access door should now be raised enough to lift it up and out of the Unibody.

  3. MacBook Unibody Model A1278 Fan Replacement, Battery: step 3, image 1 of 1
    • Be sure the access door release latch is vertical before proceeding.

    • Grab the white plastic tab and pull the battery up and out of the Unibody.

  4. MacBook Unibody Model A1278 Fan Replacement, Lower Case: step 4, image 1 of 1
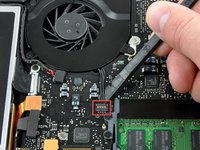
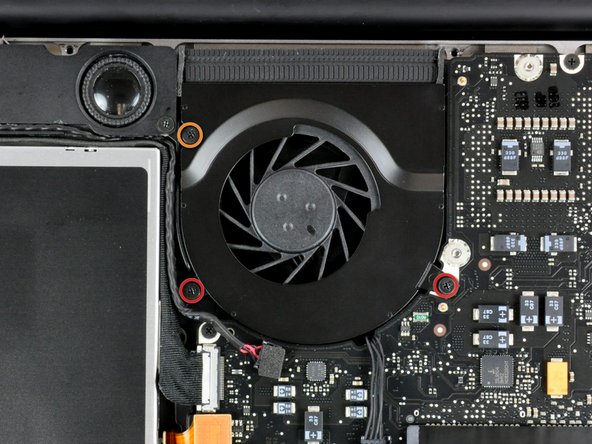
    • Remove the following eight screws securing the lower case to the chassis:

    • One 3 mm Phillips screw.

    • Three 13.5 mm Phillips screws.

    • Four 3.5 mm Phillips screws.

  5. MacBook Unibody Model A1278 Fan Replacement: step 5, image 1 of 1
    • Using both hands, lift and remove the lower case off the upper case.

  6. MacBook Unibody Model A1278 Fan Replacement, Fan: step 6, image 1 of 3 MacBook Unibody Model A1278 Fan Replacement, Fan: step 6, image 2 of 3 MacBook Unibody Model A1278 Fan Replacement, Fan: step 6, image 3 of 3
    • Use a spudger to pry the fan connector straight up off the logic board.

    • It is useful to twist the spudger axially from beneath the fan cable wires to release the connector.

    • The fan socket and the fan connector can be seen in the second and third pictures. Be careful not to break the plastic fan socket off the logic board as you use your spudger to lift the fan connector straight up and out of its socket. The layout of the logic board shown in the second picture may look slightly different than your machine but the fan socket is the same.

  7. MacBook Unibody Model A1278 Fan Replacement: step 7, image 1 of 1
    • Remove the following three screws securing the fan to the upper case:

    • Two 5 mm Phillips screws.

    • One 7 mm Phillips screw.

    • The longer of the three screws belongs in the upper left corner of the fan.

  8. MacBook Unibody Model A1278 Fan Replacement: step 8, image 1 of 1
    • Lift the fan out of the upper case.

Conclusion

To reassemble your device, follow these instructions in reverse order.

113 other people completed this guide.

5 Comments

This doesn't look ANYTHING like my A1278. You should check that not every A1278 is the same.

Jon Bukovsky - Reply

All Non-Retina 13" MacBook Pros and the Late 2008 Aluminum MacBook have the same A1278 Model Number (I guess due to the almost identical chassis).

Carl Hauschke -

Bonjour. j’ai bien réalisé toutes les étapes mais l’ordinateur ne redémarre plus et l’écran s’allume mais reste “sombre” (pas d’apparition de la pomme non plus)…

J’ai réinstallé les anciens ventilateurs mais le problème persiste (initialement, j’avais bien vérifié que mon macbook s’allumait correctement avant le changement des ventilos).

Quelqu’un aurait une solution? Les forums indiquent le reset SMC, mais ça ne donne rien… Merci

azza malik - Reply

Vérifie la petite prise qui relie le chassis principal avec l’écran. Elle se débranche facilement sans crier gare, l’écran fonctionne anormalement ou pas du tout et la pomme au dos reste éteinte. C’est pas grave, rien n’est cassé mais c’est c….t ! A rebrancher avec précaution. Apple adore les connecteurs minuscules fragiles. Ceci dit je ne remplacerai pas mon Mac de sitôt !

petitonton - Reply

This is a very straightforward job. I was on the point of changing my laptop when I realised how easily and cheaply I could change the fan, getting rid of the annoying noise of a worn out fan. One tip: use a vacuum cleaner to clear the dust from the air intake and general area of the fan.

harwood - Reply

Add Comment

View Statistics:

Past 24 Hours: 3

Past 7 Days: 19

Past 30 Days: 75

All Time: 81,980