Introduction
Use this guide to access and upgrade the RAM.
What you need
-
-
Remove the following ten screws securing the lower case to the upper case:
-
Three 13.5 mm (14.1 mm) Phillips screws.
-
Seven 3 mm Phillips screws.
 Ask FixBot
-
-
-
Using both hands, lift the lower case near the vent to pop it off two clips securing it to the upper case.
-
Remove the lower case and set it aside.
-
-
-
-
Use the edge of a spudger to pry the battery connector upwards from its socket on the logic board.
-
-
-
Bend the battery cable slightly away from its socket on the logic board so it does not accidentally connect itself while you work.
-
-
-
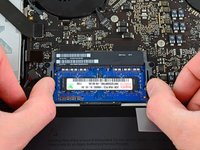
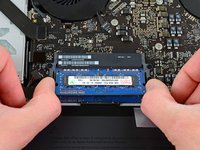
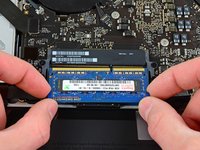
Release the tabs on each side of the RAM chip by simultaneously pushing each tab away from the RAM module.
-
After the RAM chip has popped up, pull it straight out of its socket.
-


To reassemble your device, follow these instructions in reverse order.
Cancel: I did not complete this guide.
181 other people completed this guide.


13 Guide Comments
Super clear guide, super easy way to upgrade the RAM.
But the factory default RAM is supposed to be 1600MHz on this (PC3 10600S is 1333MHz) right?
Super easy! Great guide!
This was a very clear and helpful guide. Thanks, Andrew!
One point that I thought would help others trying this for the first time is about the mechanism holding the RAM. As the guide points out, the RAM chips should 'pop' up when the clips holding them down are properly extended to the side. And when installing the new chips I found that though the force applied was between light and moderate, relative there wasn't much force needed to insert them into the board as there was to push them downwards until you here a 'pop.' The force needed to be applied at any stage of the whole process was minimum to midway between minimum and moderate.
Hey I consulted this iFixit guide, the official guide on the apple website and also the crucial memory selector tool.
1) Apple said you didn't have to disconnect the power. So you don't (if you're just swapping out the ram).
2) Crucial confirms that 16 gb works. I ended up getting 16 gb of PNY at BestBuy. They didn't have any Crucial on the shelves.
3) The first two times I did this, the connections weren't perfect. So I had the triple beep motherboard error and then the "nothing happens when i try to power on" error. So if either of these happens, fret not. Just calmly open everything back up and do it again.
So happy I did this. Yosemite was a memory guzzling beast. Now I have garageband and iTunes and iPhoto all blazing and not a hitch.
Cheers.
Could I suggest adding a hardware test after installation.
For my MacBook Pro you hold down the D key when restarting.