
MacBook Pro 15" Unibody Mid 2012 Left Speaker Replacement

What you need

  1. MacBook Pro 15" Unibody Mid 2012 Left Speaker Replacement, Lower Case: step 1, image 1 of 1
    • Remove the following ten screws securing the lower case to the upper case:

    • Three 13.5 mm (14.1 mm) Phillips screws.

    • Seven 3 mm Phillips screws.

    • When removing these screws, note how they come out at a slight angle. They must be reinstalled the same way.

  2. MacBook Pro 15" Unibody Mid 2012 Left Speaker Replacement: step 2, image 1 of 1
    • Using both hands, lift the lower case near the vent to pop it off two clips securing it to the upper case.

    • Remove the lower case and set it aside.

  3. MacBook Pro 15" Unibody Mid 2012 Left Speaker Replacement, Battery Connector: step 3, image 1 of 2 MacBook Pro 15" Unibody Mid 2012 Left Speaker Replacement, Battery Connector: step 3, image 2 of 2
    • For certain repairs (e.g. hard drive), disconnecting the battery connector is not necessary but is recommended as it prevents any accidental shorting of electronics on the motherboard. If you do not disconnect the battery connector, please be careful as parts of the motherboard might be electrified.

    • Use the edge of a spudger to pry the battery connector upwards from its socket on the logic board.

    • It is useful to pry upward on both short sides of the connector to "walk" it out of its socket.

  4. MacBook Pro 15" Unibody Mid 2012 Left Speaker Replacement: step 4, image 1 of 1
    • Bend the battery cable slightly away from its socket on the logic board so it does not accidentally connect itself while you work.

  5. MacBook Pro 15" Unibody Mid 2012 Left Speaker Replacement, Left Fan: step 5, image 1 of 1
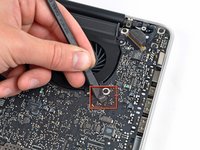
    • Remove the following three screws securing the left fan to the logic board:

    • Two 3.5 mm T6 Torx screws.

    • One 4.2 mm T6 Torx screw.

  6. MacBook Pro 15" Unibody Mid 2012 Left Speaker Replacement: step 6, image 1 of 3 MacBook Pro 15" Unibody Mid 2012 Left Speaker Replacement: step 6, image 2 of 3 MacBook Pro 15" Unibody Mid 2012 Left Speaker Replacement: step 6, image 3 of 3
    • Use the flat end of a spudger to disconnect the left fan connector from the logic board.

    • It is useful to twist the spudger axially from beneath the fan cable wires to release the connector.

    • The fan socket and the fan connector can be seen in the second and third pictures. Be careful not to break the plastic fan socket off the logic board as you use your spudger to lift the fan connector straight up and out of its socket.

    • The layout of the logic board shown in the second picture may look slightly different than your machine but the fan socket is the same.

  7. MacBook Pro 15" Unibody Mid 2012 Left Speaker Replacement: step 7, image 1 of 1
    • Lift the left fan out of the upper case.

  8. MacBook Pro 15" Unibody Mid 2012 Left Speaker Replacement, Logic Board: step 8, image 1 of 1
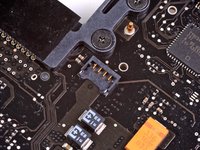
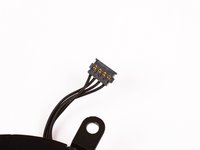
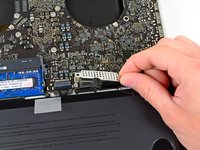
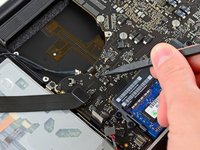
    • Use the flat end of a spudger to lift the right fan connector out of its socket on the logic board.

    • It is useful to twist the spudger axially from beneath the fan cable wires to release the connector.

  9. MacBook Pro 15" Unibody Mid 2012 Left Speaker Replacement: step 9, image 1 of 2 MacBook Pro 15" Unibody Mid 2012 Left Speaker Replacement: step 9, image 2 of 2
    • Remove the three 3.4 mm (3.1 mm) T6 Torx screws securing the right fan to the logic board.

    • Lift the right fan out of its opening in the logic board.

  10. MacBook Pro 15" Unibody Mid 2012 Left Speaker Replacement: step 10, image 1 of 1
    • Pull the camera cable out of its socket on the logic board.

    • Don't lift upward on the camera cable as you disconnect it. Pulling upward on the cable may damage both the cable and the logic board. Pull the cable parallel to the face of the logic board.

  11. MacBook Pro 15" Unibody Mid 2012 Left Speaker Replacement: step 11, image 1 of 1
    • Use the flat end of a spudger to pry the AirPort/Bluetooth connector up from its socket on the logic board.

  12. MacBook Pro 15" Unibody Mid 2012 Left Speaker Replacement: step 12, image 1 of 1
    • Use the flat end of a spudger to lift the optical drive connector out of its socket on the logic board.

  13. MacBook Pro 15" Unibody Mid 2012 Left Speaker Replacement: step 13, image 1 of 1
    • Disconnect the hard drive/IR sensor cable from its socket on the logic board by lifting up from beneath its connector.

  14. MacBook Pro 15" Unibody Mid 2012 Left Speaker Replacement: step 14, image 1 of 1
    • Use the flat end of a spudger to lift the subwoofer/right speaker connector out of its socket on the logic board.

    • Pry up from beneath the wires.

  15. MacBook Pro 15" Unibody Mid 2012 Left Speaker Replacement: step 15, image 1 of 2 MacBook Pro 15" Unibody Mid 2012 Left Speaker Replacement: step 15, image 2 of 2
    • Remove the two 1.5 mm ( 1.2 mm ) Phillips screws securing the keyboard/trackpad cable cover to the logic board.

    • Lift the cover off the logic board and set it aside.

  16. MacBook Pro 15" Unibody Mid 2012 Left Speaker Replacement: step 16, image 1 of 1
    • Use the flat end of a spudger to pry the trackpad connector up and out of its socket on the logic board.

  17. MacBook Pro 15" Unibody Mid 2012 Left Speaker Replacement: step 17, image 1 of 2 MacBook Pro 15" Unibody Mid 2012 Left Speaker Replacement: step 17, image 2 of 2
    • Use your fingernail to flip up the retaining flap on the keyboard ribbon cable ZIF socket.

    • Be sure you are prying up on the hinged retaining flap, not the socket itself.

    • Use the tip of a spudger to pull the keyboard ribbon cable out of its socket.

  18. MacBook Pro 15" Unibody Mid 2012 Left Speaker Replacement: step 18, image 1 of 1
    • Use the flat end of a spudger to lift the battery indicator connector up and out of its socket on the logic board.

  19. MacBook Pro 15" Unibody Mid 2012 Left Speaker Replacement: step 19, image 1 of 2 MacBook Pro 15" Unibody Mid 2012 Left Speaker Replacement: step 19, image 2 of 2
    • Grab the plastic pull tab secured to the display data cable lock and rotate it toward the DC-In side of the computer.

    • Pull the display data cable straight out of its socket on the logic board.

    • Do not lift up on the display data cable, as its socket is very fragile. Pull the cable parallel to the face of the logic board.

  20. MacBook Pro 15" Unibody Mid 2012 Left Speaker Replacement: step 20, image 1 of 2 MacBook Pro 15" Unibody Mid 2012 Left Speaker Replacement: step 20, image 2 of 2
    • Use the tip of a spudger to flip up the retaining flap on the keyboard backlight ribbon cable ZIF socket.

    • Be sure you are flipping up the hinged retaining flap, not the socket itself.

    • Pull the keyboard backlight ribbon cable out of its socket.

  21. MacBook Pro 15" Unibody Mid 2012 Left Speaker Replacement: step 21, image 1 of 1
    • Remove the following nine screws:

    • Seven 3.4 mm ( 3.1 mm) T6 Torx screws on the logic board

    • Two 8 mm T6 Torx screws on the DC-In board

  22. MacBook Pro 15" Unibody Mid 2012 Left Speaker Replacement: step 22, image 1 of 3 MacBook Pro 15" Unibody Mid 2012 Left Speaker Replacement: step 22, image 2 of 3 MacBook Pro 15" Unibody Mid 2012 Left Speaker Replacement: step 22, image 3 of 3
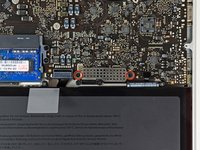
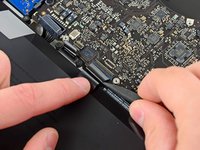
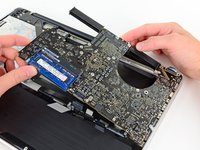
    • Carefully lift the logic board assembly from its left side and work it out of the upper case, minding the optical drive cable and the I/O ports that may get caught during removal.

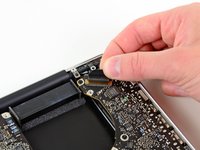
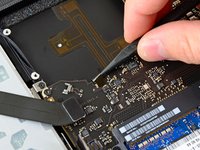
    • If necessary, use the flat end of a spudger to separate the microphone from the upper case.

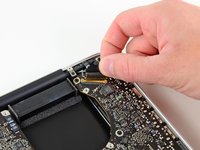
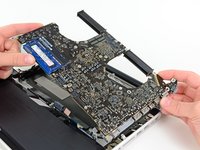
    • Pull the I/O port side of the logic board away from the side of the upper case and remove the logic board assembly.

  23. MacBook Pro 15" Unibody Mid 2012 Left Speaker Replacement, Left Speaker: step 23, image 1 of 1
    • Lift the microphone out of its recess in the left speaker housing.

  24. MacBook Pro 15" Unibody Mid 2012 Left Speaker Replacement: step 24, image 1 of 1
    • Remove the two 5 mm Phillips screws securing the left speaker to the logic board.

  25. MacBook Pro 15" Unibody Mid 2012 Left Speaker Replacement: step 25, image 1 of 1
    • If present, remove the small strip of black tape covering the left speaker connector.

    • Carefully pull the left speaker wires upward to lift the left speaker connector out of its socket on the logic board.

Conclusion

To reassemble your device, follow these instructions in reverse order.

9 other people completed this guide.

Andrew Optimus Goldheart

Member since: 10/17/09

502,109 Reputation

407 Guides authored

Team

iFixit Member of iFixit

Staff

135 Members

16,476 Guides authored

0 Comments

Add Comment

View Statistics:

Past 24 Hours: 3

Past 7 Days: 18

Past 30 Days: 56

All Time: 8,908