
MacBook Pro 15" Unibody Mid 2010 Matte LCD Replacement

What you need

  1. MacBook Pro 15" Unibody Mid 2010 Matte LCD Replacement, Lower Case: step 1, image 1 of 1
    • Remove the following ten screws securing the lower case to the upper case:

    • Three 13.5 mm (14.1 mm) Phillips screws.

    • Seven 3 mm Phillips screws.

    • When removing these screws, note how they come out at a slight angle. They must be reinstalled the same way.

  2. MacBook Pro 15" Unibody Mid 2010 Matte LCD Replacement: step 2, image 1 of 1
    • Using both hands, lift the lower case near the vent to pop it off two clips securing it to the upper case.

    • Remove the lower case and set it aside.

  3. MacBook Pro 15" Unibody Mid 2010 Matte LCD Replacement, Battery: step 3, image 1 of 1
    • Remove the two 7.4 mm Tri-point screws securing the battery to the upper case.

    • Note: For certain repairs (e.g. hard drive), removing the battery is not necessary but it prevents any accidental shorting of electronics on the motherboard. If you do not remove the battery, please be careful as parts of the motherboard might be electrified.

    • You do not necessarily have to follow steps 3-6 to remove the battery in order to replace the hard drive. However it is recommended to remove all power sources from electronics before working on them.

  4. MacBook Pro 15" Unibody Mid 2010 Matte LCD Replacement: step 4, image 1 of 1
    • Use the tip of your finger to carefully peel back the corner of the warning label to reveal a hidden Tri-point screw.

    • Remove the last 7.4 mm Tri-point screw securing the battery to the upper case.

  5. MacBook Pro 15" Unibody Mid 2010 Matte LCD Replacement: step 5, image 1 of 2 MacBook Pro 15" Unibody Mid 2010 Matte LCD Replacement: step 5, image 2 of 2
    • Lift the battery by its plastic pull tab and slide it away from the long edge of the upper case.

    • Do not try to completely remove the battery just yet.

  6. MacBook Pro 15" Unibody Mid 2010 Matte LCD Replacement: step 6, image 1 of 1
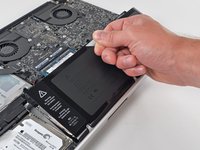
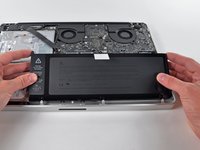
    • Tilt the battery away from the logic board enough to access the battery cable connector.

    • Pull the battery cable connector away from its socket on the logic board and remove the battery from the upper case.

    • Pull the battery cable connector away from the center of the logic board.

    • If you're installing a new battery, you should calibrate it after installation:

    • Charge it to 100%, and then keep charging it for at least 2 more hours. Next, unplug and use it normally to drain the battery. When you see the low battery warning, save your work, and keep your laptop on until it goes to sleep due to low battery. Wait at least 5 hours, then charge your laptop uninterrupted to 100%.

    • If you notice any unusual behavior or problems after installing your new battery, you may need to reset your MacBook's SMC.

  7. MacBook Pro 15" Unibody Mid 2010 Matte LCD Replacement, Display: step 7, image 1 of 1
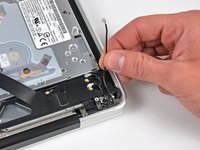
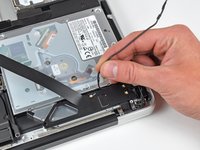
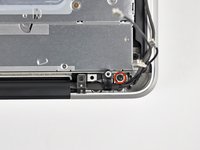
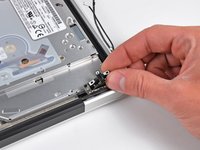
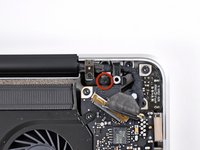
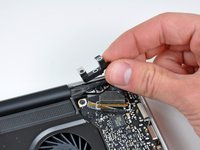
    • Use the flat end of a spudger to carefully pry the AirPort/Bluetooth ribbon cable up off its socket on the logic board.

  8. MacBook Pro 15" Unibody Mid 2010 Matte LCD Replacement: step 8, image 1 of 1
    • Pull the camera cable connector straight out of its socket on the logic board.

    • Pull the cable parallel to the face of the logic board toward the optical drive opening.

  9. MacBook Pro 15" Unibody Mid 2010 Matte LCD Replacement: step 9, image 1 of 1
    • Use the tip of a spudger to pry the three antenna connectors up off the AirPort/Bluetooth board.

  10. MacBook Pro 15" Unibody Mid 2010 Matte LCD Replacement: step 10, image 1 of 2 MacBook Pro 15" Unibody Mid 2010 Matte LCD Replacement: step 10, image 2 of 2
    • De-route all three antenna cables from their channels in the AirPort/Bluetooth housing.

    • De-route the camera cable from its channel in the AirPort/Bluetooth housing.

  11. MacBook Pro 15" Unibody Mid 2010 Matte LCD Replacement: step 11, image 1 of 1
    • Remove the following two screws securing the AirPort/Bluetooth housing to the upper case:

    • One 3.8 mm Phillips

    • One 8.6 mm Phillips

  12. MacBook Pro 15" Unibody Mid 2010 Matte LCD Replacement: step 12, image 1 of 1
    • Remove the AirPort/Bluetooth assembly from the upper case, minding any cables that may get caught.

  13. MacBook Pro 15" Unibody Mid 2010 Matte LCD Replacement: step 13, image 1 of 2 MacBook Pro 15" Unibody Mid 2010 Matte LCD Replacement: step 13, image 2 of 2
    • Remove the 8.6 mm Phillips screw securing the antenna/camera cable retainer to the upper case.

    • Remove the antenna/camera cable retainer from the upper case.

  14. MacBook Pro 15" Unibody Mid 2010 Matte LCD Replacement: step 14, image 1 of 1
    • Remove two of the three 6 mm T6 Torx screws securing the right side of the display to the upper case.

    • We purposely have you leave one screw attaching the display to the upper case to aid in future steps.

  15. MacBook Pro 15" Unibody Mid 2010 Matte LCD Replacement: step 15, image 1 of 3 MacBook Pro 15" Unibody Mid 2010 Matte LCD Replacement: step 15, image 2 of 3 MacBook Pro 15" Unibody Mid 2010 Matte LCD Replacement: step 15, image 3 of 3
    • Grab the plastic pull tab secured to the display data cable lock and rotate it toward the DC-In side of the computer.

    • Pull the display data cable straight out of its socket on the logic board.

    • Do not lift up on the display data cable, as its socket is very fragile. Pull the cable parallel to the face of the logic board.

  16. MacBook Pro 15" Unibody Mid 2010 Matte LCD Replacement: step 16, image 1 of 2 MacBook Pro 15" Unibody Mid 2010 Matte LCD Replacement: step 16, image 2 of 2
    • Remove the 8.6 mm Phillips screw securing the display data cable retainer to the upper case.

    • Remove the display data cable retainer from the upper case.

  17. MacBook Pro 15" Unibody Mid 2010 Matte LCD Replacement: step 17, image 1 of 1
    • Remove two of the three 6 mm T6 Torx screws securing the left side of the display to the upper case.

    • We purposely have you leave one screw attaching the display to the upper case to aid in future steps.

  18. MacBook Pro 15" Unibody Mid 2010 Matte LCD Replacement: step 18, image 1 of 1
    • Open your MacBook Pro so the display is perpendicular to the upper case.

    • Place your opened MacBook Pro on a table as pictured.

    • While holding the display and upper case together with your left hand, remove the remaining T6 Torx screw from the upper display bracket.

  19. MacBook Pro 15" Unibody Mid 2010 Matte LCD Replacement: step 19, image 1 of 1
    • Be sure to hold the display and upper case together with your left hand. Failure to do so may cause the freed display/upper case to fall, potentially damaging each component.

    • Remove the last remaining T6 Torx screw securing the display to the upper case.

  20. MacBook Pro 15" Unibody Mid 2010 Matte LCD Replacement: step 20, image 1 of 3 MacBook Pro 15" Unibody Mid 2010 Matte LCD Replacement: step 20, image 2 of 3 MacBook Pro 15" Unibody Mid 2010 Matte LCD Replacement: step 20, image 3 of 3
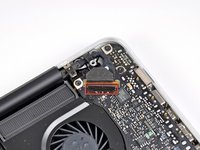
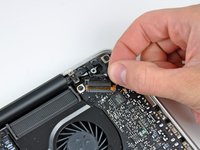
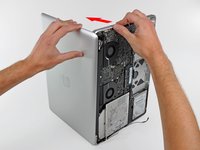
    • Grab the upper case with your right hand and rotate it slightly toward the top of the display so the upper display bracket clears the edge of the upper case.

    • Rotate the display slightly away from the upper case.

    • Lift the display up and away from the upper case, minding any brackets or cables that may get caught.

  21. MacBook Pro 15" Unibody Mid 2010 Matte LCD Replacement, Front Bezel: step 21, image 1 of 2 MacBook Pro 15" Unibody Mid 2010 Matte LCD Replacement, Front Bezel: step 21, image 2 of 2
    • It's very easy for the rubber display gasket to deform when exposed to heat, so it is best to remove it before using a heat gun to remove the display glass.

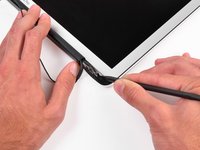
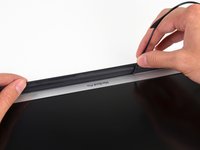
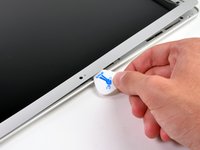
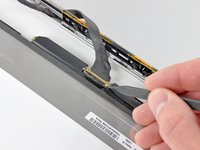
    • Insert the tip of a spudger underneath the black rubber gasket at the bottom right corner of the display assembly.

    • Gently pry the wide edge of the gasket up from the back case.

  22. MacBook Pro 15" Unibody Mid 2010 Matte LCD Replacement: step 22, image 1 of 3 MacBook Pro 15" Unibody Mid 2010 Matte LCD Replacement: step 22, image 2 of 3 MacBook Pro 15" Unibody Mid 2010 Matte LCD Replacement: step 22, image 3 of 3
    • Starting with the freed corner, pull the rubber gasket off the right side of the display assembly.

  23. MacBook Pro 15" Unibody Mid 2010 Matte LCD Replacement: step 23, image 1 of 3 MacBook Pro 15" Unibody Mid 2010 Matte LCD Replacement: step 23, image 2 of 3 MacBook Pro 15" Unibody Mid 2010 Matte LCD Replacement: step 23, image 3 of 3
    • Continue pulling the display gasket off the display assembly across the top edge.

  24. MacBook Pro 15" Unibody Mid 2010 Matte LCD Replacement: step 24, image 1 of 3 MacBook Pro 15" Unibody Mid 2010 Matte LCD Replacement: step 24, image 2 of 3 MacBook Pro 15" Unibody Mid 2010 Matte LCD Replacement: step 24, image 3 of 3
    • Continue pulling the display gasket off the display assembly down the left side.

    • Pull the gasket off the bottom edge of the display to completely free it and set it aside.

  25. MacBook Pro 15" Unibody Mid 2010 Matte LCD Replacement: step 25, image 1 of 1
    • In the following steps, you will use a heat gun to soften the adhesive securing the outer silver border around the underside of the front panel to the display.

    • With the heat gun set to low, start by heating the metal bezel surrounding the LCD.

    • When using the heat gun, the goal is to soften a layer of adhesive holding the bezel to the display assembly. Be very careful not to overheat the LCD, as it could cause permanent damage.

  26. MacBook Pro 15" Unibody Mid 2010 Matte LCD Replacement: step 26, image 1 of 2 MacBook Pro 15" Unibody Mid 2010 Matte LCD Replacement: step 26, image 2 of 2
    • Carefully insert a guitar pick between the top right corner of the bezel and the display assembly.

    • Use the guitar pick to gently pry up the adhesive along the top edge securing the bezel to the display assembly.

    • The bezel is very thin metal, so be very careful not to crease it as you pry it up.

  27. MacBook Pro 15" Unibody Mid 2010 Matte LCD Replacement: step 27, image 1 of 2 MacBook Pro 15" Unibody Mid 2010 Matte LCD Replacement: step 27, image 2 of 2
    • If necessary, use a heat gun to reapply heat along the top right edge to loosen the adhesive securing the bezel to the display assembly.

    • Work along the top right edge of the display assembly, carefully prying the adhesive up with the guitar pick. Stop when you get to the iSight camera.

    • Do not pry near the iSight camera—there is no adhesive immediately surrounding it, and you could damage the camera with the guitar pick.

  28. MacBook Pro 15" Unibody Mid 2010 Matte LCD Replacement: step 28, image 1 of 1
    • Use a heat gun to soften the adhesive under the bezel along the left and top left edges of the display.

  29. MacBook Pro 15" Unibody Mid 2010 Matte LCD Replacement: step 29, image 1 of 3 MacBook Pro 15" Unibody Mid 2010 Matte LCD Replacement: step 29, image 2 of 3 MacBook Pro 15" Unibody Mid 2010 Matte LCD Replacement: step 29, image 3 of 3
    • Carefully insert a guitar pick between the top left corner of the bezel and the display assembly.

    • Use the guitar pick to gently pry up the adhesive along the left edge securing the bezel to the display assembly.

  30. MacBook Pro 15" Unibody Mid 2010 Matte LCD Replacement: step 30, image 1 of 3 MacBook Pro 15" Unibody Mid 2010 Matte LCD Replacement: step 30, image 2 of 3 MacBook Pro 15" Unibody Mid 2010 Matte LCD Replacement: step 30, image 3 of 3
    • Repeat the procedures in the two previous steps for the right edge of the display.

  31. MacBook Pro 15" Unibody Mid 2010 Matte LCD Replacement: step 31, image 1 of 3 MacBook Pro 15" Unibody Mid 2010 Matte LCD Replacement: step 31, image 2 of 3 MacBook Pro 15" Unibody Mid 2010 Matte LCD Replacement: step 31, image 3 of 3
    • Work along the top left edge of the display assembly, carefully prying the adhesive up with the guitar pick. Stop when you get to the iSight camera.

    • Do not pry near the iSight camera—there is no adhesive immediately surrounding it, and you could damage the camera with the guitar pick.

  32. MacBook Pro 15" Unibody Mid 2010 Matte LCD Replacement: step 32, image 1 of 2 MacBook Pro 15" Unibody Mid 2010 Matte LCD Replacement: step 32, image 2 of 2
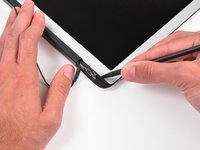
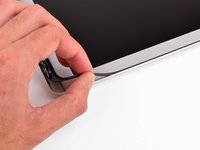
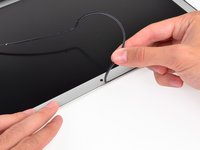
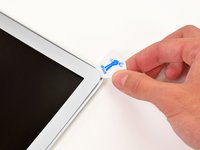
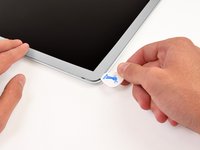
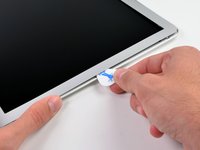
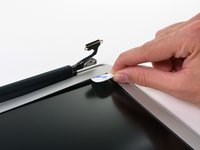
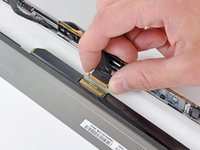
    • Wedge a guitar pick in between the bezel and display assembly near the inner bottom left corner.

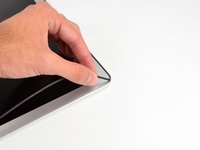
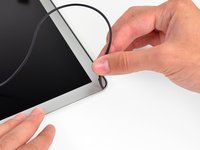
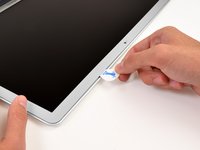
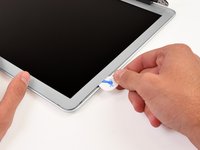
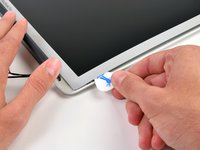
    • Work along the inner bottom left edge of the display assembly, carefully prying the adhesive up with the guitar pick.

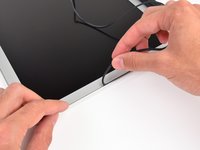
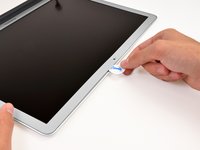
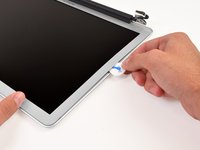
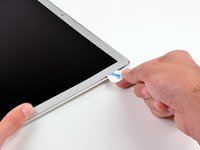
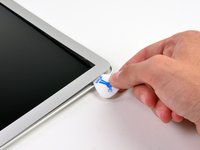
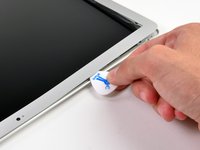
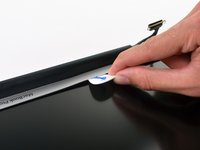
    • Continue prying along the inner bottom edge to release the adhesive securing the bezel to the display assembly.

  33. MacBook Pro 15" Unibody Mid 2010 Matte LCD Replacement: step 33, image 1 of 1
    • Use a guitar pick to gently lift the bottom right corner of the bezel.

  34. MacBook Pro 15" Unibody Mid 2010 Matte LCD Replacement: step 34, image 1 of 2 MacBook Pro 15" Unibody Mid 2010 Matte LCD Replacement: step 34, image 2 of 2
    • Slowly lift the bottom edge of the bezel and gently rotate it out of the display.

  35. MacBook Pro 15" Unibody Mid 2010 Matte LCD Replacement, Clutch Cover: step 35, image 1 of 2 MacBook Pro 15" Unibody Mid 2010 Matte LCD Replacement, Clutch Cover: step 35, image 2 of 2
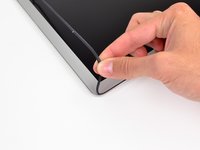
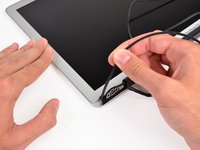
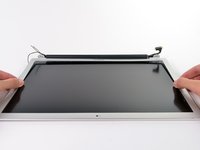
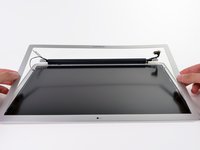
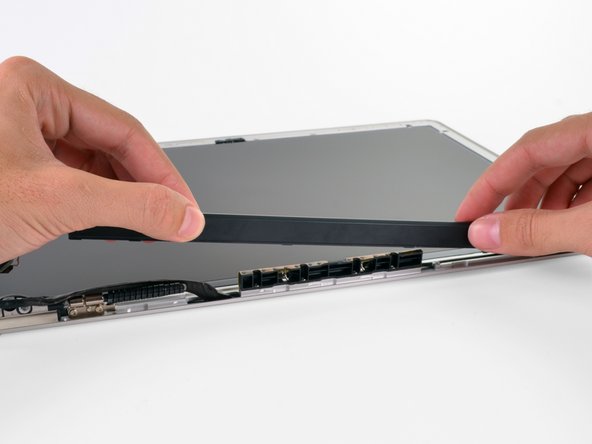
    • Lifting the left edge of the clutch cover, gently rock it back and forth on its long axis while pulling it away from the display.

    • Remove the clutch cover from the display, minding any cables that may get caught.

    • When reinstalling the clutch cover, be sure to widen the opening when slipping it over the small black plastic cosmetic cover that fills the open end of the clutch cover when it is in place. The cosmetic cover has very thin and delicate plastic arms that hold it to the right clutch hinge.

  36. MacBook Pro 15" Unibody Mid 2010 Matte LCD Replacement, Matte LCD: step 36, image 1 of 1
    • Remove the six 2.9 mm Phillips screws securing the LCD panel to the display assembly.

  37. MacBook Pro 15" Unibody Mid 2010 Matte LCD Replacement: step 37, image 1 of 1
    • Pull the LCD toward the top edge of the display assembly to slide the inverter board along its lower edge out of the recess in the aluminum display assembly.

    • It may be helpful to use one hand to feed the display data cable through its channel in the aluminum display assembly as you pull the LCD toward the top edge of the display with the other hand.

  38. MacBook Pro 15" Unibody Mid 2010 Matte LCD Replacement: step 38, image 1 of 1
    • Peel the piece of tape covering the display data cable connector away from the edge closest to the LCD.

  39. MacBook Pro 15" Unibody Mid 2010 Matte LCD Replacement: step 39, image 1 of 2 MacBook Pro 15" Unibody Mid 2010 Matte LCD Replacement: step 39, image 2 of 2
    • Use the tip of a spudger to flip up the thin steel retaining clip securing the display data cable to its socket on the LCD.

    • Pull the display data cable straight away from its socket on the LCD.

    • Lift the LCD out of the display assembly and set it aside.

    • If you are replacing the LVDS/display data cable, simply de-route it from its slot cut into the display casing.

Conclusion

To reassemble your device, follow these instructions in reverse order.

12 other people completed this guide.

2 Comments

Does the gasket reapply easily? It seems like once you get it off it wouldn’t like to go back on.

Jacob - Reply

I had no problem with reapplying the gasket as it fits nicely into the notch.

A big THANKS to Walter! It is in deed not easy but thanks to this detailed instructions I got it working!! :)

Dirk Hoppe - Reply

Add Comment

View Statistics:

Past 24 Hours: 0

Past 7 Days: 4

Past 30 Days: 25

All Time: 14,989